Photo Jottings - Page 3 of 127 - Photography equipment expertise


Our latest camera for review is the 1989 Canon Sure Shot Zoom XL, a very expensive point and shoot zoom that Canon claimed had the optical quality comparable to Canon FD interchangeable lenses; well, we shall see about that; (if you’re impatient, scroll down to the test pictures for instant gratification, or displeasure).  Other high end, and almost ‘SLR’ like features include a powerful flash that zooms with the lens; almost two frames per second continuous shooting; and a very useful docked remote control, (a nice feature that unfortunately has not found its way to the cameras of today—some thirty years later).

I bought this camera as new old stock, it still had the sealed wrappers on it; and believe it or not, the batteries in the docked remote control are still good!  As a side note; this is the only camera so far I’ve reviewed that originally came with factory installed batteries, in both the camera (2CR5), and a couple of CR1220 for the remote, however, the main camera battery still had some power, but not enough to operate it properly.

I have to laugh; Canon tells us in the owner’s manual that when looking at the little green and red warning lights for the flash and AF lock next to the viewfinder, that you will observe blinking in the range of 4Hz, which means the subject is too close, and 16Hz when AF is ‘impossible.’  How many people know what ‘Hz‘ is?  I guess Canon thought that describing the blinking as 4, or 16 times per second would be confusing?

The ‘high end’ Canon Sure Shot Zoom XL with 39-85mm lens has a nice build quality, and is very refined in operation, especially when you consider the fact that it’s a Sure Shot, which are normally purchased by novices or second cameras for advanced amateurs.  Additionally, the camera is fully automatic, with only a couple of flash control options, and unfortunately has no exposure adjustments whatsoever, so let’s hope the auto exposure system does a good job; and if not, the camera becomes a nice looking paper weight for your desk.

Will the Sure Shot Zoom XL take pictures that are comparable to Canon’s ‘FD’ system, or is it just another 1980s point and shoot zoom camera that’s best left for the museum basement?  Let’s find out now!

Name; Canon Sure Shot Zoom XL in the US.  Autoboy Zoom Super in Japan, and Prima Zoom F in Europe.

Box contents; camera, including the main camera battery, and a remote control battery is included from the factory!  Owner’s manual, a black vinyl carrying case and neck strap.

Manufactured by; Canon Inc, Tokyo, Japan.

Made in: Japan.

Date of manufacture; late 1989 to ?

Price; expensive! Initial retail ¥54,800 or $385 in 1989; at end of run well below $200 in discount stores.  Current ebay prices are around $20-50 for a good used copy.

Build material; plastic.

Weight; camera with batteries, 21.0oz (595g).

Dimensions; Size is 6.0″ (152mm) wide, 3.65″ (93mm) high, and 2.6″ (66mm) deep; excluding protrusions.

Focal length; 39-85mm.

Aperture; F/3.6-7.3 maximum, F/22-F/45 minimum, not user selectable.

Focusing; Canon SST (solid state triangulation) passive type auto focus with 51 zones, 2.0′ (0.6m) to infinity.

Original print size; standard over-sized prints 4 x 6.″

Approximate resolution; will make excellent 8″x 10″ and larger prints.

Lens; Spectra Coated 39-85mm F/3.6-7.3 glass, with nine elements in eight groups design.

Shutter and speed; programmed electronic shutter, speed from 2 seconds to 1/250s but not user adjustable.  Self timer with Remote control.

Distortion; looks mild at all focal lengths from the pictures below.

Good features; fill flash, 10 second timer, docked remote control, and sharp lens.

Film; all 135 film cartridges, B&H, Amazon, eBay.

Flash.  built-in and zooming type, wide end: 38.7′ (GN 11.7m) at ISO 100, long end: 47.2′ (GN 14.4m). Recharge time 2.5 seconds with fresh batteries; lasts for about 35 rolls of 24 exposure film with 50% battery use.

Power; One 2CR5 6 volt 1.4ah lithium battery.  B&H, Amazon.  Remote control uses two inexpensive CR1220 3v coin cell batteries available at your local grocer or drug store.

Viewfinder; Canon claims it’s a 1″ (25mm); actual glass is 11mm wide, but they’re measuring the entire protrusion with focus and flash warnings.  Real image zoom viewfinder, 84% coverage,  0.41x magnification at 39mm, and 0.83 at 85mm.  Has frame guidelines, autofocus mark, close-up correction marks, green autofocus indicator and red flash indicator lights on the side of the viewfinder; solid green means focus is locked, and you’re good to shoot, blinking green means it isn’t focused properly.  Solid red means the flash is charged and ready.

DX coding; 50-3200 in one stop increments. Defaults to ISO 100 when no code is detected.

Accessories for this model; apparently none.

Crippling features and omissions; no manual exposure compensation setting.

Go here for an owner’s manual about halfway down the page.

Product shots with descriptions.  Click for larger images.

The Canon Sure Shot Zoom XL has a somewhat odd shape, with a large right grip, and protruding flash, it almost looks like it has a vertical grip attached along the bottom.

The camera is powered on and ready to shoot.  The end of the zoom lens has a rubber coating around it, and it won’t take any filters.

The rectangular openings along the top left are for AF, and on the right are the viewfinder, self timer and remote windows.  The flash zooms with the focal length, meaning it adjusts the dispersion angle accordingly; a unique feature on a point and shoot camera.  Notice the clear plastic cover for the flash/viewfinder area has a green coating, I guess to reduce reflections in the viewfinder, but I’m not sure it matters for the flash.

The oblong button at the top (on the right) is for setting the focus to infinity; press in and hold while taking the shot.  Doing this ensures the camera doesn’t miss focus on foreground clutter and window glass.

The two round buttons are for zooming in, (top), and out, (bottom).  The little round button by the Canon logo blinks red when the self timer is  set, and/or the remote is in use.

The handgrip comes off with the turn of a coin.  The Canon Sure Shot Zoom XL takes a rather expensive 2CR5 battery, here B&H, Amazon.

The back cover is quite plain, with only a film reminder window and tiny thumb rest.  The on-off switch is at the lower left, with ‘L’ lock for off, and ‘A’ auto for on.  The viewfinder is clear and bright, but a bit small.  The two small lights on the left side of the viewfinder window are; the top one is green for AF confirmation, and the bottom one is red for flash status and shake warning.

A look inside of the camera. The DX code reader is at the back of the cartridge compartment, but not visible in this shot.  At the back of the lens you’ll see a rectangular flat black stray light shield.  The film pressure plate is metal, and the film tensioner is spring steel.  I see moltoprene (spongy light sealing material) around the film reminder window, but nowhere else.

The lens extends about 30mm at full zoom.  Although there are marks at 50mm, 70mm and 85mm, you can set the zoom at any length in between.

The large white square is for illuminating the viewfinder guideline marks, and focus points.

The round gray button is for setting the self timer, and below it is the tiny film rewind button.

The oblong gray button to the right of the LCD controls the shooting mode, single or continuous, and Intelligent Framing mode.  The button below is for flash mode; on, off  or slow sync.  Both the shooting, and flash modes go back to default when the power is turned off.

The LCD shows the flash mode, battery check, film transport, back cover open, remote controller, frame counter, shooting mode, single or continuous, and intelligent framing zoom mode.

The shutter is operated by the large black button on the right; it has the standard half press pre-focus feature.

The remote control is stored underneath the camera; you slide the little switch under the remote, and slide the whole thing out to the right.   There is an off-center, and what appears to be a plastic(!) 1/4-20 tripod socket.

The remote has controls for the shutter and zooming.  The ‘2’ symbol is for a 2 second shutter delay, and ‘Ο’ symbol for instant shutter, or intelligent zoom when set.

When removed, the remote will operate for a period of eight minutes, after that it will turn off and you have to replace the controller and remove it again.

The maximum distance for using the remote is listed as 16.4′ (5m), but I was able to get over 20′ (6m).  The two coin cell CR1220 batteries can be replaced on the remote by removing the cover.

Above is the vinyl case which I forgot to show in the top picture.  It’s really just for protecting the camera as there isn’t any way to carry it around your neck or belt.  I guess the loop is for running the camera neck strap through and letting it hang so you don’t lose it while taking a snap.

This introduction article appeared in the October 1989 issue of Popular Photography.


Here are some test images scanned on a Pacific Image PrimeFilm XA SE, B&H, Amazon.  All are 4000 pixels wide.  Kodak Gold 200 used for all shots.  Click for larger images.

Totem pole cactus.  Taken at 39mm; it looks like it focused accurately.

Zoomed to 85mm.  Quite sharp in the whole central area, with some softening along the sides.

Z forest is an interesting place.  I think 39mm; seems underexposed slightly.

Más a Más at the Plaza Antigua, around 50mm, or 85mm, not sure.

Pro Golfer Matt Kuchar at 39mm.

Pro Golfer Matt Kuchar at 85mm.  I see decent background blur, but maybe the focus hit the shoulder instead of the face.

A sneaky streaker caught behind the tree at 39mm.  Very sharp in the central area, with minor softening along the sides.

Conclusion.

The Canon Sure Shot Zoom XL was fun to use, and it worked flawlessly.  My copy was probably made close to the end of the run for the model, maybe in the early 1990s, and I was the first one to actually use it. I wish I had it back then for recording my travels and friends, but I was broke, and only had enough money for this one.  Actually, if I had $300 to buy this Sure Shot Zoom, I’d more likely have purchased a Canon ‘A’ body with kit prime and used it with my Canon FD 28/2.8 lens I bought in 1985 for shooting interiors; and boy that lens seemed really wide at the time, but now it seems almost too long, at least for inside shots.  The Sure Shot Zoom XL has a range of 39-85mm; so it barely hits what I consider wide angle coverage, and seems too restrictive today, but back then it was very common.

There are some good things to say about this fully automatic camera; the lens is super sharp in the whole central area at all focal lengths, and very noticeable at the wide end; it definitely has prime lens sharpness, color and contrast.  There is some minor softness as you near the sides of the images at all focal lengths, but that’s really very good performance, and as good as some of the ‘FD’ zooms from the 1980s; I know because I used them on my Canon AE-1 Program, and later A-1.  Focusing seems very quick and accurate; I had no out of focus shots, even in dull, after sundown lighting.  Also, the camera handles well, and does have some heft to it, but it’s still much lighter, and has a smaller footprint than a SLR with zoom lens.  The exposures overall were pretty accurate, but I think I’d like at least another stop of light for my taste when using print film.  Canon claims the Sure Shot Zoom XL will “detect backlight situations, and adjust the exposure by 2 steps,” but my results suggested the feature didn’t work very well.  I think the camera chooses to protect the highlights by default, maybe as a precaution for slide film that Canon thought would be used more often than print film; however, I haven’t tried any slide film yet to confirm my theory.  A workaround for this is: tape over the DX code on the film canister of either ISO 200 or 400 speed print film, and the camera will default to ISO 100, so in this way you get exposure compensation; I may do that on my next roll.

For the record, I did play around with the (intelligent framing) I.F. zoom mode but found it to be useless for my type of shooting.  The idea is that you can frame your subject at a certain focal length or magnification, the camera will memorized it, and will automatically frame the subject at the same apparent size using a different zoom length as you change your shooting distance and angle from the subject.  This type of gimmick was popular back then, but it’s a little confusing to set up, and not really worth it in my opinion, so I guess that’s why manufacturers drop it a few years later.

If you’re going to trust a camera to make all the decisions for you, and you want sharp shots for enlarging later on, the Canon Sure Shot Zoom XL should work nicely if you don’t mind the zoom range.  But just between you and me, I’d rather carry this one around for fun.

That’s it for this review, thanks for visiting!

Please consider buying your goodies through my links, doing so helps support the site, thanks!


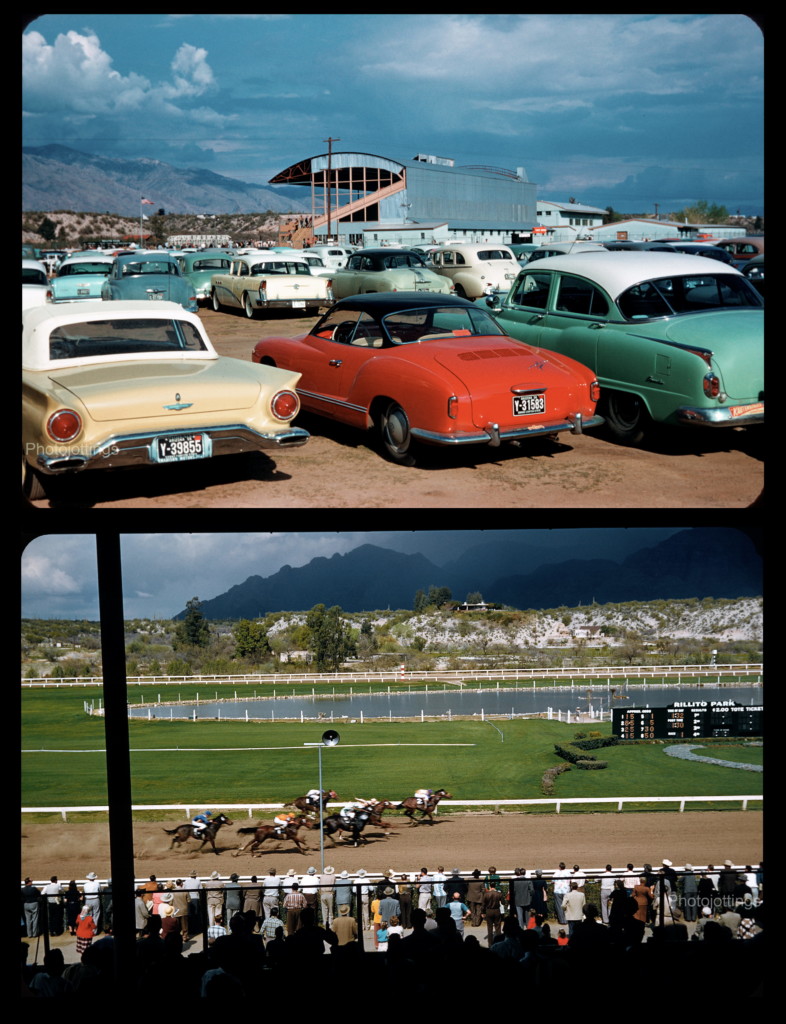
This installment of the Kodak Moment takes us back to February, 1958; the location, Rillito Race Track, Tucson, AZ.

My Dad took these Kodachrome snaps while visiting the race track with this camera.  Back in 1958 it was known as the ‘Rillito Race Track,’ but now it’s called ‘Rillito Park,’ where you can watch seasonal horse racing, play soccer, or attend art shows and farmers markets. If you go here, you’ll see an aerial view of the place as it is now; and it looks like the original grandstands are still there, but the lake is gone.

According to the Rillito Park Foundation, the Rillito Track is recognized as the birthplace of modern quarter horse racing in America with many innovations created, such as the chute track layout, photo finish, and various conditions for pari-mutuel wagering.  Internationally renowned Thoroughbred greats started out at Rillito, with multiple KY-Derby winner and Hall-of-Fame trainer Bob Baffert and the jockey brothers Angel and Milo Valenzuela the most famous among them.

This was taken from the parking lot looking NE. Can you name the cars? I’ll try: on the left is a “57 T-Bird Convertible in Inca Gold.  In the middle is a 1957? Karmann Ghia hardtop in Cardinal Red?  And an ‘old’ Buick Special four door sedan in Glenn Green.

This is the same picture that I used in the Aires review.  The black strips are from the beams in the building.  Pusch Peak is in the background, and I live right behind the mountain where I take the test shots that look the other way.

Looking NW.  Here they come, Tim Tam pulls ahead.

It’s Tim Tam by half a length.

The starting gate looking NW.

The west grandstands.  It appears the betting windows are starting to close and the next race is coming up quick.

Bench standing is ok if you’re slim, but don’t try it if you’re overweight.

A slightly different view from the second picture in the series.

That’s it for this trip down memory lane, hope you enjoyed Dad’s Kodachrome snapshots from a Tucson AZ horse race in February 1958.


The 1980s brought us some goofy cameras, and the Ricoh Mirai (the future) 105 Zoom is one of them; it’s boxy and almost camcorder like in it’s appearance since the flash and AF sensors are on the side of the lens, instead of along the top as it would be on a traditionally designed 35mm type camera, so it’s actually a regular camera, but it looks odd as it has a big upturned grip for your right hand.  The Ricoh Mirai 105 is not the only unusual looking camera from the crazy 80s, (remember the Samurai?), did you know Olympus teamed up with Ricoh (or vise versa) to sell their own version of this camera, and during the partnership they exchanged lenses and other parts to produce different models, presumably as a cost saving measure.

The Ricoh Mirai 105 Zoom was rather expensive for a late 1980s ‘bridge’ type camera, but it offered some nice features that allowed you to control how your pictures would turn out, almost like an SLR.  The Camera sports an ‘ME’ mode, which lets you take multiple exposures; pretty cool, and see my bad example below; it also has an infinity focus button so you can be sure you capture the mountain scene, instead of mis-focusing from a low contrast area in the center of the picture where the AF zone is.  Macro mode automatically extends the lens to full telephoto, and moves the AF point to adjust for parallax, which is a nice touch.  The end of the lens is threaded for relatively inexpensive 40.5mm filters, but oddly not mentioned in the owner’s manual??  Of course you also get exposure compensation, ranging from -1.5, to +1.5 in half stop increments; so all said, a pretty good feature set!

The only real downer for the camera is that it isn’t an SLR, so you can’t see what’s happening in the viewfinder, such as focusing, depth of field, filter effects and whatnot, but if you’d like that, see this review, or check out the top line Mirai.

So is the Ricoh Mirai 105 Zoom ‘the future’ of cameras, or is it just another dud from the crazy 80s?  find out below!


Name; Ricoh Mirai 105 Zoom; also known as: nearly identical to the Olympus Infinity Superzoom 300, and very similar to the Olympus AZ-330 superzoom.

Box contents; camera, owner’s manual, a wrist/hand strap and maybe a vinyl carrying case.

Manufactured by; Ricoh Company LTD, Tokyo, Japan.

Made in: Japan.

Date of manufacture; 1988-?

Price; original MSRP from a Pop Photo magazine in June of 1989; a whopping $592; but, street prices in the USA probably around $399 or less.  A big New York City discount store has a magazine price of $319.50 during Christmas of 1989.  Current ebay prices are around $15-$45 for a good used copy.  I paid $9 for mine at a thrift shop, complete with good batteries!

Build material; all plastic body.

Weight; camera with batteries, 22.5oz (638g).

Dimensions; Size is 5.2″ (132mm) wide, 3.15″ (80mm) high, and 3.9″ (99mm) deep.

Focal length; 38-105mm.

Aperture; wide end; F/4.5-16, long end; F/6-18.4 but not user adjustable.

Focusing; passive type auto focus with illuminator, 4.3′ (1.3m) to infinity.  Half press to lock AF.

Original print size; standard over-sized prints 4 x 6.″

Approximate resolution; will make excellent 8″x 10″ and larger prints.

Lens; Ricoh zoom lens 38-105mm, 12 elements in 11 groups design. Has 40.5 filter threads, check prices here B&H, Amazon, eBay.

Shutter and speed; 2s to 1/500s, not user adjustable.  Cable release option, but you must use proprietary Ricoh electronic type.

Distortion; slightly wavy barrel type at 38mm, and pincushion at 105mm.  See examples below.

Color fringing; none noticeable.

Double exposure prevention; yes, but it can be over-ridden in ‘ME’ mode.

Features; 12 second timer, flash on-off and fill settings, exposure compensation, infinity focus setting, stupid ‘auto zoom’ feature, macro mode, continuous shooting, and more.

Film; all 135 film cartridges, B&H, Amazon, eBay.

Flash.  built-in, range of 1.3m-4m at ISO 100, 3.5 second recharge time with fresh lithium battery.

Power; 2 each, 3 volt CR123a batteries, sometimes available at your local grocer or drug store, but very expensive, get them cheaper here. B&H, Amazon, eBay.

Viewfinder; Kepler type 0.46x-1.2x bright frame, with a field of view of 85%.  Shows autofocus frame, AF indicator, flash indicator, and macro mode flower indicator.

DX coding; automatically adjusted to: ISO 25, 50, 100, 200, 400, 800, 1600 and 3200.  Defaults to ISO 100 when no DX code is detected.

Accessories for this model;  apparently only one item, and that’s a Ricoh electronic shutter release cord.

Crippling features and omissions; 2 seconds minimum shutter speed not sufficient for good night shots.  Camera is about the same size as an SLR with kit zoom lens.

Good features; exposure compensation, fast and accurate focusing in bright light, self timer, multi-exposure mode, infinity focusing mode, good zoom range for the 80s.

Other models; the ‘Mirai 105’ is the little brother of the ‘Mirai‘ which was a high spec bridge camera that had a 35-135 lens, with available wide and teleconverter lenses.  The ‘Mirai’ was the same as the Olympus AZ-4.

Go here for an owner’s manual, and be sure and tip the site owner.

Product shots with descriptions.  Click for larger images.

The front of the Mirai 105 with the lens cover off and ready to shoot.  The viewfinder window is the rectangular glass piece near the top.  Beside the viewfinder window is the circular AF illuminator, and the two rectangular openings with curved sides are distance measuring windows.  The flash strobe is in the vertical orientation on the Mirai 105.  The lens stays tucked in even when you turn the power on, and only starts to extend when you push the telephoto portion of the zoom button.  See the lens cap design in the very first picture at the top of the review.

In this view you can see the large handgrip on the right side of the camera, and the strap lug by the flash.  The lens accepts screw-in 40.5 filters, check prices here B&H, Amazon, eBay.

This strap came with the camera; I don’t know if it’s the same one that’s used on the more expensive ‘Mirai’ 35-135mm model, I’m guessing it is.

The lens is extended all the way out to 105mm, except in macro mode, see below.  The on/off switch is a slider by the LCD panel, and the shutter button is the oval to the right.  On top of the left handgrip is the zooming switch, you press and hold to select the required amount of zoom.  The decorative little round button by the  zoom switch has an ‘R’ in the middle, but it is not meant to be functional.

The 24mm x 13mm LCD panel is able to show quite a bit of information, but normally it simply displays a progressive type shot counter, and if film is loaded and winding correctly.  Other items that will show up are; battery condition for a couple of seconds after power on, macro mode, exposure compensation value, self timer, multi exposure, flash mode, continuous or single shot, etc.

When you select macro mode when the lens is already at 105mm, it will extend another couple of millimeters to a ‘Macro‘ line with a flower symbol.  The lens automatically extends to the macro mode position regardless of what focal length the lens is set at.  Another nice feature is that in this mode it compensates for parallax in the viewfinder by moving the autofocus frame marks to the correct position.

Not much to see on the bottom except the plastic ¼-20 tripod socket, and the manual rewind button on the right.

The back of the camera has a lot of buttons and a couple of other gizmos. For starters; the clear oval on the back door is a film reminder slot, and just above that is a thumb rest.  The viewfinder is off to the right, and is sufficiently bright, but has no guidelines; it shows 85% of the actual view, see window pictures below.  The viewfinder has a decent relief so eyeglass wearers will be happy, especially since it has no adjustable diopter correction.  Remember, this isn’t a SLR, so you don’t see the actual view, and everything will appear sharp, even if the camera is mis-focusing.

The row of buttons along the top are; the left is a ‘reset’ button, and resets the camera to the default shooting mode if you get flustered.

The second button marked ‘A’ is for ‘action’ and this will get you continuous shooting—1.3fps, self timer, and the ‘M.E.’ or multiple exposure mode.

The +/- button is for exposure compensation, it goes from -1.5 to +1.5 in half stop increments.

The ‘O’ (Object) button has macro mode, a stupid auto zoom feature that attempts to re-frame the subject for you, and infinity focus (mountain symbol).

The far right button is used for setting the flash, as you press you’ll get: flash off, fill flash and no symbol which is auto flash mode.

The right side of the camera shows the back strap lug, the battery compartment and the little round electronic cable release socket.

With the battery cover off, we can see the two CR123a batteries installed both with the positive (+) side up.

Nothing really special inside the camera.  Normal items are a spring steel film tensioner, and pressure plate.  Moltoprene is used around the film reminder slot, and a small strip at the end of the door.  The back cover can be taken off by sliding down the little screw on the top part of the hinge.  Not useful, but there are three contacts above the film compartment, but nothing on the door to make contact with; hmm…


Here are some boring test images scanned on a Nikon Super Coolscan 9000 ED.  All are 4000 pixels wide; there is no additional resolution from scanning at a higher sample rate.  Kodak Gold 200 used for all shots.  Click for larger images.

Palo Verde, Cholla and Mountains. A pretty sharp image at 38mm.

Close focus macro mode shot.  I was trying for the top flower, but it looks like it hit just below that.  The background blur is  pretty smooth.

Pincushion distortion at 105mm along the window line is not very noticeable unless straight lines are near the edges like this.  This is the actual coverage you get when you compose exactly for the window frame as I did here; it looks like the viewfinder is off a bit at the telephoto end, or am I off?

At 38mm, the distortion is slightly wavy barrel type, but not really noticeable in most shots.  As I said above, this is the coverage you get when you fill the window frame in the viewfinder.

A 105mm shot, focused on the middle part of the image, or yellow flowers, but it hit the back red flowers instead.

Here’s my awful attempt at a multiple exposure shot.  I first set the camera to ‘ME’ and took the shot of the cactus on one side of the frame, (the other part of the frame was a blank wall above the cactus), the shutter will click, but the film won’t advance to the next frame, and then you take your second shot on the other part of the frame, which were the red flowers, (with an open area on the other part of the frame), and this is the result.  Remember, you’re overlapping two shots over the entire frame, so be careful about what parts you overlap.  Hopefully you’re more creative than I am.

High noon Mountain scene at 38mm; and quite sharp, even along the sides.

Close focus this time at 105mm, not in macro mode though.  I was almost too close to the aloe onions.

At 105mm, and I think it focused too closely, I should’ve used the infinity focus mode, or maybe not, I’m not sure…


Conclusion.

The Ricoh Mirai 105 Zoom is definitely a crazy 80s camera, but it really works quite well, and has a better than average feature set.  I found the infinity focus mode was handy to ensure sharp shots of distant scenes, but I forgot about it more often than not.  Multiple exposure mode is fun to try out; that is if you’re in a creative mood, I guess I wasn’t for my one and only try.  Exposure compensation is always good to have available, and I usually set it for one stop over, or +1.0ev to make sure the shadows are decent, especially on color print film as I’ve used for the review.  Of course a built-in flash is handy for those outdoor people shots with the sun over their shoulders.

There are a couple of negatives for the camera of the future, the ‘Mirai.’  I thought it tended to focus slightly behind the subject at close distances, and sometimes it wouldn’t focus at all, but that’s probably normal for the 1980s, and crap, I even had a DSLR hang up on focusing quite often that was from the 2000s.  Also, the camera is slow to use; meaning it zooms slowly, focuses slowly, and it takes a little doing to make mode changes, so this isn’t a camera for fast action.

All said and done, the Ricoh Mirai 105 Zoom is pretty cool, and very useful if you aren’t in a big hurry to take your pictures.  The lens is surprisingly sharp at the wide end, and good at the long end.  The zoom range was useful back in the 80s, but now days 38mm seems too restrictive as people are used to their super wide angle cell phone images, including me.  Oh well, this camera is all about nostalgia, and it’s nice to take a trip down memory lane!

That’s it for this review, thanks for visiting!

Please consider buying your goodies through my links, doing so helps support the site, thanks!


This week we check out a unique device for taking stealthy images; the Expo Watch Camera.  An October 1917 ad in a Popular Mechanics Magazine suggests you’ll get lots of fun taking pictures of your friends in an act of a ‘funny stunt.’  You’ll also have even more fun when you see the look of bewilderment on their faces when you show them the pictures you took.  I bet the ‘funny stunts’ back then were a little different than the ‘funny stunts’ that get pulled today.

The details concerning the manufacturing and marketing of the Expo Watch Camera are a bit cloudy when sourced online, but the Expo was probably first produced in 1905.  I did find a book from September 1905 called ‘Camera and Darkroom’ that made mention of the Expo, and said (not surprisingly as it probably took advertising from the company) that it produced ‘wonderfully good results’ from such a tiny instrument.  The last year of production appears to be 1939, although there isn’t much in the way of documentation for this.

Go here for what seems like a good source of information on the Expo Watch Camera, including pictures and info on the somewhat minor variations of the camera over the years it was sold.  Apparently, Expo Watch Cameras were also offered at one time in red, blue and black, and are extremely rare today.  There is another camera very similar to the Expo called the ‘Ticka,’ which was a licensed copy of the Expo that was produced by Houghtons Ltd, and sold throughout England.

Anyhow, it’s an interesting camera to play around with, and it would produce some decent images with fresh film on the original empty cassette, but good luck trying to respool it.  I tried cutting lengthwise 8×10 sheet film that I taped together, along with similar width 120 backing paper, then wrapping it around the wooden spools for a full roll of about 20 shots; unfortunately the sheet film it too thick, it wouldn’t stay rolled up; and it wound up being a total failure, oh well.  However, I did manage to take some decent images by cutting individual negatives from 8×10 sheet film, and taping them over the film gate.  The procedure involved opening the camera in the darkroom, taping the film to the gate, installing the cap and cover, then going outside and taking a picture.  After several attempts, I developed the film, and wound up with about three usable shots as seen below.  It was hard to compose as I don’t have a viewfinder with my camera, so I had to guess on the framing.

Well, that’s probably enough of the boring details, let’s do a quick walk-around of the Expo Watch Camera.

Name; Expo ‘The Watch’ Camera.

Manufactured by; Expo Camera Co.  256, and later 241-3 W 23rd St, New York, USA.

Original Price: camera only about $3 in 1916.  Current ebay prices are roughly $200-$500 for a good working model, and substantially more for one with all the accessories in the box.

Build material; nickel plated brass cover and inner ring; main camera body is nickel plated steel, and the film gate is painted steel.

Box contents; just the camera inside a cloth pouch, some included the external viewfinder, and instruction manual, and even a presentation case lined in fabric.

Date of manufacture; probable manufacturing dates ranging from around 1905 to 1939, but who knows really; patent date is sept 1904.  My Watch Camera is a ‘new’ model from the mid teens.

Weight; camera only, 2.2oz (68g), with film cartridge, 2.7oz, (77g).

Dimensions; 2.25″ (57mm) wide on the short end, 2.85″ (72mm) including ‘stem’ or lens protrusion, 0.88″ (22mm) deep, excluding winder protrusion.

Focal length; approximately 1.05″ or 27mm.  Equivalent to 43mm in ‘full frame’ 135 format.

Aperture; hole is about 2.1mm, so with a focal length of 27mm, it’d be close to F/13.

Focusing distance; I’m guessing about 10′ (3.0m).

Prints; one accessory was a 2″x 3″ enlarger, and the pictures probably looked pretty good at that size.  Good film and proper technique today will make decent 3½ x 5″ prints.

Approximate resolution; , similar to a 0.3mp cheap digital camera from the late 1990s.

Lens; uncoated glass meniscus type.  About the same aspect ratio and size of an ‘APS-C’ digital sensor.

Shutter and speed; metal horizontal traversing slit type shutter, and one ‘instant’ speed of about -1/90s, along with ‘T’ time mode.

Features; Point and shoot only, no frills for this model.

Film; Special cartridge for 20 pictures, size of negatives: 5/8″ x 7/8″(16x22mm).  Some models had counters for 25 exposures, mine only goes to 20.  I believe the film was about 18mm wide, and probably 480mm (19″) long with backing paper for the 20 exposure roll.  Anyone care to respool 110 film? it’s about the same size.

Accessories for this model; brilliant ‘finder,’ 2×3 enlarger, leather carrying case, and special developing tank.

Crippling features and omissions; none, it’s for snaps only.

Product shots with descriptions.

The front of the worn, and beat up Expo.  The cover is made of brass, and is full of wear marks and mild dents, but it’s still light tight.  The Expo Watch Camera actually does resemble a watch.

The back appears to be made of some sort of steel as there are a few small rust spots here and there.  In this view you can see the molded lip of the front cover sticking out, (at 7 o’clock) which helps with removal.  The lens cap has a chain attached to the ‘stem’ ring of the camera.  Don’t lose the lens cap, as the shutter opens momentarily upon cocking the camera, and will expose the film.  The lens cap is to be taken off as a last step just before you take a picture.

The cocking lever is shown here in the already fired position, (to the right).  The ‘T’ stamp in the middle is for ‘time.’  You pull the lever back to this spot until it stays put, then take the lens cap off for a long exposure.  After you’re done, push the cocking lever back to the position as seen above.  For ‘I’ or ‘instant’ pictures, you pull the lever all the way back until it stays, and press the tab shaped shutter button that’s located near the stem, and to the very right in the picture above.  The lever will trip and go all the way back to the rest, or ‘fired’ position.  Incidentally, I had trouble with getting my finger out of the way of the cocking lever as I held it, and a few shots were ruined because the lever didn’t fully release and seat, which over-exposed the shot, plus the camera jiggled a little bit while I moved my fingers out of the way.

Inside the square is an exposure counter, here it’s at number 12.  On my model it goes up to 20, although I think some earlier models go to 25.  There were half rolls available at 10, and 12 shots.

With each half turn of the winder, a new frame is advanced, with the corresponding exposure number displayed in the square.

With the lens cap off you can see the front of the meniscus lens behind the drilled, non adjusting aperture.  I estimate it’s about F/13, with a 27mm focal length.

With the back cover off, the internals are revealed.  The large gear underneath the coated paper covering is for showing the exposure number as it revolves.  The brass fork is connected to the winder on the backside, and advances the film along with the large exposure number gear using the teeth at the base of the brass fork (at the 7 and 1 O’clock position–not visible here).  When the film is advanced properly, you hear a ‘tick’ sound that reminds you to stop winding.

The film cartridge is made up of two wooden film spools, a metal holder, and construction type paper as a shield for the film.  The film had backing paper, so this was probably just for people that might load the camera in very bright light.   There are slits in the wooden spools for grabbing the film leader,  similar to 120 spools.

The film cartridge as you would have purchased it—except obviously it would have film in it.  The flat rectangular spot along the top edge acts as a mild ‘pressure plate’ to keep the film flat.

The film cartridge is held securely in the back with a steel strap that locks into the cartridge covers.

A look inside the film chamber.  The film ‘gate’ is 16mm x 22mm, or about the same size as an APS-C digital sensor.  You may be able to respool the cartridge with 110 film, but I didn’t try that.

Bad cell phone shot showing what’s under the removable film ‘gate.’  The shutter spring, rod and slot are visible here, with the horizontally traversing shutter just behind the inner ring and lens hole.

Looking at the back of the uncoated 27mm±  glass meniscus lens.  The shutter is behind the brassing inner ring of the camera body.

Here the film cartridge has been installed, and we’re almost ready to start taking pictures.  Notice the approximately 2mm gap between the film cartridge and film gate; I factored that gap in when figuring the focal length, but is this the way it came from the factory, or is it caused by fluctuations in tolerances when making the cartridges?

The unusually small Olympus XA looks big compared to the Expo Watch Camera.

An ad from a 1917 Popular Mechanics Magazine showing an earlier version of the camera.

This photo sample was taken from a ‘Camera and Darkroom’ magazine, volume 8, January 1909.

Sample shots below.

Here are some samples taken with fresh film, Ilford Ortho Plus 80.  I cut this film from larger stock, and taped it along the film gate inside the camera. The pictures are around 1700 pixels long, so click for a larger version.  Scanned on a Nikon Super Coolscan 9000 ED.

This was my first attempt at trying to fit and tape the negative along the film gate, and as you can see, the emulsion has been badly scratched; I had some problems with shifting it around and trying to get it flush.

A better job here at film installation.  Desert brush at about 10′ (3m).

Our standard Mountain test scene using the instant shutter.  Wow, I actually kept the camera level for the shot, even without a viewfinder!  The right side of the image is quite soft, caused by my inability to get the film completely flat along the gate, and not by the lens design.  As a side note; normally when you use ortho film, the sky is white with no cloud definition, but the day I took these shots the clouds were mostly dark looking, and they showed up well here.


Conclusion.

The Expo Watch Camera must’ve been pretty cool back in the day.  In fact, It’d be pretty cool even today if one could secure a few cases of fresh cartridge film.  I’m guessing ISO 800 speed B&W or color film would produce at least as much resolution as an instax mini print, so maybe there’s hope for that, but reality says…..No!  These little cameras are way too expensive and collectable for anyone to consider mass producing the film.  For what it’s worth, I think a person might be able to use 110 film for respooling; it has backing paper, and is about the same width; 16mm, so you should be able to get the same size negative, but without any margins on the upper and lower portions of the frame.

The Watch Camera was an enjoyable diversion from my more serious photographic undertakings.  I had fun taking a few pictures with it; not that I was hoping for new pocket camera to replace my Kodak, but mainly to see what kind of prints a person in the early 1900s would get using this type of toy camera.  I think the quality of the negatives would make some decent small prints, good enough for those queer and awkward moments as the ad suggests.

Anyhow, this neat little camera stays in my collection, and maybe I’ll try again at taking some shots and see if I can come up with something better than what I’ve shown so far.

Thanks for visiting!

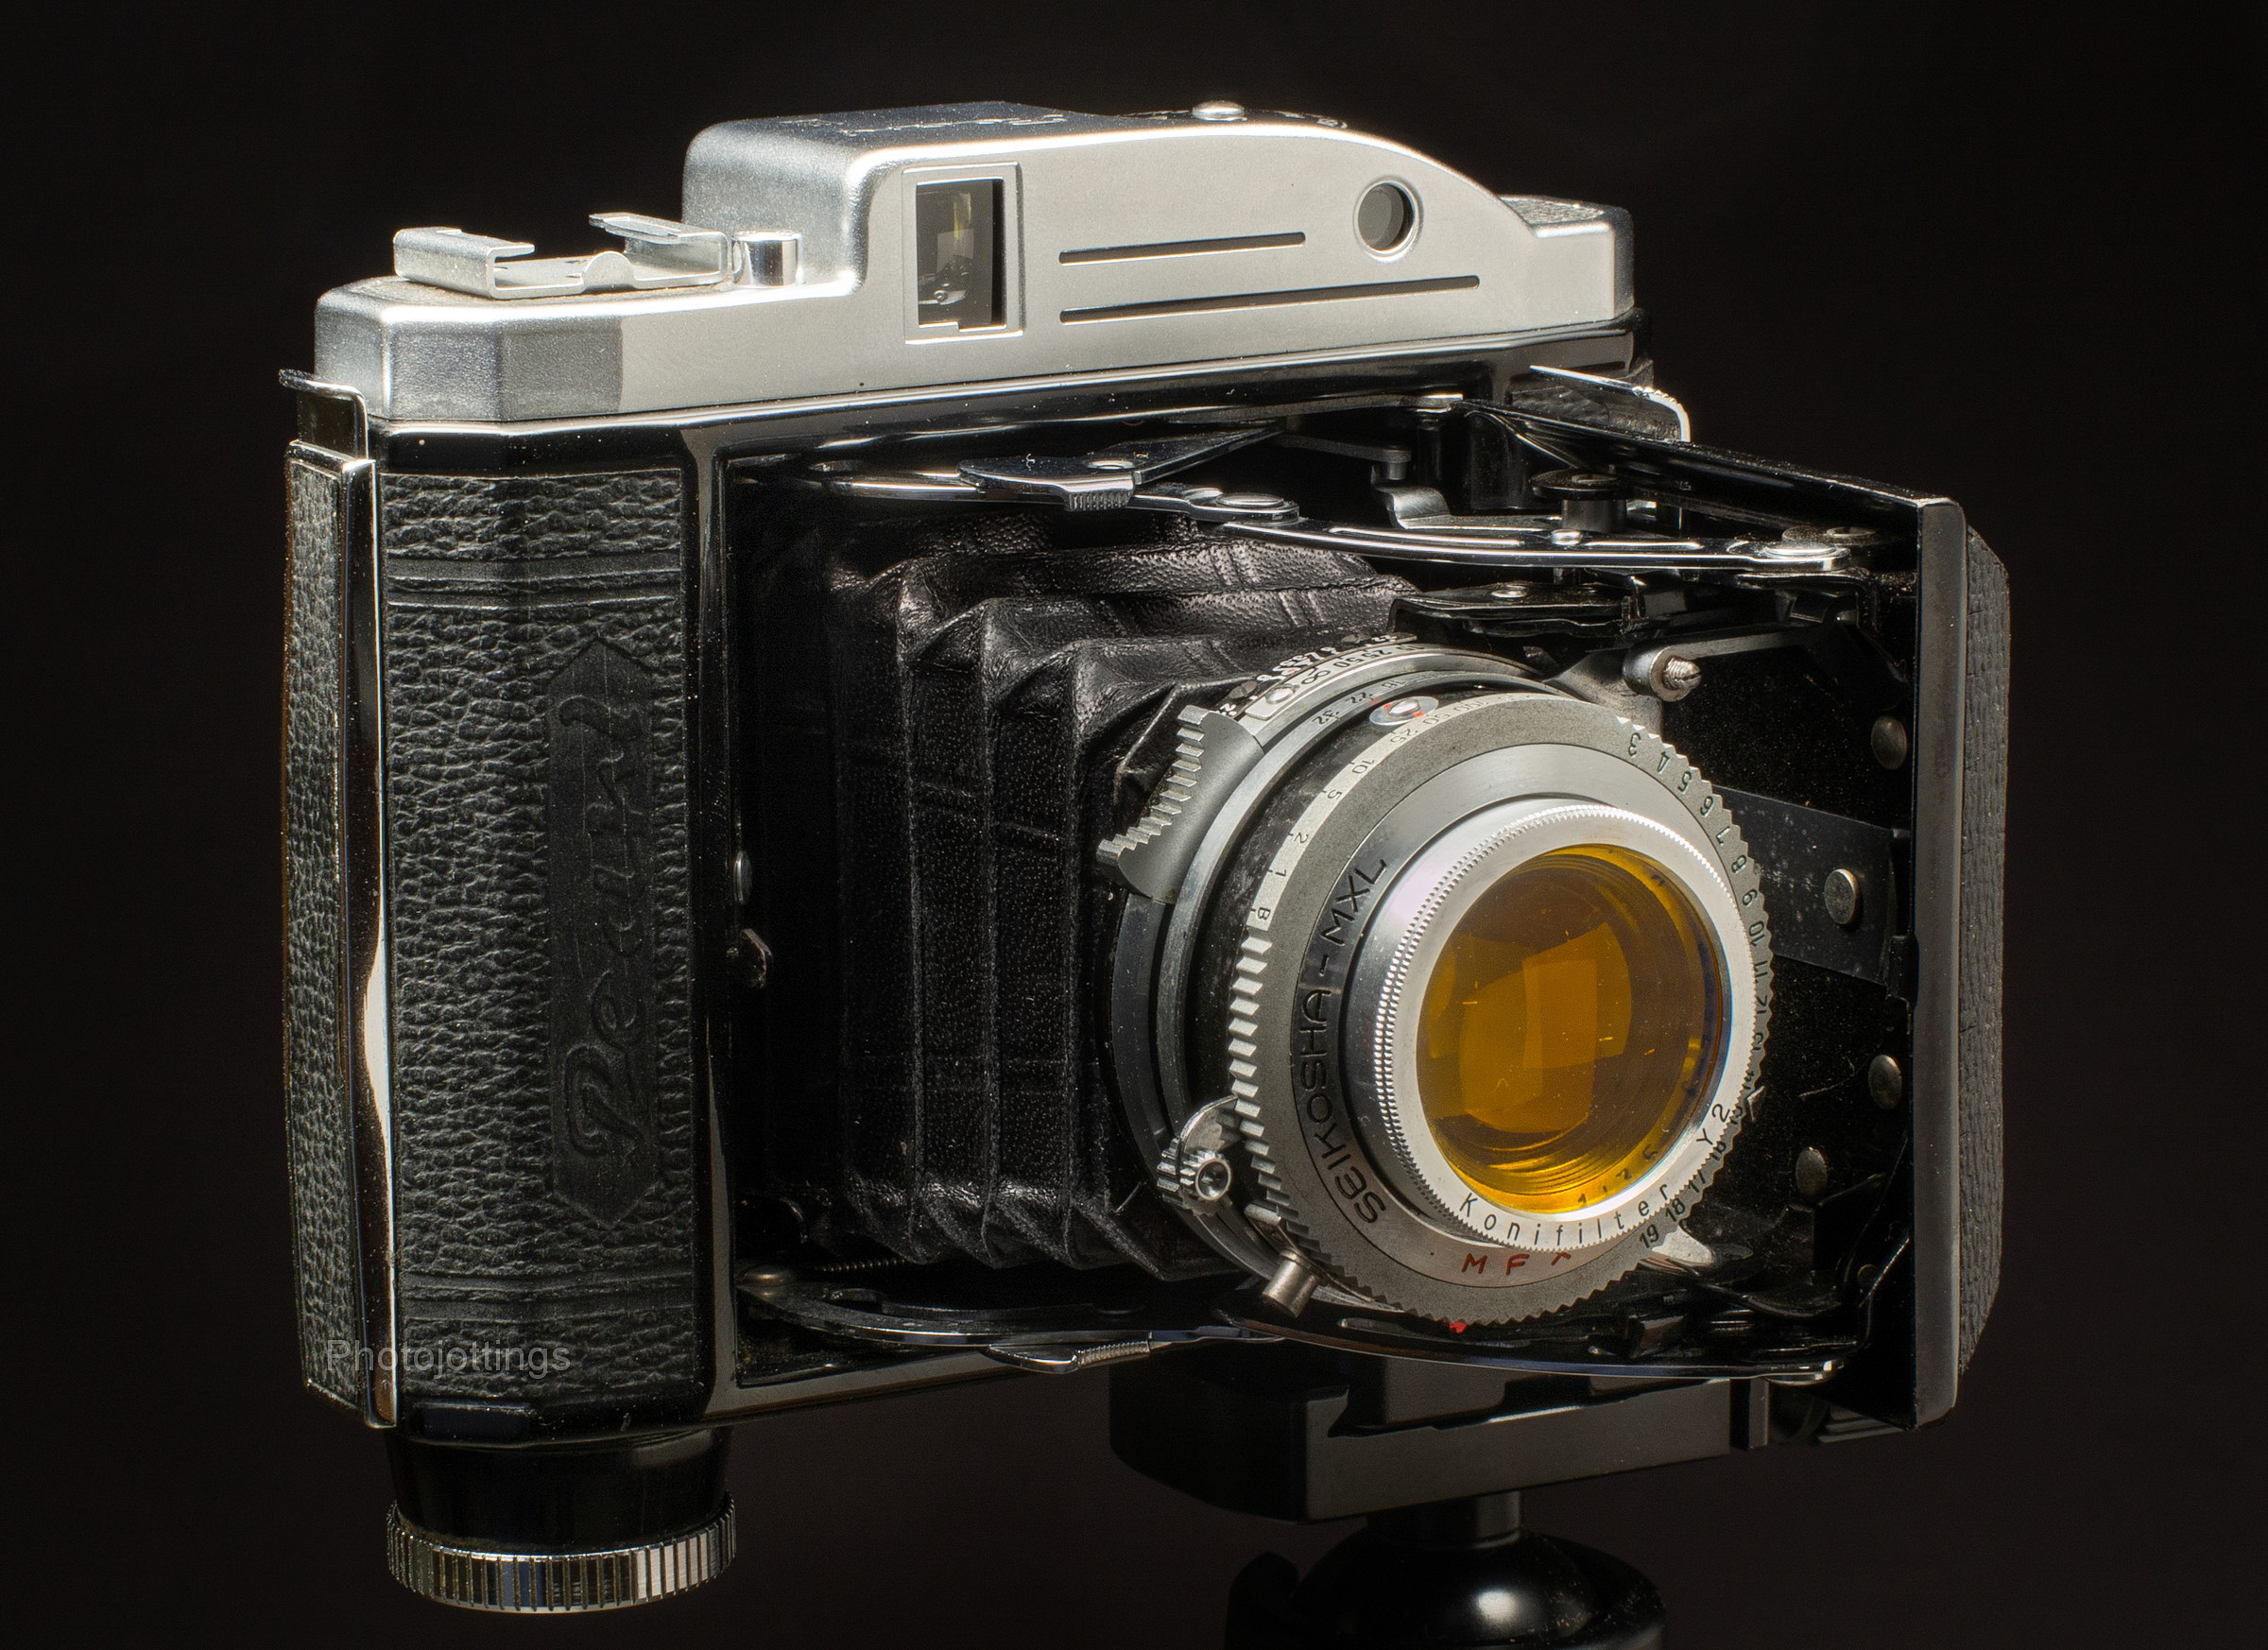
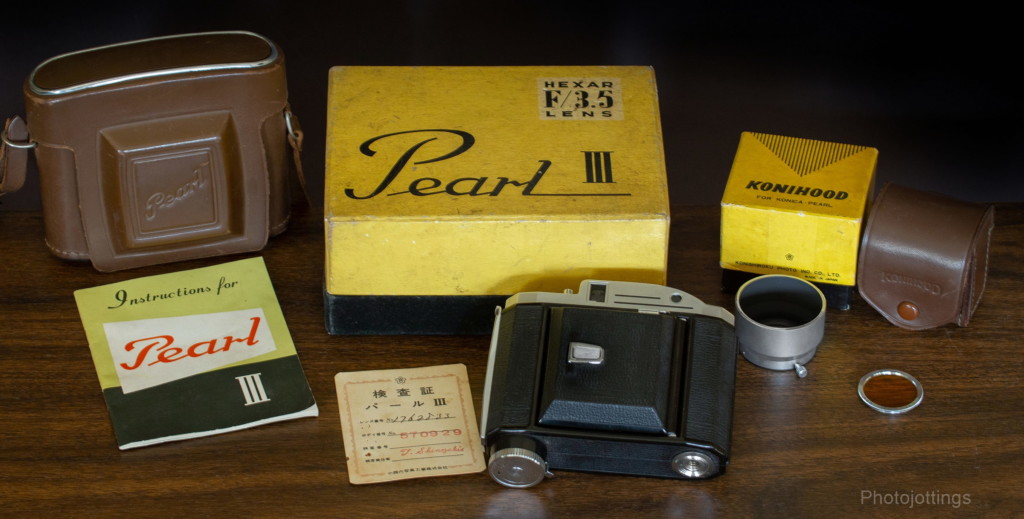
This diminutive, but stylish Japanese coupled rangefinder camera is a Konica Pearl III, and it’s from the late 1950s, a time when medium format folding cameras were on their way out, (as were folding cameras in general), and small format 35mm cameras were all the rage.

Our late model Pearl III has a nice feature set including a four element 75mm F/3.5 ‘Tessar’ type lens, a nine speed shutter with the dreaded light value scale embedded on the shutter speed ring, and an ‘automatic film advance’ mechanism which BTW, doesn’t wind your film automatically, you wind it yourself just like a regular folder, but it’s supposed to be safer, and more precise than watching for the shot number in the red window of your average folder.  Other nice features include a coupled rangefinder, cable release, accessory shoe, and the ability to use 30.5mm screw-in filters.  Oddly, this high spec camera has no double exposure prevention, so be careful!

The Konica Pearl III is a small camera that will actually fit nicely in your back pocket, however, a safer place might be a waist pack or sling!  I recently put a couple rolls of color film though it, and have a few pictures to share as it were, ahem…, but first, let’s check out the specifications.

Name; Konica Pearl III.

Manufactured by; Konishiroku Photo Ind. Co., Ltd.

Made in; Japan.

Date of manufacture; ca1957/8.

Price; one source claims around ¥22,000 which would convert to about $61 in 1958, that seems low though, but who knows.  Get a good working copy on ebay for around $200-$400.

Build material; metal body, thin, almost paper like covering with fine pebbled finish, and leather bellows.  Fit and finish are very good.

Box contents; camera, instruction manual, and a leather case.

Weight; 22.1 oz (627g) no film.

Dimensions; my measurements; 4.65″ (119mm) long,  4.25″ (109mm) tall,  1.75″ (44mm) deep closed, and 3.7″ (95mm) open.

Focal length; 75mm, 3.0″.

Aperture;  F/3.5-F/32, in half stop clicks.  Five straight aperture blades.

Focusing; 1.3m (4.0′) to infinity.

Viewfinder; coated, with vertical orientation.  Small but decent viewing with your eye up against the frame.  No guide lines or parallax correction.  A small cut-out in the outer viewfinder rim let’s you see the aperture, distance and shutter speed as you’re looking through the viewfinder, but good luck with that unless you have great close-up vision.

Light meter; none, but has light value scale around shutter speed ring.

Approximate resolution; good film and technique will make sharp 11×14″ or larger prints.  See sample images farther down the page.

Distortion; none of my images show any discernible distortion.

Light fall-off; I notice moderate “corner shading” when shooting in the area of F/3.5-5.6; at smaller apertures it doesn’t show much.

Color fringing; none that I notice.

Background blur or “bokeh;” looks good when close to the subject at wide apertures.

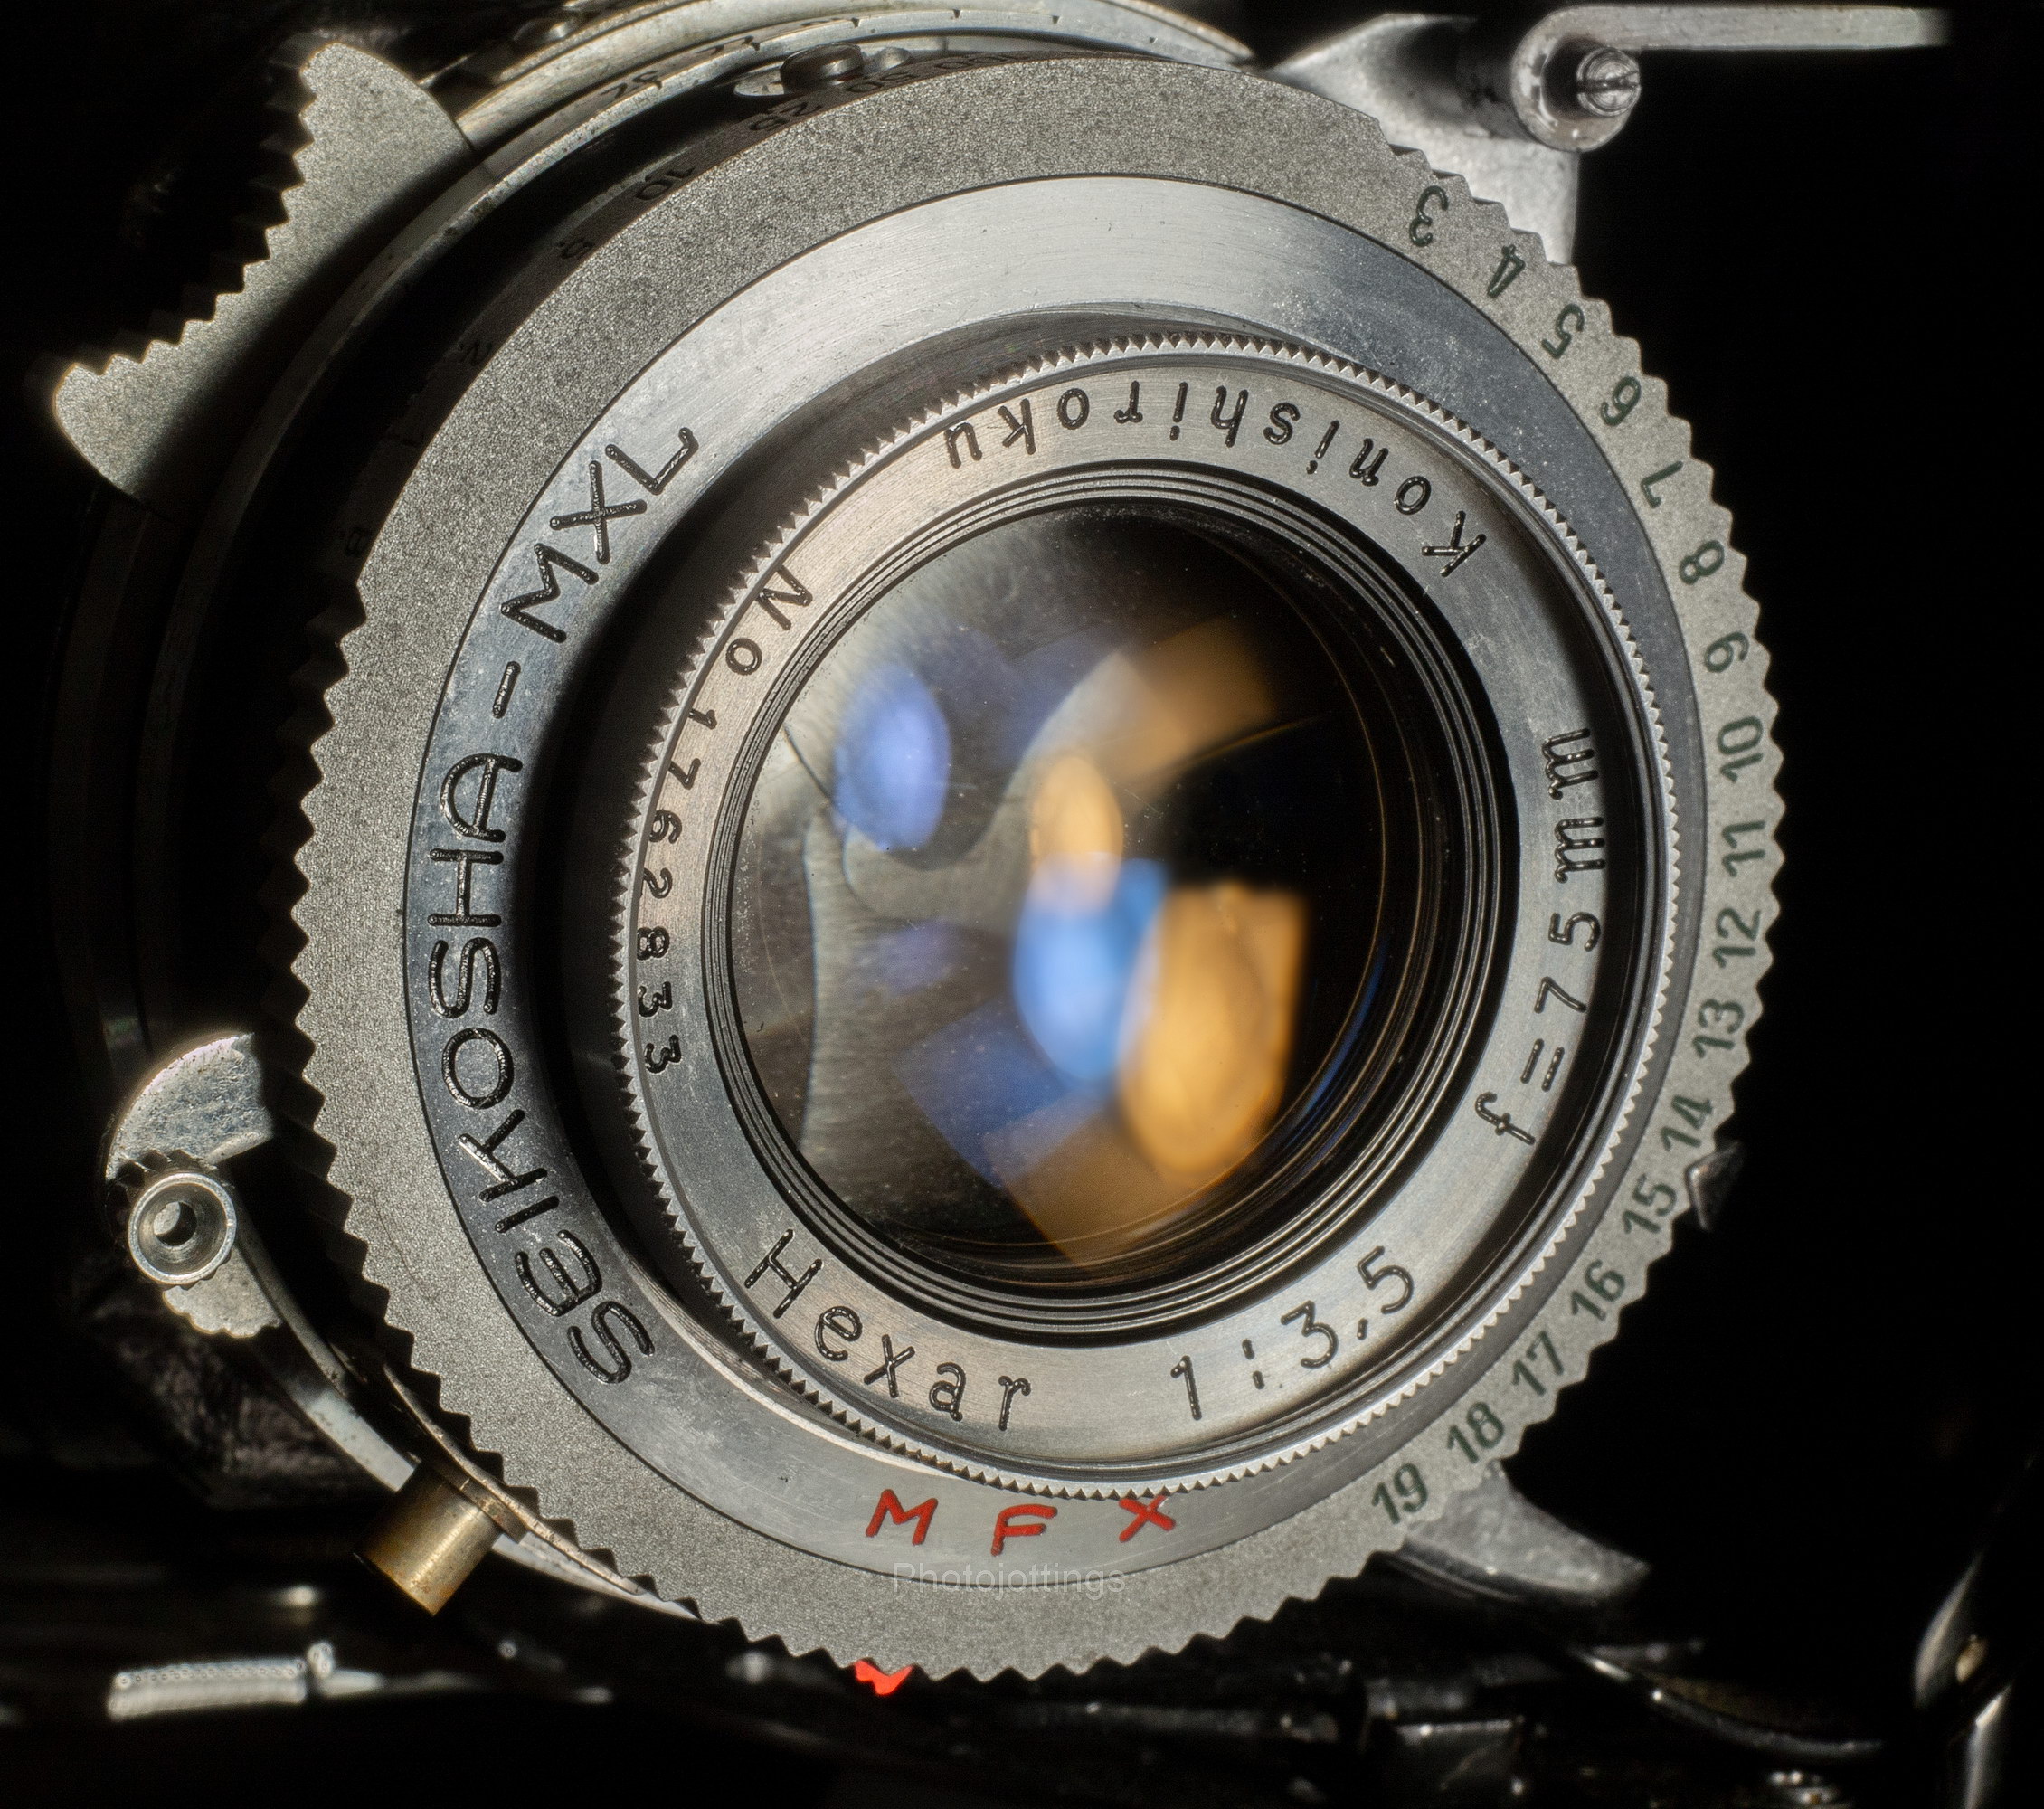
Lens;  amber hard coated 75mm F/3.5 Hexar, four elements in three groups ‘Tessar’ type.  Five aperture blades going from F/3.5-32 in half stop clicks.  Lens surround outside diameter is about 32mm.  Takes 30.5mm filters.  ‘Koni’ filters for the Pearl III with F/3.5 lens are thin and will allow the camera to close with the filter on, see very top picture.  There are a lot of Konifilter sizes, make sure you measure your lens thread diameter and get the right one.

Shutter and speed; Seikosha MXL, 9 speeds, bulb, 1 sec, 1/2, 1/5, 1/10, 1/25, 1/50, 1/100,  1/250 and 1/500.  Cable release socket on door hinge pin, not the shutter itself.

Film; standard 120 roll, 16 pictures per roll, each with an approximate area of 2-1/4″ x 1-5/8″ (6×4.5mm) images.  Actual exposed film measure 41.5 x 56mm.

Flash; none, but has German PC port, and syncs at all shutter speeds.

Power; no batteries required.

Accessories for this model; metal thumb screw hood, called a ‘Konihood,’ leather case, and some B&W filters: I have the Konifilter Y2 yellow; it seems slightly orange, and matches the dandelion flower color.

Crippling features and omissions; no self timer, and has stupid automatic film advance winder, which sounds cool, but it doesn’t work so well in real life.  Shutter trip lever gets hung up occasionally-but easy fix.  No double exposure prevention, what the f***?

Good features; quite small, It’ll easily fit in the back pocket of jeans, with the size being about the same as a medium to small 35mm film camera with a small lens attached.  Sharp lens, which takes inexpensive screw-in 30.5mm filters.

Problems;  sometimes the shutter trip lever gets out of position, and it won’t fire, to fix just close the folder and open it again.  For users that are new to folders, make sure you check the bellows for light leaks, and the shutter speeds, they’ll most certainly be off, especially at the lower, and highest speeds.

Product shots with descriptions.  Click pictures for larger versions.

Here is the box and a couple of accessories.  The bottom of the box, and the hand written and stamped ID card both have the camera lens number printed on them, and mine match, so that’s kind of neat.  The Konihood is made of metal, and attaches using a screw that tightens around the lens rim.  You can attach both the Konifilter and hood together if you want, as one mounts to the lens rim, and the other screws inside the rim.  The hood comes in a leather pouch similar to the camera case, and it has a slot for one or two Konifilters on the inside.  On the bottom of the Konihood box is the price of ¥560, which was about $1.52 back in 1958.

A view of the Seikosha MXL shutter and Konishiroku Hexar 75/3.5 lens.  The M F X is for flash syncing, the M and F for bulbs, and the X for electronic strobe use.  The goofy light value scale is along the shutter speed dial, I don’t think people use that feature very much, maybe because it makes it harder to change aperture and shutter speed settings when you aren’t’ interested in using the same exposure value.

The top view shows the film reminder dial; ‘Panchro’ is B&W, with ASA speeds that match common films of the day.  The flat chrome lever above the reminder dial is actually the shutter button, and the button to open the camera is in the place where the shutter button would normally be, just to the top left of the accessory shoe.  You’ll figure this out quickly when you push what you think is the shutter button and the lens pops out!  The accessory shoe is not hot, it’s just for mounting a flash or light meter etc.

With the back open you can see inside the bellows to the back of the lens, and the film gate advance rollers.  The new film roll goes on the left, with the take-up spool on the right.  Both holders are spring loaded on the top.  It looks like the film pressure plate is from a 6×6 camera as it covers much more than the 6×4.5 area here.  The black rimmed viewfinder eyepiece unscrews for cleaning.

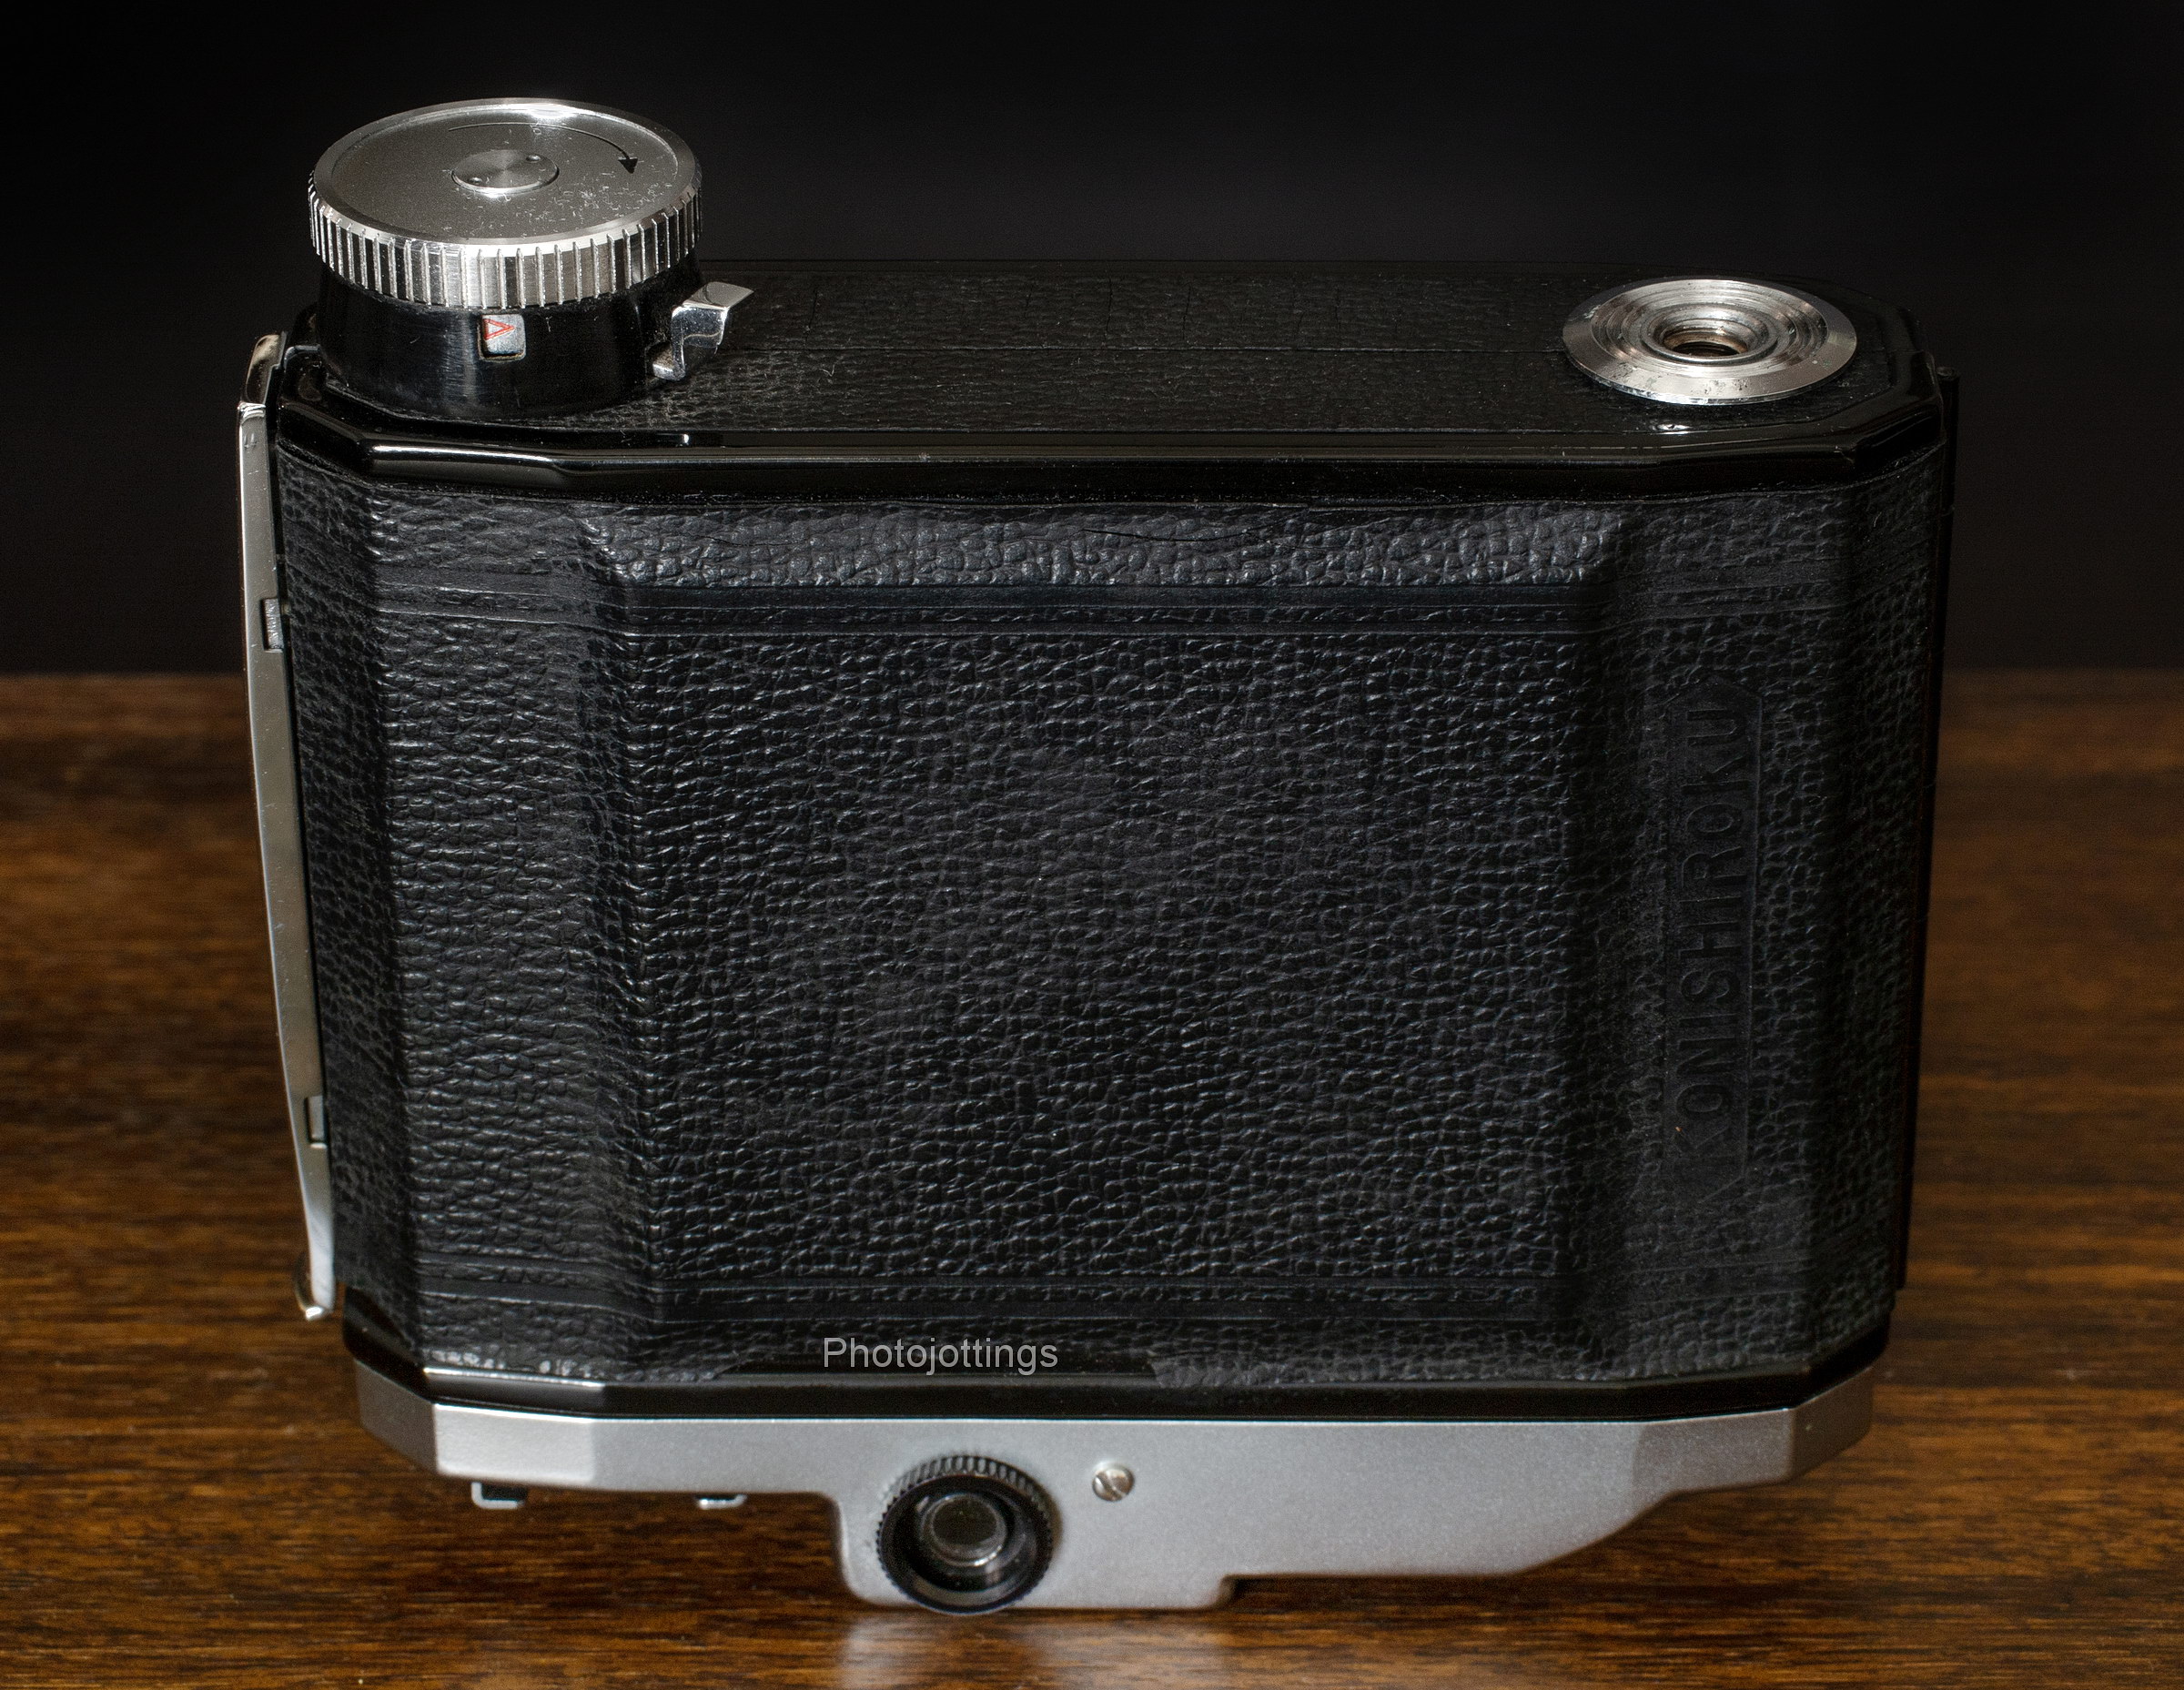
Underneath the camera is the ‘auto winding mechanism’ that Konica seems proud of.  You’re supposed to be able to turn it to the red arrow as I’ve done here, insert the film and wind it manually until the arrows on the backing paper line up with the upper and lower white dots (seen in the picture above on the right side of the film gate).  You then close the back, wind it to number one, and take your picture.  In real life, I found this was hard to do, the mechanism didn’t seem to want to stop at exactly number one, or ‘exactly’ any subsequent number for that matter, so you wind up with unevenly spaced images, and some are slightly overlapping.  There is no red window for backup, so you’re SOL if the winding mechanism doesn’t work right.  The lever on the side of the winder is called the filmwind stop and release lever, I’m not sure if it’s working correctly on my camera.

The tripod socket is originally a 3/8″-20, but for the US market I guess Konica simply installed a 1/4″-20 insert, or maybe that was done by a prior owner.

Here the Konihood is installed and we’re ready for some fair weather picture taking.

To open the back, you lift up on the lever along the right side of the camera, or left in this picture.   Note; the lever isn’t fully seated here, I left it up a bit for some reason.

The viewfinder window is in the vertical orientation, which is normal for 6×4.5cm pictures.  Notice the small ‘notch’ in the bottom of the viewfinder, that allows you see the speed, distance and aperture dials while looking through it; good luck with that if you’re older than a teenager.

Looking at the lens and shutter combination, we have the u-shaped grooved finger focuser at the 10 o’clock position, it moves the whole lens assembly, not just the front element.  The brass nipple is a PC connector.  The small half moon knob at the 7 o’clock position is for adjusting the aperture, and right beside it is the shutter cocking lever.  Remember, there is no double exposure prevention, so you can cock and trip the shutter as many times as you want without advancing the film.

Test images below.

Here are some test images scanned on a Nikon Super Coolscan 9000 ED.  All are 4000-5000 pixels wide; Kodak Ektar 100 or Portra 400 used for all shots.  Tripod used, no filters.  Click for larger images.

House of palms.  Quite sharp at about F/16.  Kodak Portra 400.

Underexposed test shot.  I thought I had Portra 400 film loaded, but it was actually Kodak Ektar 100, so I ruined all the shots.  Seems like there is slight movement here and it’s not real sharp; about F/11-16.

Wedding mill, about F/16.  Some movement here, not real sharp.  Kodak Portra 400.

I tried focusing on the orange poppy bloom to the center left, but it looks like I missed it, or the rangefinder is off a tad.  About F/5.6-8. Kodak Portra 400.

Home sweet Home.  Nice sharp shot at F/16.  Kodak Portra 400.

Conclusion.

The Konica Pearl III turned in a pretty good review, even though the camera may not be in correct working order, or maybe I can’t hold it steady enough for some reason.  I do like the sharpness, color and contrast of the lens, it’s about as good as it gets from a four element design.  The rangefinder patch is small, but you can easily see the images converge for correct focusing.  Another nice feature is the ability to use inexpensive 30.5mm screw-in filters, most other folders either have a proprietary push-on type, or nothing at all.

Unfortunately, there are a couple of big negatives with this camera, and number one is the ‘auto winding mechanism.’  I don’t know if this feature really worked as advertised, or was originally as troublesome as mine is now.  It just isn’t precise enough for proper spacing; meaning you get images that are too far away from each other which wastes film, and you wind up with only 14 or 15 shots; or the spacing is too short, and slightly overlapping on some shots, in which case you might get 17 images, but some parts of the images are double exposed—eh boy.   The other problem is, it doesn’t have double exposure prevention, so you have to remember to advance the film after each shot, and if you don’t it’s two shots wasted.  It’s really odd that a high spec camera like this one is missing double exposure prevention, what were the designers thinking??

In the end, the Konica Pearl III really has a lot of  potential, but for me it’s fatally flawed with the auto winding mechanism. I guess one could cut a hole in the back for manually winding the film as you watch for the shot number, but I’m not the one to do that.  And for some reason, I just can’t seem to hold the camera steady enough, even with a high shutter speed, is it the camera, or me?

Anyhow, that’s it for the Konica Pearl III review.  Please consider buying your goodies (not only camera stuff) through my links and help support the site. Thanks for visiting!

The Konica Pearl III takes readily available 120 film,  B&H, Amazon, eBay.

Before purchasing an old folder: as with all old cameras, especially ones with bellows, you’ll need to check the shutter speeds for accuracy, and the bellows for holes before you use it, so you don’t wind up paying for a roll of film, and processing, and maybe even scanning only to learn the camera was screwed up: that could easily cost you $15-$20.  I’d pay a premium for one where the seller has had the camera cleaned, lubed and adjusted, and can verify, or hopefully guarantee it’s ready for taking pictures.

My Dad bought this ’58 Savoy around 1962-3 as a pile of rust, and spent a few months after work fixing the dents, and rotting fenders and doors, then finally painting it and getting it back on the road as a daily driver for my Mom.  Years later Mom would load my brother and me in the car to run errands and get groceries, and by that time, the car was starting to fall apart again.

My only memories I have of riding in it was that every time Mom drove through a puddle, I’d get soaked.  I always rode in the backseat behind her, and over the years the floorboards rotted out so badly that the rubber mat floor coverings actually sagged and fell through, leaving an open space to the road below my feet.   Finally I started complaining, and Dad, (who was never much for words) took a quick look and murmured ‘well all be damned.’  Shortly thereafter the Sayoy disappeared, and a beat up 1966 Chevy Caprice entered our lives.

Here the car is finished and looking pretty smart, not bad for a couple hundred bucks total investment, and a first try at this type of work.  Dad was proud of the job he did on the car, and wanted to take a few glam shots to show friends.  In later years, he would do this for a living, and restored cars valued in the millions that would show or win at Pebble Beach.

The car is a 1958 Plymouth Savoy four door sedan, I think repainted to the original factory color of ‘Metallic Suede.’  Looking past the car, you can tell it was really windy this day, check out the bent over corn, and trees in the background.

These Kodachrome slides were taken in the spring of 1964 at Gramps farm, the same one featured here, and with this very camera.  The farm had about 102 acres, with the house roughly in the middle of of the property, next to the car in the picture.  Believe it or not, the entire 102 acres is now totally built up and paved over with two huge apartment complexes, a middle school, and a strip mall along the road shown in the picture below.  Ironically, the relatively new houses in the background below (late 50s-early 60s) are still there, and look mostly unchanged!

This not so sharp view; (wider aperture?) hints of ‘Christine,’ from the movie of the same name; but that car was a Red Fury, not a lowly Savoy.  Notice what looks like a nice field of goldenrod blooming, and check out ‘Butch’ the friendly, but not-to-energetic family dog.

That’s it for this trip down mid-60s Kodachrome memory lane, thanks for stopping by!


The Ricoh YF-20 Super is, at least outwardly, an uninspiring fixed focus compact 35mm camera, with a three element lens, flash, and motorized drive.  However, upon close inspection, it has a really nice feature that makes this model stand out; there’s a sliding switch under the lens that allows you to focus the camera to longer distances.  The switch is spring loaded, so you have to keep it pressed while taking the picture, that way when you go back to taking snaps of family and friends, your focus is back to where is should be for sharp shots.  The real beauty of the infinity focus feature is that you can use wider apertures and still get crisp images, so no more having to stop the camera down to the ISO 400 or 1000 (small aperture) setting, and using expensive ISO 800 film to offset the close focus, depth of field conundrum of the typical cheap compact fixed focus camera.

The Ricoh YF-20 Super has a small 35mm F/4.5 triplet lens which exhibits strong field curvature wide open, and that means you can use the camera at the maximum F/4.5 setting and get sharp shots!!

Along with the ability to change focus, it has four different aperture choices which are labels as ‘ISO’ on the front of the camera.  Actually, if you include the maximum ‘flash on’ aperture of F/4.5, and change the ISO settings with the flash still on, you can get four additional aperture settings for a total of eight!!

With the intro finished, let’s do a walk-around of the Ricoh YF-20 Super.

Name; Ricoh YF-20 Super.  Also known as the ‘L-20,’ and ‘One Take Easy II.’

Manufactured by; Ricoh Company LTD, Taiwan, R.O.C.

Date of manufacture; late 1989-?

Price; NYC photo store has the lesser non ‘super’ model for $50 in November 1989, so I’m guessing the super was around $60.

Build material; black plastic body with a clear plastic window over the viewfinder, flash signal, CdS cell and film reminder slot.

Weight and size; camera with batteries, 9.3oz (262g).  Camera only 7.6 oz (215g).

Dimensions; Size is 5.2″ (132mm) wide, 2.7″ (68mm) high, and 2.0″ (51mm) deep.

Focal length; 35mm.

Aperture; with flash turned off the main aperture at ISO 100 is about F/8, ISO 200 is about F/11, ISO 400 F/16, and ISO 1000 about F/22.  With the flash switched on, the aperture opens up fully to F/4.5, but only when the ISO is at F/100; beyond this you get in-between apertures (maybe one stop larger from the figures above) from 200, 400, and 1000; got that?

The aperture shape is a vertical ‘slit’ type when set to flash-off, ISO 100-200, and then becomes round at ISO 400-1000.  When the flash is turned on, the aperture takes on an unequal four star shape from ISO 200-400, then going to a vertical slit at ISO 1000.  When the flash is on and set to ISO 100, the aperture shape is perfectly round; got that too?

Focusing; fixed, but will focus to infinity while holding switch.  Manual states from 3.3′ (1.0m) to ∞.  The lens is probably focused around 6 feet, or 1.9m without sliding the switch.

Original print size; standard oversize prints 4” x 6,” at Walgreens, Kmart, or Walmart etc.

Approximate resolution; will make good 8″x 10″ prints at all settings when focused to appropriate distance.  Capable of excellent enlargements with ISO button at 200-400.

Lens; Ricoh coated glass three element in three groups, 35mm focal length, F/4.5 maximum aperture only when the flash is on with ISO switch at 100.  Oddly, the original Ricoh box has a matching sticker applied that says ‘included super close-up mode.’  I’m guessing it was a mistake by either the manufacturer or retailer because this lens doesn’t have any close-up capability.

Shutter and speed; mechanical two bladed shutter, with a tested speed of about 1/210s with a variation of 1/40s.  The owner’s manual says the shutter speed is 1/125s.

Distortion; mild, but complex dinner plate type, see sample below.

Color fringing; not much noticeable.

Features; infinity switch, at least five apertures to choose from, useful flash, semi-auto loading, auto advance and rewind.

Film; all 135 film cartridges, B&H, Amazon, eBay.

Double exposure prevention; Yes.  There is no way to get a double exposure even if you want one without screwing up the camera.

Flash.  4-10′ (1.2-3.1m) at ASA 100.  Recharges in about 6 seconds with fresh batteries.

Power; two AA batteries.  Manual states NiCd not usable.

Viewfinder; reverse galilean type.  Magnification 0.52x.  Field of view 80%.  Red low-light warning lamp.  No guide lines or parallax correction.

Accessories for this model;  none that I know of.

Crippling features and omissions; nothing really, it’s for super quick and easy snapshots.

Good features; five (ISO) apertures to choose from, flash, and infinity switch, so the camera is ready to shoot instantly.

Product shots with descriptions.  Click for larger images.

The Ricoh YF-20 has a sliding plastic door covering the lens; which also acts as a power switch.  To the right of the viewfinder is a little round CdS cell for triggering the low-light warning lamp, it doesn’t control the shutter which only has a single speed.  The ISO film setting are changed by sliding a tiny lever to the appropriate position.  The flash is fixed in the vertical orientation, and has decent output.

The Ricoh lens is a multi-coated three element in three group design with a maximum aperture of F/4.5, but only with the flash turned on, and the ISO setting at 100.

The bottom of the camera has an AA battery compartment on the left, a mid-roll rewind button on the right, and the gray infinity slider at the curve to the front.  You have to hold the switch while you take a picture, it’s spring loaded and will return upon release.  A workaround if you want to keep the lens focused at infinity; put a wooden broken off toothpick between the button and end of the slot, then tape it over, just be sure to release it if you want to take close pictures of your friends or family members.  Anything beyond about 15′ or 20′ (5-7m) will be sharp when focused at infinity.  The button can be pushed over to the halfway point if you really want to get fussy about your distances.  Not really important for normal people, but for technical nerds; The lens rotates slightly while moving back inside the camera about 1mm when the button is pushed all the way over to infinity.

There is no tripod socket on this model; but I’m wondering what the round protrusion (mounting pad?) is to the right of the battery cover; maybe Ricoh had plans for a tripod socket during development; or it’s for another model that shares this design.

On top we have a gray shutter button, and the additive type easy to see shot counter with black numbers on a white background, which resets itself when you open the back.

On the back side we have the viewfinder, which is sufficiently bright, with no guide lines, and an orange flash ready-light beside it.  The flash on-off switch is on the left.  The slot window on the back cover is for letting you know what kind of film is being used.

With the back open you can see the camera has some decent features like a real film pressure plate, a spring steel film tensioner and black felt inside the light chamber.  The only moltoprene is around the film reminder slot on the back cover.


Here are some test images scanned on a Nikon Coolscan 9000 ED.  All are 3000 pixels wide; there is no additional resolution from scanning at a higher sample rate.  Kodak Portra 400 film.  Click for larger images.

Ram at rest.  Infinity focus, and about ISO 400. I see some hard light fall-off in the corners.  A large depth of field here, the back mountains are sharp, as well as the Rams head.

Cholla cactus about 10′ (3m) away at F/4 ISO 100 with flash on, close focus.   The cactus is sharp, and the background is decently blurred.

Pool scene at infinity, ISO 400.

The top of the roof should be straight, but distortion is forming a complex wave, almost flat along the middle top, and then dipping towards the sides; this is typical of ‘fixed’ focus type of lenses.

Here I matched the window perfectly with what I could see in the viewfinder.  Obviously, there is more coverage area beyond what you see in the viewfinder.


Test shots at different apertures.  Scanned on a Nikon Coolscan 9000 ED.  All are 3000 pixels wide; there is no additional resolution from scanning at a higher sample rate.  Kodak Portra 400 film.  Click for larger images.

This image was taken with the flash on, and the ISO set to 100,  the effective aperture is F/4.5.  The infinity switch is not being used, so the focusing distance is fixed at about 6-8′ (1.9-2.5m). As you can see, it’s really soft when taking landscape type shots, however, if you move the focus slider to infinity, the shot is much sharper, see below.  Also notice the sides are a little sharper than the centers; that’s a result of field curvature of the lens; which shows up at wide apertures.

The flash is still on, with the ISO set to 100, now the focus switch is pushed over to infinity.  Here the aperture is still F/4.5, but it’s much sharper than the closer focus shot above.

With the flash turned off, and set to ISO 100, (approximately F/8) there is a bump in sharpness over most of the image.

In this image I’ve set the ISO slider to 200, the aperture is now about F/11.  The image is quite sharp in the whole central area, and it would make an excellent 8×10″ print.

At ISO 400, or approximately F/16, the images starts to soften a bit from diffraction.

Softening diffraction is noticeable here, especially in the central area, with dark shadows from the very small aperture and 1/200s shutter speed; ISO 1000, or approximately F/22.


Conclusion.

I’m continuously looking for that perfect always-ready, no-fuss compact camera, one that won’t miss focus, under or over expose, and uses common AA’s for the flash, and motorized drive; so is the Ricoh YF-20 Super the one?

First off, when we describe a typical compact fixed focus camera from the 1980s, it usually means that it has no focus adjustments, and maybe two aperture or ISO (100/200-400) settings, along with a flash and motorized drive; any additional features and we get into the ‘high end’ fixed focus category, which I think the Ricoh YF-20 Super is in.  However, with that said, the Ricoh isn’t really a fixed focus model, but it can be if you don’t want to fool with the infinity focus slider.

Most fixed focus cameras have the focus point at less than 10′ (3m), this is because the manufacturer figures you’ll mostly be taking pictures of family and friends and using the flash, so that short distance makes sense; but what if you want to take some shots of distant mountains, or anything more than 20′ (6m) away?  Well tough luck at wide apertures, your shots will be quite blurry when you look closely, but at small print sizes you might be ok.  In order to get sharp shots from these cameras you have to stop down the aperture for a greater depth of field.  You do that by using the ISO settings on the camera, the higher the number, the smaller the aperture.  I usually recommend the ISO 400-800/1000 setting, and using ISO 800 speed film, which is getting quite expensive now, darn it.

Thankfully, the Ricoh YF-20 Super has a slider that allows you to hold the focus out to infinity while you take the shot, thus eliminated the problem of having to stop down the lens to a tiny aperture, (just to get sharp shots), that you lose the ability to capture enough light for the beautiful early morning or late afternoon outdoor scenes.  The Ricoh YF-20 Super is very impressive when taking landscape pictures at F/4.5 at infinity focus, and at that aperture you can use inexpensive ISO 100 and 200 film.  But you do have the option of not fooling with the focus, and just shooting with the lens in the ‘fixed’ position, just like the Canon Snappy 30, or Kodak Breeze that I tested, and both are quite sharp stopped down hard.  Of course the lenses on these cameras are inexpensive; the color and contrast are not the greatest, but that’s expected in this category, and the only real negative aspect in my opinion.

In the end, the Ricoh is the best by a wide margin out of all the fixed focus compacts that I’ve tested so far at wide apertures, thanks to the infinity switch.

Check prices and availability on Ebay, Ricoh YF-20 Super.

Please consider buying your goodies through my links, doing so helps support the site, thanks!


Our review camera for today is the compact and elegant Olympus LT Zoom 105, featuring a rich ‘Leather Tech’ outer cover which actually appears to be an automotive grade naugahyde, but it still looks pretty neat, that’s why I bought it—unfortunately I think I got ripped off, see the test shots below.

Olympus offered at least two models of the ‘LT’ series, the Zoom 105 with a 38-105mm lens, and an LT-1 prime with 35/3.5 and a faux leather flap lens cover.  I see four colors available, burgundy, brown, black and a greenish one.  Later versions include a quartz date and panorama mode.

The stylish Olympus LT Zoom 105  ca. 1997 is a fully automatic point and shoot camera, with auto focus, auto exposure, auto advance and rewind, and an automatic pop-up flash.  As with most point and shoot cameras, there are only a few settings to choose from, like flash on-off, red eye reduction, fill flash, spot focusing and metering, long exposure mode up to 4 seconds, a self timer and optional RC-200 remote control.  The camera is marketed as ‘weatherproof’ and ‘all weather ,’ but will only repel light rain, and won’t withstand being submerged in water.

So is the Olympus LT Zoom 105 just another pretty ‘accessory’ camera, or can it take excellent pictures? let’s find out now!

Name; Olympus LT Zoom 105; plain versions were known as ‘Stylus Zoom 105,’ and ‘mju zoom 105‘ in Japan.

Box contents; camera, owner’s manual, a matching color wrist strap and maybe a vinyl carrying case.

Manufactured by; Olympus Optical Co, LTD, Tokyo, Japan.

Made in: Japan.

Date of manufacture; 1997-?

Price; retail probably around $249 at introduction.  A 1999 mail order NY City super store magazine ad price is $189.  Current ebay prices are around $50-150 for a good used copy.  Get the same basic camera for half the price by buying the ‘Stylus Zoom 105,’ or ‘mju zoom 105‘

Build material; mostly plastic body.

Weight; camera with batteries, 9.4oz (268g).

Dimensions; Size is 4.75″ (121mm) wide, 2.6″ (66mm) high, and 1.85″ (47mm) deep.

Focal length; 38-105mm.

Aperture; F/4.5-8.9, not user selectable.

Focusing; active type infrared auto focus, 2.0′ (0.6m) to infinity.

Original print size; standard over-sized prints 4 x 6.″

Approximate resolution; probably will make excellent 5″x 7,” and very good 8″x 10″ prints.  My copy would not make any good prints due to poor focusing.

Lens; 38-105mm F/4.5-8.9 multi-coated glass, six elements in five groups design.

Shutter and speed; four? aperture blades, speed from 4 seconds to 1/500s but not user adjustable.  Self timer with Remote control option.

Distortion; looks mild from the pictures below.

Good features; fill flash, 12 second timer, spot focus and metering, eyepiece diopter adjustment, and long exposure mode up to 4 seconds.

Film; all 135 film cartridges, B&H, Amazon, eBay.

Flash.  built-in pop-up type, 15′ (4.7m) at ISO 100, 4 second recharge time with fresh batteries.

Power; One 3 volt DL123A/CR123A battery.  B&H, Amazon.

Viewfinder; Real image zoom viewfinder (with autofocus mark, close-up correction marks, green autofocus indicator and orange flash indicator lights on the side of the viewfinder; solid green means focus is locked, and you’re good to shoot, blinking green means it isn’t focused properly.  Solid orange means the flash is charged and ready; blinking orange means the flash is not ready.

DX coding; 50-3200. Defaults to ISO 100 when no code is detected.

Accessories for this model;  N/A.

Crippling features and omissions; no exposure compensation setting.

Go here for an owner’s manual.

Product shots with descriptions.  Click for larger images.

The power button is on the escutcheon, to the right side of the lens as you hold it.  When turned on, the lens and flash pops out and the lens cover swings down.

The lens initially powers on to the wide end, and when at full telephoto, it extends another 52mm.  The lens cap must be manually pushed up and closed when the power is turned off.  Notice the odd shaped flash sticking out of the top.

Not much to see on the bottom of the camera except the off-center plastic ¼-20 tripod socket, and just above that a mid-roll rewind button.

The back cover has a lot of lovely burgundy naugahyde, interrupted only by a film reminder window.  The round knob by the viewfinder is a diopter adjuster; great for people with poor eyesight.  The viewfinder is clear and bright, but quite small.  The two small lights on the right side of the viewfinder window are; top green for AF confirmation, and bottom orange for flash status.

A look inside of the camera. The DX code reader is at the back of the cartridge compartment.  The film pressure plate is plastic, and the film tensioner is spring steel.  I see a rubber gasket around the back cover, and thankfully no moltoprene except around the film reminder window.

On top we have the LCD, remote and self timer button, flash button, shutter button and zoom toggle.  If you push both the flash and remote buttons, you can bring up the spot focus and metering mode.  Notice Olympus put ‘all-weather’ in a highly visible place, but be careful; it’s only for water slashes and light rain.  The viewfinder will show the number of shots—additive type, flash mode, battery power level, and the time and date (with the Quartz date model).

The grip side of the camera has the battery door with strap attachment.  The little sliding button in the middle is for opening the back cover.

The box with camera. I forgot to take a picture of the matching burgundy hand strap and multi language manual.


Here are some bad test images scanned on a Nikon Super Coolscan 9000 ED.  All are 3000 pixels wide; there is no additional resolution from scanning at a higher sample rate.  Kodak Gold 200 used for all shots.  Click for larger images.

Colorful paint chip display; I see a soft left side.

Close focus; I was trying for the red leaf, but it missed the focus.

I’m guessing the lens was close to wide open here, and at 38mm.  The left side is soft.

I framed the window to exactly match the viewfinder edges, so there is a lot of extra coverage in the actual frame.  I see some minor complex distortion along the window frames.

The same thing at the telephoto end; a lot more coverage than what you see through the viewfinder.  There doesn’t seem to be much distortion here, but the camera missed focus.

Our normal test scene at 38mm, and way out of focus.  The color of the lens looks pretty good though.

Eh boy, another one out of focus, this time at 105mm.  Well, that’s enough of the test shots, let’s stop wasting time and wrap things up.

Conclusion.

The Olympus LT Zoom 105 is a nice looking camera, it’s somewhat unique I think with the finish color and cover material; maybe the green version would be even better looking, but not quite as elegant as burgundy.  This little camera will look great in the display cabinet, and unfortunately that’s probably where it’ll stay for the rest of its life.

My copy (purchased via Etsy) would not focus correctly in almost all attempts.  Maybe it was dropped or roughly handled at one time.  One possible issue; I think the lens extending and simultaneous flash pop-up at power-on are mechanically linked, so if you have your hand over the flash when you turn the camera on, it may cause problems with the lens start-up positioning.  I did this by accident and the lens stopped extending and made an odd noise, however, that was after I shot the roll of film, but maybe someone else did that and screwed up the lens—who knows.

I’m guessing a properly operating model would provide quite sharp pictures with good color and contrast, but I think I’m done for now.  I might try a prime lens (LT-1) model in green next if I find a good one.

So maybe a thumb and a half up for a correctly working model, but two thumbs down for my copy; oh well, at least I gave it a decent try.  For a much better model (and way less expensive) in this category, check out the Minolta Freedom Zoom 160 I reviewed here, or the super inexpensive and excellent Canon zoom here.

That’s it for this review, thanks for visiting!

Please consider buying your goodies through my links, doing so helps support the site, thanks!


Canon Sure Shot Zoom XL Review

Our latest camera for review is the 1989 Canon Sure Shot Zoom XL, a very expensive point and shoot zoom that Canon claimed had the optical quality comparable to Canon FD interchangeable lenses; well, we shall see about that; (if you're impatient, scroll down to the test pictures for instant gratification, or displeasure).  Other high end, and almost 'SLR' like features include a powerful flash that zooms with the lens; almost two frames per second continuous shooting; and a very useful docked remote control, (a nice feature that unfortunately has not found its way to the cameras of today---some thirty years later).

I bought this camera as new old stock, it still had the sealed wrappers on it; and believe it or not, the batteries in the docked remote control are still good!  As a side note; this is the only camera so far I've reviewed that originally came with factory installed batteries, in both the camera (2CR5), and a couple of CR1220 for the remote, however, the main camera battery still had some power, but not enough to operate it properly.

I have to laugh; Canon tells us in the owner's manual...

Read more »

Kodak Moment #15, off to the races at Rillito Park

This installment of the Kodak Moment takes us back to February, 1958; the location, Rillito Race Track, Tucson, AZ.

My Dad took these Kodachrome snaps while visiting the race track with this camera.  Back in 1958 it was known as the ‘Rillito Race Track,’ but now it’s called ‘Rillito Park,’ where you can watch seasonal horse racing, play soccer, …

Read more »

Ricoh Mirai 105 Zoom Review

The 1980s brought us some goofy cameras, and the Ricoh Mirai (the future) 105 Zoom is one of them; it's boxy and almost camcorder like in it's appearance since the flash and AF sensors are on the side of the lens instead of along the top as it would be on a traditionally designed 35mm type camera, so it's actually a regular camera, but it looks odd as it has a big upturned grip for your right hand.  The Ricoh Mirai 105 is not the only unusual looking camera from the crazy 80s, (remember the Samurai?), did you know Olympus...

Read more »

Expo Watch Camera Review

This week we check out a unique device for taking stealthy images; the Expo Watch Camera.  An October 1917 ad in a Popular Mechanics Magazine suggests you'll get lots of fun taking pictures of your friends in an act of a 'funny stunt.'  You'll also have even more fun when you see the look of bewilderment on their faces when you show them the pictures you took.  I bet the 'funny stunts' back then were a little different than the 'funny stunts' that get pulled today.

The camera actually works properly, so be sure and check out my test samples at the bottom of the review and see what the Expo is capable of today...

Read more »

Konica Pearl III Review

This diminutive, but stylish Japanese coupled rangefinder camera is a Konica Pearl III, and it's from the late 1950s, a time when medium format folding cameras were on their way out, (as were folding cameras in general), and small format 35mm cameras were all the rage.

Our late model Pearl III has a nice feature set including a four element 75mm F/3.5 'Tessar' type lens, a nine speed shutter with the dreaded light value scale embedded on the shutter speed ring, and an 'automatic film advance' mechanism which BTW, doesn't wind your film automatically, you wind it yourself just like a regular folder, but it's supposed to be safer, and more precise than watching for the shot number in the red window of your average folder.  Other nice features include a coupled rangefinder, cable release, accessory shoe, and the ability to use 30.5mm screw-in filters.  Oddly, this high spec camera has no...

Read more »

Kodak Moment #14 1958 Plymouth Savoy

My Dad bought this '58 Savoy around 1962-3 as a pile of rust, and spent a few months after work fixing the dents, and rotting fenders and doors, then finally painting it and getting it back on the road as a daily driver for my Mom.  Years later Mom would load my brother and me in the car to run errands and get groceries, and by that time, the car was starting to fall apart again.

My only memories I have of riding in it was that every time Mom drove through a puddle, I'd get soaked.  I always...

Read more »

Ricoh YF-20 Super Review

The Ricoh YF-20 Super is, at least outwardly, an uninspiring fixed focus compact 35mm camera, with a three element lens, flash, and motorized drive.  However, upon close inspection, it has a really nice feature that makes this model stand out; there's a sliding switch under the lens that allows you to focus the camera to longer distances.  The switch is spring loaded, so you have to keep it pressed while taking the picture, that way when you go back to taking snaps of family and friends, your focus is back to where is should be for sharp shots.  The real beauty of the infinity focus feature is that you can use wider apertures and still get crisp images, so...

Read more »

Olympus LT Zoom 105 Review

Our review camera for today is the compact and elegant Olympus LT Zoom 105, featuring a rich 'Leather Tech' outer cover which actually appears to be an automotive grade naugahyde, but it still looks pretty neat, that's why I bought it---unfortunately I think I got ripped off, see the test shots below.

Olympus offered at least two models of the 'LT' series, the Zoom 105 with a 38-105mm lens, and an LT-1 prime with 35/3.5 and a faux leather flap lens cover.  I see four colors available, burgundy, brown, black and a greenish one.  Later versions include...

Read more »

Scroll to Top