Photo Jottings - Page 11 of 127 - Photography equipment expertise

The Canon 110 ED was one of the very best 110 cameras of the day.  It had the fastest lens for a while (F/2), until Michael Landon of little house on the prairie started hawking the Kodak Ektramax a couple of years later with a F/1.9 design.  The camera outfit you see above was expensive, and cost about as much as a good 35mm camera, but it did have some advanced features that were missing on most of the 110’s, like a tripod socket, a shutter cable release, flash hotshoe, rangefinder focusing, manual aperture adjustments, and an excellent five element lens!

We’re going to take a mid 1970s trip down memory lane for this review, so head to the closet or basement and dust off your old 110; it’s probably under your bell bottoms and peace sign jewelry.  But before your sentimental photo outing, make sure you grab yourself a few ‘cartridges’ of 110 film, they’re still available fresh from B&H, Amazon, eBay.  You can get B&W, reversed rolled ‘red scale,’ regular color print, and even E-6 slide film!

With the introduction out of the way, let’s check out the Canon 110 ED specs.

Name; Canon 110 ED.

Manufactured by; Canon  Inc, Tokyo, Japan.

Date of manufacture; ca1975.

Price; prices from period magazine ads in 1976; $125 at discount mail order stores, so probably a bit more at  your local camera shop.  Adjusted for inflation, today’s price would be around $538.  Current eBay prices range anywhere from $25 to $60 depending on condition and if it comes with the original box etc.  I paid about $45 total for the pristine outfit above.

Build material; the body appears to be mostly metal, and black parts are plastic, but it has an overall quality fit and finish.

Box contents; instruction manual in multiple languages, warranty card, servicing card, presentation box, flash, flash extender, battery and wrist strap.

Weight; camera with battery, 10.6oz (300g).

Dimensions;  5.5″ (142mm) wide, 1.2″ (29mm) tall, and 2.3″ (56mm) deep.

Focal length; 26mm, similar to 52mm in 135 format.

Aperture;  F/2-F/16 manually set.

ISO; 80.

Focusing distance; 2 feet (0.6m) to infinity.

Viewfinder; tunnel like, but fairly bright with parallax correction lines, red over-exposure warning lamp, and yellow LED camera shake warning.

Original print size; Kodak made 3½ x 4½ prints; 89mm x 114mm.

Approximate resolution; good film will make very sharp 4×6″ prints, and good 5×7.”  See sample images farther down the page.

Lens; all glass 26mm F/2; multi-coated 5 element in 4 group design.

Shutter and speed; between the lens 2 bladed, diamond shaped aperture.  Manual states up to (or longer than) 8 seconds at F/2, with a maximum of 1/500 at F/16.  Camera reverts to 1/30s if anything is inserted into the hotshoe.

Apertures; set by the blue colored slider. The ‘window’ and flash symbol on the very left side of the window is F/2, the odd shaped ‘cloud’ setting is F/4, , the ‘sun’ symbol is F/8, and the dot on the extreme right is F/16.

Features; date imprinting.  Choice of four aperture settings.  Automatic electronic shutter.  Rangefinder focusing from 2 feet (0.6m) to infinity.  Hotshoe, tripod socket, and a cable release socket next to the shutter button, see image below.

Film; all ‘110’ cartridges.

Flash; External Canolite ED flash recharges in about 5 seconds, guide number of 14m at ASO 100.  About 180 flashes per battery.  Orange light on back of flash means the flash is ready.  This outfit comes with a flash and extender to raise the flash above the camera.

Power; Uses small, but odd-ball PX28 6v battery not usually available at your local stores, so try here,  B&H, Amazon, eBay.

Accessories for this model; a soft case, ‘deluxe’ soft case, shutter cable release, ’30’ and ’50,’ a self timer and a close-up lens.

Crippling features and omissions; no battery, no working camera.  Later, the updated Canon 110 ED 20 had a mechanical shutter speed of 1/125 if the battery was not inserted.

Good features; real rangefinder focusing and four aperture settings to choose from; small, will fit in a shirt pocket.

Other models; the newer Canon 110 ED 20 had several different features, such as a fixed mechanical shutter speed with no battery, a higher shutter speed of 1/1000, and will accomodate ASA 400 film.

Product shots with descriptions. Click pictures for larger versions.

A nice sample with all the paperwork in place.  Under the camera are spaces for a battery, and flash extender.  Behind the camera resting spot is a slot for the wrist strap, and the main flash unit is on the right side.  Instructions include owners manual, Canolite ED flash manual, warranty and service cards etc.

A view of the front with the lens cover open.  The viewfinder is on the left, and right next to it is the rangefinder window.  Moving mid-camera, the small circular lens is actually the light measuring cell, and the camera lens is the large circular opening next to it.  Make sure the lens cover is all the way open and the white dots are aligned, otherwise the camera won’t work.

On the top is the date set window; I don’t want that crap ruining my pictures, so all are set to blank.  Hotshoe use sets the shutter speed to 1/30 second, but you don’t need a flash unit mounted to get that shutter speed, anything pushed in the mount will set that speed, like a little plastic flash mount adapter.  This feature is handy if you’re shooting in low light, and don’t want shutter speeds that are lower, or higher than 1/30s.

On the rightside is the aperture and rangefinder sliders, we’ll get to that in a moment.

The back is simply for loading film, and looking through the viewfinder.

With the film loading door open, you can see the battery compartment on the left side, it’s the square with a circle in the middle.  The lens light chamber is felt lined.  The finder with parallax lines can be seen in this view.

Here is the main control panel for the camera.  The red slider is for focusing; you move the slider until the rangefinder patch subject coincides; you don’t really need to use the scale. The top blue colored slider is for setting the aperture, and are as follows: the white outlined ‘window’ and ‘flash’ symbol on the very left side is F/2, the odd shaped ‘cloud’ setting is F/4, , the ‘sun’ symbol is F/8, and the dot on the extreme right is F/16.

At the bottom right are the shutter button, and the cable release socket; no, that’s not a tripod mount!

The geared wheels are where you set the date for imprinting on your pictures; it ends at 12-31-’86 so Canon figured the camera would last about 10 years.  The red switch is for checking the battery; when pressed, it triggers a orange light in the viewfinder if the battery has a sufficient charge.

Underneath we have the film advance on the left, and a 1/4-20 tripod socket on the right.

Canon 110 ED with Canolite ED flash and extender attached.  The flash is quite powerful, but not very useful or handy for what’s supposed to be a pocket camera.  The flash takes two ‘AA’ batteries.

This is the ‘Soft Case’ and wrist strap that was probably included when purchasing the camera only.

This is the presentation case that included the flash; I don’t think you could purchase it separately.

A view through the finder.  The yellowish rangefinder patch is visible in the center; it’s not focused properly here.
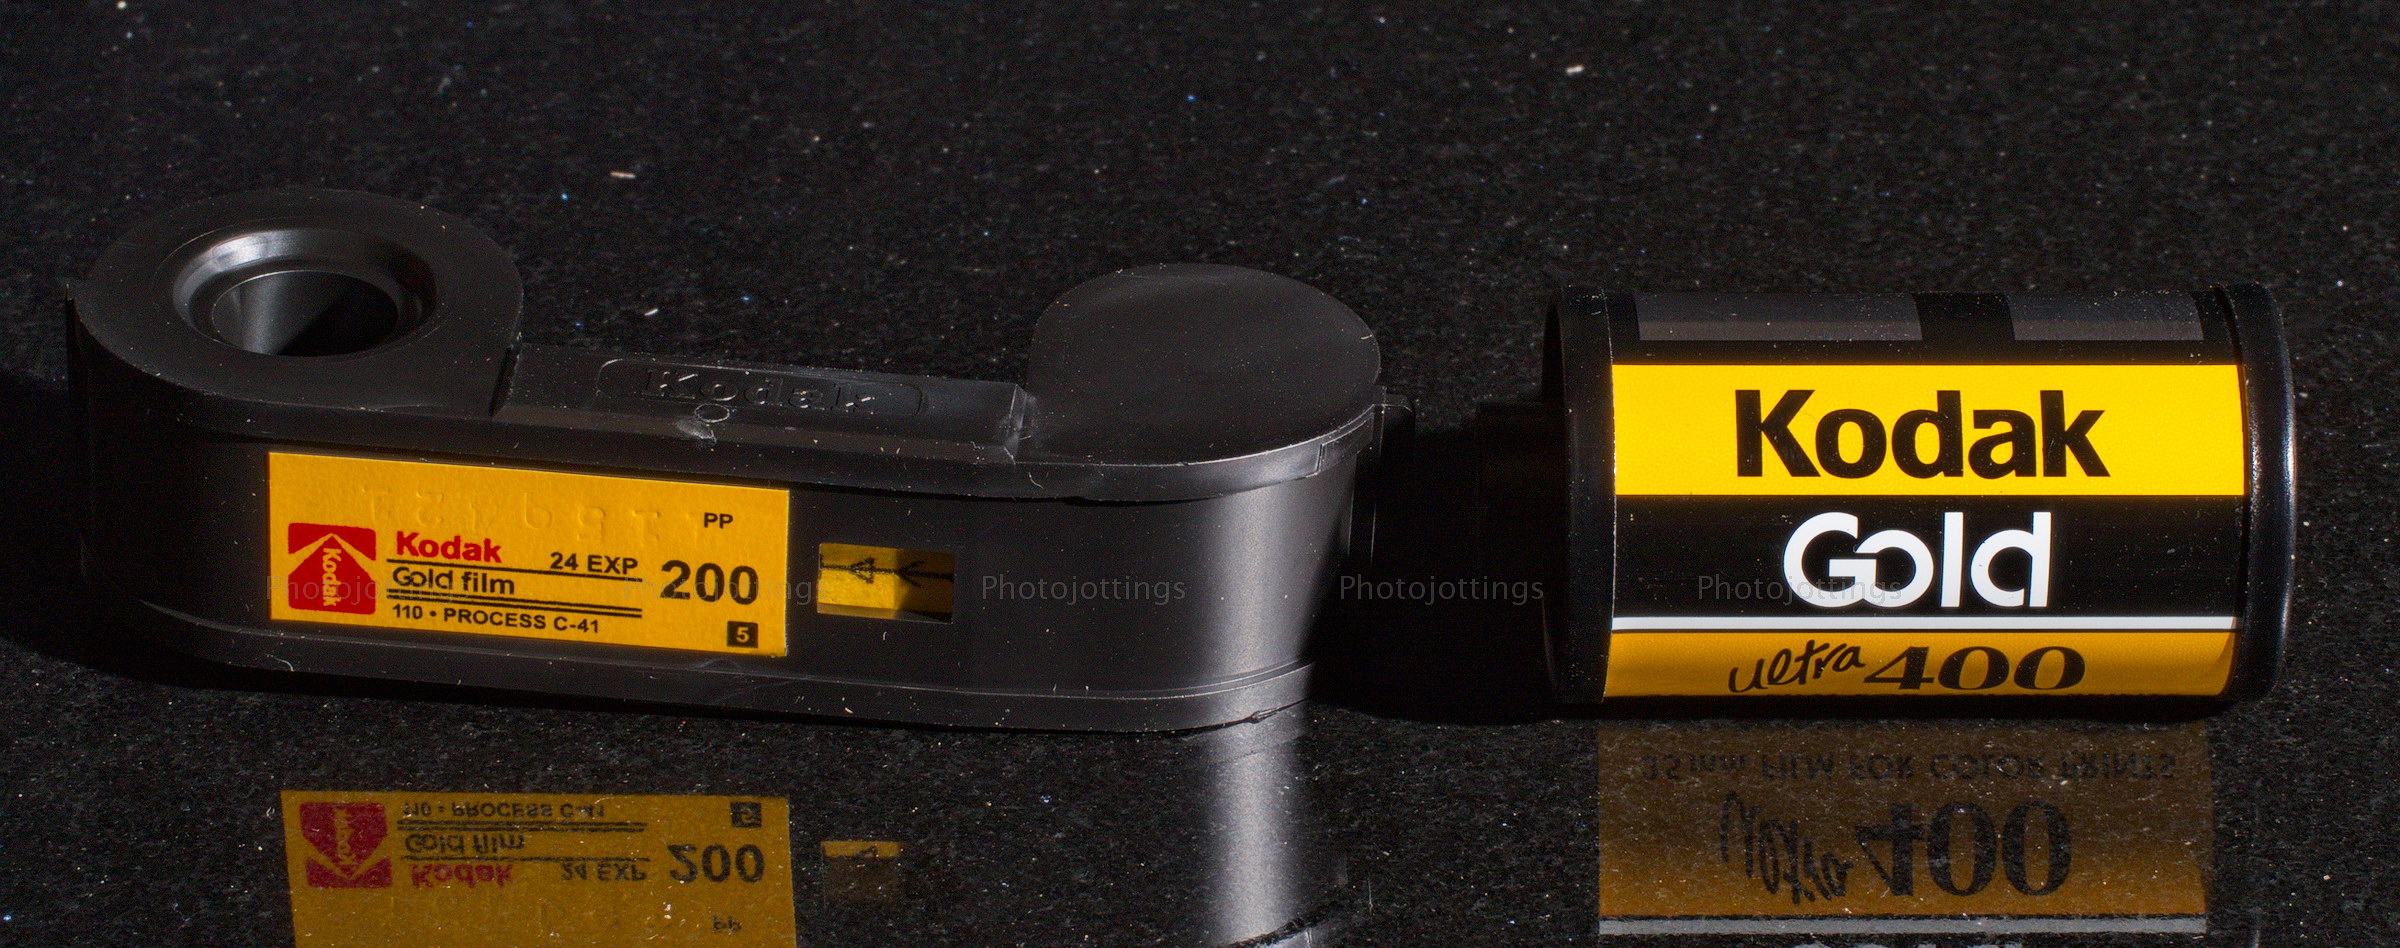
The 110 cartridge is actually larger than a roll of 35mm film.  With 35mm film, you had to thread the film leader on to a  take up spool, not so with 110 film, you just plopped it in and closed the door.


Sample images below.  All were scanned on a Nikon 9000 ED, and sized to just south of 2000 pixels on the long end.  There is no more resolution than what you see here.

A note on the samples: the images below show a very soft left side, especially at F/2-4.  I initially thought the lens was somehow messed up on my camera, so I bought another one hoping it would be better.  Unfortunately, both show the same problem.  I’m guessing it’s the way the film cartridge sites inside the chamber.  Lomography is apparently manufacturing their own 110 cassettes, and they must not be exactly the same as the original ones.  However, this problem did not show up in the Minolta Autopak 460 Tx review.  I did run 2 rolls through each camera from different film batches, so I don’t think I received some bad, or defective cassettes.  When I get a spare moment, I may try an original Kodak 110 cassette and see how that works.

Raging river in the fall.  Lomography Tiger 200.

Resort life.  Notice the blurry background on the left side, this must’ve been taken at F/2-4.  Focusing was correct for this shot.

Close focus at F/2.  Lomography Tiger 200.

The Sonoran Forest in Spring; I think at F/8.

A depth of field study, F/2, close focus.  Lomography Tiger 200.

Spanish gates, I’m guessing F/5.6 or F/8 here.  Lomography Tiger 200.

I see a small amount of pincushion distortion alone the garage roof line.

Long exposure at F/2; I think this ended up being about 20+ seconds long; much more than the rated 8 seconds in the owner’s manual.


Test shots from four different apertures.  All are 1984 pixels wide on the long end.

This shot is at F/2, and we can clearly see the soft left side.

Moving to F/4 provides a little more sharpness along the whole image, especially the left side.

Stopped down to F/8 the image looks pretty good, but the softness on the left continues.

Finally at F/16 the whole image is sharp.  Lomography Tiger 200.

Conclusion.

The Canon 110 ED turned in a good review, even with the soft side issue, as I think it’s not with the camera, but the newly manufactured cartridges from Lomography.  Those new cartridges don’t have exactly the same protrusion dimensions as the original Kodak cartridges, and the tiny differences are enough to keep the cartridge from correctly positioning itself inside the chamber.  Both types of cartridges seem to fit in the chamber properly, but the Kodak is easy to insert and remove.  Maybe if I have some time in the future, I’ll test out an old cartridge of Kodak 110 film and see what happens.

With the problems aside, I think the Canon 110 ED was (and is), a very good camera, and using an original film cartridge from Kodak the lens is probably quite sharp even at F/2, just look at the right side of the F/2 shots above and you can see it’s sharp.  The rangefinder focusing works well and seems very accurate on my copy.  I also like the tripod socket and cable release for night shots.  One thing that I wish this model had is a built-in flash; the included add-on just isn’t very handy, and when the flash is on the camera, it’s no longer small and pocketable, and that’s the whole point of this camera system isn’t it?

For right now, I’m recommending the Minolta Autopak 460Tx over the Canon 110 ED.  The pictures look better at larger apertures, you get a flash and telephoto lens too, plus the Minolta works without batteries.

Even though 110 film doesn’t have as much resolution as a mediocre cell phone, remember: film is fun, especially when you take a few weeks to shoot a roll, or wait a few months to turn it in for developing, and when you get them back, you’re pleasantly surprised by all the pictures you forgot you took!  Number two; with film, you have an original of your work, and you can hand the negatives down to your children, or sell them decades later on eBay for a few bucks per picture, like so many people do here.  Well, that’s probably not a big positive, but what the hell, it’s still fun to go out and shoot like it’s 1975!

As I’ve stated earlier, there are some choices for film.  I like Lomography Tiger 200, it’s actually quite sharp, and about the same as Kodak film back in the day, I know this as I have a bunch of negatives that I’ve scanned from the 1980s, and those photos are no sharper than today’s film.  Lomography Orca 100 B&W film is ok, but it’s very grainy, and appears to be an ortho type film (not sensitive to red) because the skies are always white with almost no cloud definition.  Lomography Peacock is ‘slide’ or E-6 film, and looks just awful all the way around, avoid this as E-6 is more expensive to develop, and the colors make me want to puke.  I guess it’s made to cross process in standard C-41 chemistry for that cool ‘film gone bad’ look so many people like now days.  Lomography Lobster Redscale is a color print film that has been reversed spooled, so you’re shooting the image opposite of the emulsion side; pardon me, but I’think I’m ready to puke again.

For that classic 1980s Kodak film look, try Lomography Tiger 200, it’s my favorite by far.

110 cameras on eBay.

Lomography film types for 110 cameras.

Color Tiger 200   B&H, Amazon, eBay.

B&W Orca 100   B&H, Amazon, eBay.

Lobster Redscale   B&H, Amazon, eBay.

Peacock 200   B&H, Amazon, eBay.


That’s it for this review, thanks for visiting!

Here are a few samples of Fujichrome Provia 400X; it’s color reversal film rated at ISO 400.  I really like it for those late afternoon photoshoots with medium format cameras, it allows you to keep the shutter speeds up when the sun is low in the sky.  This is excellent film, and it’s almost as fine grained as ISO 100 speed Provia due to Fuji’s use of magical Epitaxial Sigma Crystal Technology!!  Check out the Fuji Spec sheet here.

Unfortunately, this film was discontinued around 2016, and the prices now are freakin’ ridiculous for fresh dated or refrigerated stock; like $20-$30 per roll!!  I bought a couple dozen rolls before the prices when through the roof.  I’ve only used three rolls so far, and one roll did not turn out well as the lens was screwed up.  Lesson for this day, test cameras with cheap film, at least for the first roll.

Samples with descriptions.

All images below were taken with a 1950s 6×6 folder, or the excellent Fuji GA645.  I shot the film at ISO 500-640 (-0.5 half stop) instead of the rated speed of 400 to protect the highlights.  Scanned on a Nikon Coolscan 9000 ED.  Pictures are sized between 4000 and 5500 pixels wide.

Click pictures for larger versions.

Housing project.  About the same dynamic range as Provia 100 speed film, just a little more grainy.  Agfa Isolette with Solinar 75/3.5.

Babbling brook.  Grain is less noticeable here.  Agfa Isolette with Solinar 75/3.5.

Escape to Catalina State Park.  Focus is on the vehicle.  Agfa Isolette with Solinar 75/3.5.

The pictures below are from the Fuji GA645 review.

Harbour town, closed for the season.  Slightly under exposed here.  Fuji GA645.

Harbour town, open for the day.  Good exposure, nice detail, poor composition.  Fuji GA645.

Fuji Provia 400X is a excellent fine grained fast color reversal film for late afternoon or early morning shots with medium format cameras, especially those 6×9 folders from yesteryear that don’t look very sharp until stopped down to F/11 or F/16.  I wouldn’t bother with this extremely expensive film in 135 format, just use Provia or Velvia 100.

That’s it for a cursory look at Fujichrome Provia 400x Color reversal film.  Help support the site by getting your goodies, and this film here.

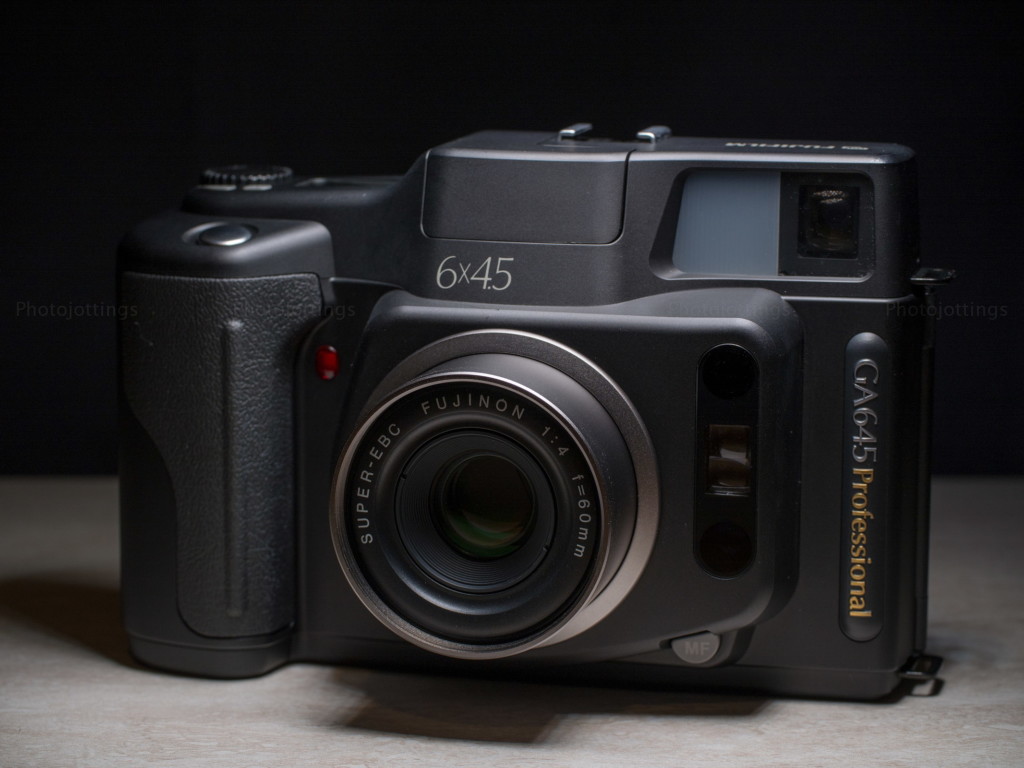
The Fuji GA645 ‘Professional’ is the companion model to the ‘wide’ version I reviewed here.  Both are nearly identical, except for the lenses, so this review will look very much like the other one, with the lens differences pointed out when necessary.

The Fuji GA645 was a very modern and expensive camera for the professional photographer or rich amateur back in the mid to late 1990s.  This particular model has a slightly wide angle lens of 60mm, and covers about the same as a 37mm in 135 format; the ‘wide’ Professional version has a 45mm F/4 lens which I reviewed  here.  The Fuji GA645 is a medium format camera that is feature rich, including full manual operation, and fully automated controls for quick point and shoot snap shots.

People looking to step up to medium format from an automated 35mm camera like the Nikon 35Ti will love the simplicities of the Fuji GA645 models, they both function basically the same, of course size being another matter.  So you don’t know how to meter light, no problem, the camera does that for you.  And you don’t know how to focus rangefinder cameras, no problem, its auto focus system is very accurate, and there’s no rangefinder to fiddle with.  Do you like to write down your exposure settings for future use; well, you can keep your pencil in your pocket, the camera records the date and exposure settings along the film margins, not in the picture area!

With the introduction out of the way, let’s do a walk around of the Fuji GA645, and see what kind of performance this expensive mid 1990s medium format camera can deliver today!


Name; Fuji GA645 Professional.

Manufactured by; Fuji Photo Film Co., LTD., Tokyo, Japan.

Made in; Japan.

Date of manufacture; Approximately 1995-97.

Price; around $1300 US in the late 1990s according to photo magazine ad from a NY city discount dealer.  ebay prices start around $500 for a good working model, and go up past $800 if it comes with a low shutter count, box and all the original contents.

Build material; appears to be a mixture of metal and plastic.  Fit and finish are very good.

Box contents; camera, instruction manual, a softcase, neck strap, hood and cap.

Weight; my measurements ready to shoot; camera with hood and batteries, 28.4oz (805g).

Dimensions; my measurements; 6.5″ (169mm), 4.3″ (110mm) tall, and 2.6″ (69mm) deep.  All dimensions include protrusions.

Focal length; 60mm.  60° diagonal angle of view.

Aperture;  F/4-F/22 auto or manually set in half stop increments.

ISO; 25-1600 manually set in 1/3 stop increments.

Focusing distance; 27″ to infinity, or 0.7m to infinity.  Auto focus sets the shooting distances in 870 steps, but uses 14 steps in the viewfinder.

Viewfinder; ‘portrait’ orientation illuminating window type bright frame finder with automatic parallax correction.  Manual states 93% coverage at infinity, 91% at 1 meter, with a magnification of 0.5x.

Light meter; TTF, through the finder center weighted light metering SPD photocell.

Approximate resolution; good film and technique will make very sharp 16×20″ prints.  See sample images farther down the page.

Distortion; none of my images show any discernible distortion.

Light fall-off; I see moderate “corner shading” when shooting at F/4; at other apertures I don’t see any.

Color fringing; none that I notice.

Back ground blur or “bokeh;” looks good when close to the subject at wide apertures, see picture below.

Lens; Fujinon Super-EBC (electron beam coating) 60mm F/4 multi-coated, 7 elements in 6 groups.  Uses 52mm filters, B&H, Amazon, eBay.

Shutter and speed; super quiet electronic auto exposure inter-lens shutter with buzzer so you know when it trips!  Speeds from 2 seconds up to 1/400 from F/4-9.5, and 1/700 from F/11-22, plus bulb mode.

Film; standard 120 or 220 roll, with a picture area of 56mm x 41.5mm.  The “6×4.5” picture area is 2.7x larger than 135 film.

Flash; built-in pop-up type, guide number of 12 at ISO 100, not user adjustable in power.  Fill flash only in aperture priority and manual modes.

Total shots indicator; push in the exposure compensation (+/-) button and hold, then turn the selecting dial from off to ‘ISO.’  It reads in increments of 100, and says it may have up to 200 test shots from the factory.

Power; two CR123a 3V lithium batteries, sometimes available at your local grocery/drug store, or these shops; B&H, Amazon, eBay.  Fuji claims the batteries will last for 3000 shots with no flash use.

Accessories for this model; Fuji GA flash bracket, Fuji Strobe GA, and a Fuji GA Close up lens kit No. 5.  I’m not sure if the close up lens kit is for use on the ‘Wide’ model, but I’m guessing it is since both cameras are the same outside, as well as close focusing distance.

Crippling features and omissions; nothing really bad, the only minor item would be TTF metering, and that means you have to manually compensate when using filters.

Good features; excellent lens, very accurate metering and focusing, auto parallax adjusting, self timer, auto first frame positioning, auto film advance, last shot beep, ±2.0 exposure compensation in half stop increments, and manual focusing via dial setting.  I also like the pop-up flash, which is rare for a medium format camera.

Quirks; you only get 15 shots per roll, not 16 as some information suggests; only the newer “i” models get 16.  Also, the camera works normally with the cap on, and you can see through the viewfinder, but you’ll get no pictures.  The best way to avoid this is to leave the cap off, and put the hood on, that way you can’t attach the cap; at least on this model.  The newest version GA645Zi has a lens cap warning beeper.

Problems; most of these cameras seem to suffer a bit from erratic “jumping” or “skipping” when using the up-down wheel.  For example; when you want to go from F/9.5 to F/11, (which is one click), the settings may jump to F/22, or down to F4 etc.  Apparently, according to several internet posts, some sort of factory lubricant used near the up-down dial has crept about, and is causing the problem.  My camera has this problem too, but it really doesn’t bother me at this point.  It sounds like it’s a fairly straight forward fix even for an amateur.

Other versions; there is a GA645W with a wide angle 45mm F/4 lens, but everything else is the same.  There are also versions ending in “i” such as GA645Wi that have (among other things) two shutter buttons and a bar code film reader that automatically sets the film ISO.  There is one with a 55-90mm zoom lens also reviewed here called the GA645Zi.

Go here to see the owners manual for the “i'” version, and make sure you tip the site owner.

Product shots with descriptions.  Click pictures for larger versions.

The Fuji GA645 ready to go; the screw-on rubber hood doesn’t cause any blockage of the flash.

On top we have a hot-shoe in the middle, and LCD panel on the right showing ISO, shutter speed, film type, shot number, aperture, focusing distance, AF or MF, flash ready, battery indicator, and other data.  The large up-down dial wheel is for adjusting settings like aperture, ISO shutter speed etc, oddly, it goes down when turned clock wise, that seems counter-intuitive.  The +- button is for exposure compensation, and holding it down while turning the dial adjusts the shutter speed in manual mode.  The AF button is for setting either auto focus or manual focus; and last but not least, the large silver button at the top of the grip is for tripping the shutter.

On the left we have the battery cover that holds two CR123a lithium batteries, with access by coin slot screw .  The ¼-20 tripod socket is centered on the lens.  The small little button to the right bottom is for mid-roll rewind.  The two black circles are film loading knobs that you release via a red button inside the camera.  Just visible is the gray colored MF button located under the lens.  Press and hold while turning the up-down dial sets the focus manually.

The back of the camera is relatively uncluttered; the big square in the middle is a film reminder slot, the film box end fits nicely in here.  The viewfinder in on the top left.  You can use Nikon “F” style eye-pieces like these  Nikon FM, FE, FA  on this camera, and they’re interchangeable with the larger Fuji GW series.  Go here for the review of the 6×9 big brother of this camera.  The next dial is for selecting either ISO, Program mode, aperture priority, and full manual operation.  The left gray button is for setting data such as date and imprinting on the film edges.  The middle button is for the self timer.  The black button is for popping up the flash.

The gray lever type catch on the right side opens the rear cover.  On the inside of the back cover we have the film pressure plate, which can be adjusted from 120 to 220, and after doing so, it will show up on the LCD.  The two red buttons are for popping out the film loading knobs so you can load your film, then press the knobs up until they lock.  While loading the film you can jog the take-up spool for easier flap insertion into the spool slot by turning the up-down dial; the power doesn’t have to be on for it to work.

Note: here I used the same image from the 45mm F/4 wide angle review camera.  This is the information you get on the margin of the film if you scan outside the picture area; I’m only showing one edge here, and you don’t normally scan beyond the picture area, especially if you’re using masks for flat scanning.  I set the data to show the date and camera settings, but there are other settings to choose from.  Reading from left to right, (or top down here), the date reads 18-2-20, or the 20th of February 2018.  ‘M’ is manual mode, ‘F8.0’ is the aperture, ‘1/60’ is the shutter speed, and ‘AF’ is autofocus.

The data info is red for a positive image, but it will be bluish green when viewed as a negative.  Also, the information is easy to read here, however, when you’re actually looking at the negative, it’s really small, and you’ll need a magnifying glass to read it.

Both prime lens models of the GA645 series.


Sample shots below.

Here are a few samples for your viewing pleasure.  They’re about 5500 pixels wide.  Click images for a larger version.

Cholla Cactus, F/4.  Distance is the same as a torso shot of people.  Background blur is harsh in the corners.  Kodak Ektar 100.

Geraniums at F/4, close focus.  Central bokeh looks pretty smooth, but gets busy towards the corners.  Kodak Ektar 100.

For the test shots below I used Fuji Provia 400x, which is a high-speed Color reversal, (slide) film that has some good qualities, but also has a bit less resolution and more grain than Fuji’s other color reversal film.  With that said, I really like the film, and use it in the late afternoon quite often with medium format cameras.  Unfortunately, this film has recently been discontinued; and good luck finding fresh film at any reasonable price.  All pictures below were scanned and saved at 5500 pixels wide.

Leo’s Drugs, F/4.  Depth of field is pretty substantial with this lens given a little distance.  Fuji Provia 400X.

Harbour town, F/13.  Fuji Provia 400X.

Late sun, F/11.  Fuji Provia 400X.

Crescent Ave walk,  F/11, Fuji Provia 400X.

Test scene below.

All test shots are displayed at 5500 x 4125 pixels wide when enlarged, and that’s all the resolution included in the film.  Scanned on a Nikon Coolscan 9000 ED.

Here is our standard Mountain test scene, this time using Kodak Ektar 100 film.  A tripod was used, but no filters.  Click to enlarge.

F/4.  Quite sharp with plenty of contrast here, even along the sides.

F/5.6,  about the same as F/4.

F/8.  Nice jump in resolution and contrast at this aperture.

F/11.  The extreme sides are as sharp as the centers; I see no diffraction softening yet.

F/16.  Here the image softens very slightly due to diffraction.


Conclusion.

The Fuji GA645 turned in a great review, just like the ‘wide’ model I reviewed, they’re almost the same camera, so I was not surprised at the outcome.

There are a lot of positives to mention for this wide angle camera:  the lens is very sharp with plenty of contrast, even when used wide open; the exposure metering system is excellent, which is a must for color reversal or “slide” film, and the focusing is dead-on in good light.  Having a pop-up flash on a medium format camera is a rarity, and I actually use it quite often for fill when photographing people.  I generally don’t use program mode, but it works just fine if you’re a point and shoot person.  Another real plus is the date and exposure imprinting on the negative margin, that saves me from having to stop and write down my exposure settings after each shot.

I don’t see any real downers for this camera, but just for fun let me mention a few items that could’ve been implemented or improved in the updated model.  Low light focusing is not always spot on, but only noticeable at wide apertures.  It takes two sometimes pricey batteries that may not be available at your vacation destination, so keep a spare set handy.  Filter use requires compensation (really easy to do though) as the metering is through the finder.  Also, don’t forget the camera will work just fine with the lens cap on, so don’t forget to take it off at the start of your picture taking session, otherwise, no pictures for you!!

I like the Fuji GA645, it provides substantially more resolution than 135 format cameras, which will show up when making large prints, or looking at your images on a 5k screen.  The actual picture size on the film is also much larger than 135 format, (2.7x the area), which makes direct viewing of color transparencies more enjoyable.

I’m just thinking out loud now, but I wish Fuji would’ve made the wide model even wider, like maybe 38mm, which would make it similar to a 24mm in 135 format.  The differences between 45mm and 60mm is not really all that much when photographing landscapes; but for interior work there’s a big difference.

Anyhow, when it’s all said and done, theFuji GA645 is a precision tool for the discriminating photographer, and ironically, equally suited for the novice because of the well implemented fully automated features.

Please consider buying through my links and help support the site. Thanks for visiting!

Here’s a quick comparison of the resolution between two excellent fixed lens cameras, the Olympus 35 SP, and the Fuji GW690III.  Both cameras have the same aspect ration, and about the same coverage and depth of field, that’s why this comp will have some value if you want to know the quality you’ll need for large print sizes.  Of course there are other differences between the two films sizes other than just resolution potential, but this is just a quick write up until I dedicate a post to the subject.

The Olympus 35 SP has a 42mm lens, and uses 135 cartridge film, known by hobbists as “35mm” film, which isn’t actually 35mm for the imaging area, but that’s for another post.  Image area is about 24x36mm

The Fuji GW690III has a 90mm lens and uses 120 roll film, with a size known as 6×9, but it isn’t actually 6x9cm, that’s also for another post.  Image area is about 56x83mm

Both lenses are widely known to be extremely sharp, and have very similar coverage areas; the Fuji would be about 40-41mm converted to 135 format, so it’s at a slight disadvantage for this comparison.

To sum up the two images quickly; I’m actually surprised at the Olympus 35 SP, it holds up pretty well for having such a small negative, and of course is a much smaller and handier camera.  However, if large prints are you you are looking for, the Fuji really shows much more detail than the Olympus.  The most significant difference as far as I’m concerned between the two is not so much the resolution, but how much cleaner the Fuji is at large sizes; it’s very obvious in the crops.

A big plus for people who only print 8×10″ or smaller is that you can carry a much smaller and less expensive camera like the Olympus 35 SP, and the pictures look the same as a camera with a much larger negative, like the Fuji GW690III.  Just between you and me; I’d rather carry the Oly for most of my photo excursions.


Technical aspects for the comparison:

Olympus original image is 4000×2667, the Fuji is 9000×6000.  The Fuji film negative is over 5 times the area as the 135 negative used in the Olympus.  The Olympus crop has been upsized to match the Fuji.

The time of year is different by about a month, but the time of day is pretty close; you can see this in the foliage and shadows.  The Fuji was taken in March, the Olympus in April.

The Olympus shot was taken at F/8, and the Fuji GW690III at F/11.  Tripod used, no filters. Kodak Ektar 100.

Crops below.

Olympus crop from center.

Fuji crop from center.


Here are the original files where the crops were taken from. Click for full size images.

Olympus 35 SP, F/8.  4000×2667.

Fuji GW690III at F/11.  9000×6000.

That’s it for this quick comparison!

I’ve decided on a standard aperture test scene for the camera reviews; it’s the mountain scene above.  I like it in that is shows different levels of detail, and it lowers the probability of focusing errors as the distance is usually at infinity, and that particular focus setting is easy to test for accuracy.

The Olympus 35 SP has been updated with the new test scene; the old ones were from color reversal film, (Fuji Velvia 100), and I didn’t like the way they looked when I took them just before sunset.  The new pictures really show the details much better, and the lens seems even more impressive now; I know that’s probably hard to believe, but it’s true, check it out yourself.

Both the Fuji GSW690III, and GW690III reviews have been updated as well with the mountain test scene, and I’ve included a few additional details as a result of further use; plus I tweaked the specifications section to match up better with the current review format.

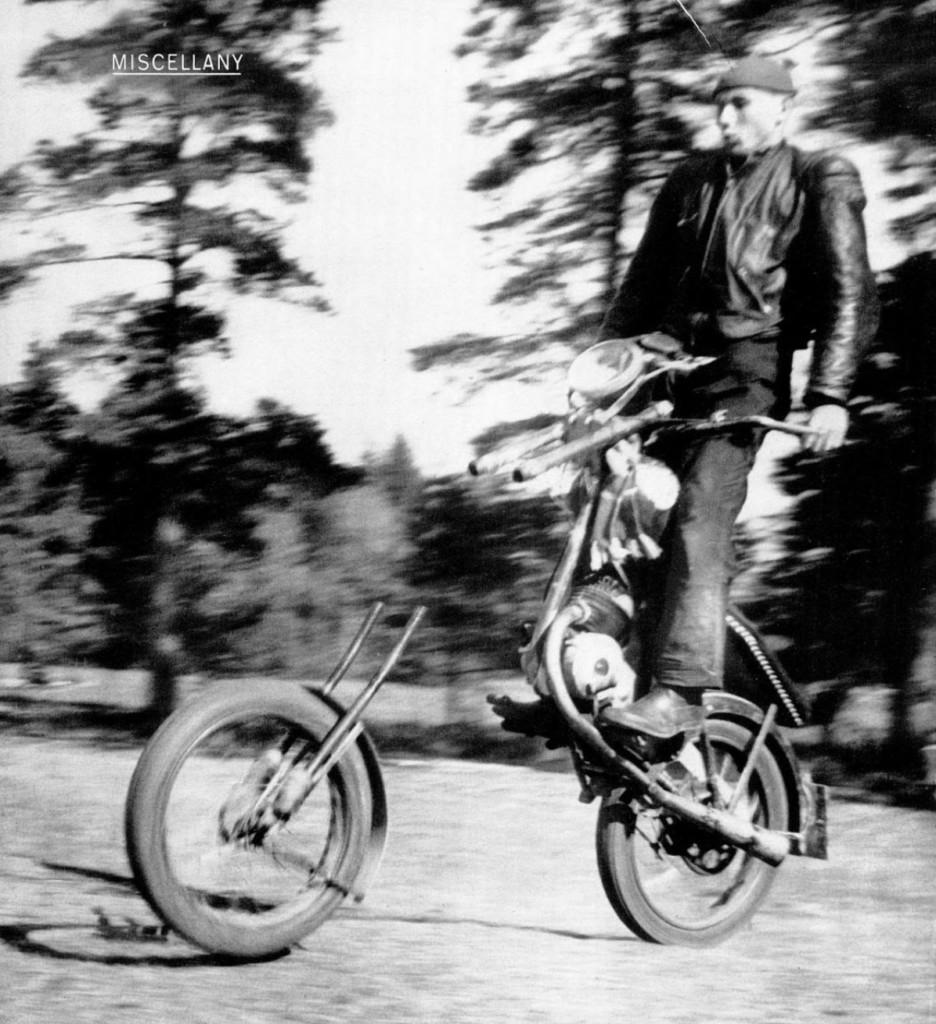
Think you need a $4500 Sony A9 and expensive trick lens to take fast action shots?  The photographer that caught this moment was probably using an early 1950s rangefinder, or a press 4×5 with sport finder; try using one of those today in a similar situation and see if you can come up with anything remotely usable.

Swedish amateur motorcyclist and stuntman Roine Loeow decided to perform a trick called “the cavalier start” (where the machine “would rear like a bucking horse”) for the local crowd on a sleepy Sunday in Uppsala Sweden, when he suddenly lost the front fork and wheel of his motorcycle in the process.  The caption says he came out it “miraculously uninjured” due to the fact he was wearing a high-tech knit cap helmet.

This story ran in the January 17th 1955 edition of Life Magazine, and I got it from Google books.


I bought this weeks review camera brand new in 1989; it was a K-Mart blue light special blister-pack model and I think I paid about $45 for it.  I wanted to take some pictures of a house I was renovating, and did not have any other camera available.  At the time I thought I’d take a few rolls of what I needed, toss it in the drawer, and eventually it’d head to a garage sale or dumpster.  When I bought it way back then I didn’t think I’d be using it almost 30 years later.  I still get a kick out of running a roll through it every once in a while; the technical image quality is pretty good, about the same as a top line $900 cell phone camera, but much quicker and easier to operate, and a whole lot less expensive; pick up a nice copy on ebay for less than $10, or even less at a garage sale.

Oddly, I can’t seem to find a single page of information on Google for this particular model, even when scouring the Canon Museum site.  I see plenty of Canon Snappy ‘EZ’ and Prima Juniors, but they do not exactly match my model, and have slightly different features.  It looks like the Snappy 30 is a stripped down version of those models.

So is this a super rare model, made only for a brief period by mistake?  Or was it so awful that Canon doesn’t want to remember it?  Either way, let’s take a closer look at the Canon Snappy 30.

Name; Canon Snappy 30, similar to the Canon EZ, Canon Snappy K, CB 35 or Prima Junior in Europe.  Oddly, the Olympus trip S uses the same basic camera but with a minor face-lift.

Manufactured by; Canon Inc. Tokyo, Japan.  Made in Malaysia.

Date of manufacture; late 1980s, early to mid 1990s?

Price; K-Mart blue light special around $45 in 1989.

Build material; black plastic body with a clear plastic window over the view finder, flash signal, and film reminder slot.

Weight and size; camera with batteries, 9.2oz (261g).  Camera only 7.0 oz (200g).

Dimensions; Size is 5.1″ (129mm) wide, 2.9″ (73mm) high, and 2.0″ (52mm) deep.

Focal length; 35mm.

Aperture; main aperture at ASA 100-200 is F/8.  When setting the ASA to 400, the aperture goes to about F/11-16, see images below.  With the flash switched on, the aperture opens up fully to F/3.8, but only when the ASA is at F/100-200; when at 400, the aperture goes to back to F8, (from F/11-16); got that?

Focusing; fixed, manual states from 4.6′ (1.3m).  The lens is probably focused around 8-10 feet, or 2.5.-3.0m.

Original print size; standard oversize prints 4” x 6,” at this size any setting used will look excellent, but maybe not flash pictures unless the subject is about 10 feet away.

Approximate resolution; will make good 8″x 10″ prints when the aperture is set to F/8, and excellent at F/11+.  Decent 4″x 6″ prints at the widest aperture with flash.

Lens; coated glass three element 35mm focal length, F/3.8 maximum aperture.

Shutter and speed; two bladed shutter, fixed speed of 1/125 at F/8, and about 1/75 at F/3.5 during flash use.

Distortion; very mild wavy type pincushion.

Color fringing; not much noticeable.

Features; three apertures to choose from, useful flash, semi-auto loading, auto advance and rewind.

Film; all 135 film cartridges, B&H, Amazon, eBay.

Double exposure prevention; Yes.  There is no way to get a double exposure even if you want one without screwing up the camera.

Flash.  Guide number of 10 at ASA 100.  Recharges in 4-5 seconds with fresh batteries.

Power; two AA batteries.  Manual states NiCd not usable.

Viewfinder; bright, but no guide lines or parallax correction.

Accessories for this model;  none, but it came with a roll of Kodak 200 film, a hand strap and instruction manual.

Crippling features and omissions; nothing really, it’s for super quick and easy ‘snappy’ type snapshots.

Good features; three apertures to choose from, flash, and fixed focus, so the camera is ready to shoot instantly.

Product shots with descriptions.  Click for larger images.

The Canon Snappy 30 shown with the lens cover open, which mechanically allows the shutter button to be pushed.  The sliding button on the right is for the flash.  The faint little solid semi-circle to the right of the viewfinder is a space for more advanced models with a low light flash warning, I think it’s a red light you can see through the viewfinder warning of under exposure.

The lens cover slider is under the lens.  The ASA button is on the bottom middle, and is really an aperture selector.  In the 100-200 setting, the aperture is F/8, and at 400 it stops down to about F/11-16.  The battery cover is to the far right; it takes two AA’s.  The little slider on the left is for rewinding the roll.  Unfortunately, there is no tripod socket.

On top we have the shutter button in off-white, and the progressive type shot counter in blue, which resets itself when you open the back.

On the back side we have the viewfinder, which is sufficiently bright, with no guide lines, and a flash ready-light beside it.  The window slot on the back cover is a film reminder.

With the back open you can see the camera has some decent features like a real film pressure plate, a spring steel film tensioner and black felt inside the light chamber.

This is the aperture shape at F/8, which is what you would normally be using at ISO 100-200.

This is the aperture size when switched to ISO 400, and seems to be at least a stop less than the opening above; or maybe two.

The aperture opens fully when you turn on the flash if the camera is set to ASA 100-200.  It’s mechanically attached to the flash switch.  If you have the ASA set to 400, the flash switch sets the aperture back to the F/8 opening.

Here are some test images scanned on a Nikon Coolscan 9000 ED.  All are 3000 pixels wide; there is no additional resolution from scanning at a higher sample rate.  Click for larger images.

A really yellow Palo Verde tree at ISO 400 using Kodak Max 400 film.

Santa Rita Prickly Pear.  Taken at ASA 400 using Fuji Superia 800 film.  Distance is near 10′ (3m), which is about where the focus is set, that’s why is looks really sharp.

A blooming Cholla cactus near 10′ (3m), makes a very sharp subject.  Taken at ISO 400 using Kodak Max 400 film.

A bridge to nowhere.  The sun is low on the horizon, and I should’ve put the camera on the ISO 100-200 setting to allow another stop of light for a brighter exposure.  Taken at ISO 400 using Kodak Max 400 film.

Interior from 1991, or is it 1949?  With the flash on, and set to ISO 100-200, the picture is actually pretty decent.  However, don’t use the flash for landscape images, see the first test shot below.

Monte Carlo in the sunshine state; this was shot at ISO 100-200.  Here you can see the sides are not as sharp as the others above.  The effective aperture here is F/8.  Kodak Gold 200.


Test shots at different apertures.  Bad developing and scanning on this set (not by me this time), and boring Fuji Superia X-tra 800 doesn’t help.  Believe it or not, I had to photoshop these pics to get them to look this good.  All are Fuji Superia X-tra 800 at 3000 pixels wide.  Click for larger image.

This image was taken with the flash on, and the ASA set to 100-200.  Effective aperture is F/3.8.  As you can see, it’s really soft and has poor contrast when taking landscape type shots, however, if you place a subject within flash distance, the image looks much better, see interior image above.  Notice the the very sharp part of the image on the extreme right side, must be the lens elements are not set correctly.

Here we have the ASA set to 100-200, with the flash off, for an effective aperture of F/8.  The image is much sharper overall, with improved contrast.

Now I’ve set the ASA slider to 400, the aperture is now about F/11-16.  This image is quite sharp all the way around, and would make an excellent 8×10″ print if one wanted to waste ink on this photo.


Conclusion.

The Canon Snappy 30 was close to the cheapest 35mm camera you could buy back then, at least brand new; I was broke and needed a camera, so I walked into K-Mart and picked this one out.  I actually like this simple little camera, when set to ISO 400, it’s pretty sharp all over, and would make some nice 8″x 10″ prints.  I guess that’s why I still have it.  Plus, it’s really easy to use, just plop in a film cartridge, stick the leader into the take-up spool, close the back and you’re all ready to go.  You need two AA batteries for the camera to work, but the auto advance and flash are nice features.

The Canon Snappy 30 is not quite as small as the Olympus XA or even the Nikon 35Ti, but it’s very light-weight and fits perfectly in a jacket pocket.  Other things I like about the Snappy 30; you never have to worry about missed focus or spending time trying to manually focus.  It’s always ready, just slide the lens cover open and start shooting!

For the sharpest shots, use ISO 800 film, and set the camera to ASA 400.  Also, when it’s cloudy, or you’re in a low light situation, slide the ISO switch to 100-200 for at least a full stop of extra light, and if things get really dark, turn on the flash, (make sure the ISO setting is at 100-200).  If you don’t want the light from the flash on your subject, just put your finger over the flash and take your snap.

Hope you enjoyed the review of this rare and intriguing camera!

Please consider buying your goodies through my links, doing so helps support the site, thanks!


This amazing 1928 photo, probably taken by San Francisco Photographer Christopher Helin, shows “the new” (1928) Marmon 78 roadster in San Francisco, Ca. (most likely along the First Unitarian Church at the intersection of Franklin and Geary Streets, and around the corner from the Van Ness auto row).

I purchased this 5×7″ glass plate negative from a collector in San Francisco via ebay.  I’m presenting it here at 7000 pixels wide.  I scanned it on an Epson V700 flatbed, which actually did a pretty good job, and is it ever sharp!  Click for larger image.  Check out the dapper driver’s reflection in the chrome headlight and the building across the street; and maybe the photographer in the chrome grill.

As a side note; Christopher Helin was an automotive writer and travel editor for the San Francisco Examiner from around 1915 to 1930.  Check out his ever-growing automobile portfolio, and a self portrait at Shorpy.

Canon 110 ED review, Perfection in Miniature!

The Canon 110 ED was one of the very best 110 cameras of the day.  It had the fastest lens for a while (F/2), until Michael Landon of little house on the prairie started hawking the Kodak Ektramax a couple of years later with a F/1.9 design.  The camera outfit you see above was expensive, and cost about as much as a good 35mm camera, but it did have some advanced features that were missing on most of the 110's, like a tripod socket, a shutter cable release, flash hotshoe, rangefinder focusing, manual aperture adjustments, and an excellent five element lens!

We're going to take a mid 1970s trip down memory lane for this review, so head to the closet or basement and dust off your old 110; it's probably under your bell bottoms and peace sign jewelry.  But before your sentimental photo outing...

Read more »

Fuji Provia 400X samples

Here are a few samples of Fujichrome Provia 400X; it's color reversal film rated at ISO 400.  I really like it for those late afternoon photoshoots with medium format cameras, it allows you to keep the shutter speeds up when the sun is low in the sky.  This is excellent film, and it's almost as fine grained as ISO 100 speed Provia due to Fuji's use of magical Epitaxial Sigma Crystal Technology!!  Check out the Fuji Spec sheet here.

Unfortunately, this film was discontinued around 2016, and the prices now are freakin' ridiculous for fresh dated or refrigerated stock; like $20-$30 per roll!!  I bought a couple dozen rolls before...

Read more »

A quick comparison between 135 and 6×9 film

Here's a quick comparison of the resolution between two excellent fixed lens cameras, the Olympus 35 SP, and the Fuji GW690III.  Both cameras have the same aspect ration, and about the same coverage and depth of field, that's why this comp will have some value if you want to know the quality you'll need for large print sizes.  Of course there are other differences between the two films sizes other than just resolution potential, but this is just a quick write up until I dedicate a post to the subject.

The Olympus 35 SP has a 42mm lens, and uses 135 cartridge film, known by hobbists as "35mm" film, which isn't actually 35mm for the imaging area, but that's for another post.  Image area is about 24x36mm

The Fuji GW690III has a 90mm lens and uses 120 roll film, with a size known as 6x9, but it isn't actually 6x9cm, that's also for another post.  Image area is about 56x83mm

Both lenses are widely known to be extremely sharp, and have very similar coverage areas; the Fuji would be about 40-41mm converted to 135 format, so it's at a slight disadvantage for this comparison.

To sum up the two images quickly; I'm actually surprised...

Read more »

Updates to recent film camera reviews

I've decided on a standard aperture test scene for the camera reviews; it's the mountain scene above.  I like it in that is shows different levels of detail, and it lowers the probability of focusing errors as the distance is usually at infinity, and that particular focus setting is easy to test for accuracy.

The Olympus 35 SP has been updated with the new test scene; the old ones were from color reversal film, (Fuji Velvia 100), and I didn't like the way they looked when I took them just before sunset.  The new pictures really show the details much better, and the lens seems even more impressive now; I know that's probably hard to believe, but it's true, check it out yourself.

Both the Fuji GSW690III, and GW690III reviews have been updated as well with the mountain test scene, and I've included a few additional details as a result of further use; plus I tweaked the specifications section to match up better with the current review format.

Read more »

Surprise On The Rise

Think you need a $4500 Sony A9 and expensive trick lens to take fast action shots?  The photographer that caught this moment was probably using an early 1950s rangefinder, or a press 4×5 with sport finder; try using one of those today in a similar situation and see if you can come up with anything remotely usable.

Swedish amateur motorcyclist …

Read more »

Canon Snappy 30 review

I bought this weeks review camera brand new in 1989; it was a K-Mart blue light special blister-pack model and I think I paid about $45 for it.  I wanted to take some pictures of a house I was renovating, and did not have any other camera available.  At the time I thought I'd take a few rolls of what I needed, toss it in the drawer, and eventually it'd head to a garage sale or dumpster.  When I bought it way back then I didn't think I'd be using it almost 30 years later.  I still get a kick out of running a roll through it every once in a while; the technical image quality is pretty good, about the same as a top line $900 cell phone camera, but much quicker and easier to operate, and a whole lot less expensive; pick up a nice copy on ebay for less than $10, or even less at a garage sale.

Oddly, I can't seem to find a single page of information...

Read more »

Scroll to Top