Photo Jottings - Page 32 of 127 - Photography equipment expertise

Here’s a brief look at the Konica Minolta AF 17-35mm F/2.8-4 (D) lens.  Scroll down for the review.

Lens
Konica Minolta AF 17-35mm F/2.8-4 (D)
Box contents
Front and rear caps, hood, and a users manual.
Cost
$250-$300 on eBay
Build quality
Good
Additional information
No longer produced and no Sony equivalent yet.
Specifications below
Optical configuration
14 elements in 11 groups
Angle of view
104°-63° full frame, 69°-42° APS-C.
Aperture
7 blades, circular
Full frame and APS-C
Yes, made for full frame.   APS-C equivalent, 25.5-52.5mm
Depth of field and focus scales?
Just focus scale
Minimum focus, image plane to subject
13″  (330mm)
Minimum focus, end of lens barrel to subject
6″  (152mm)
Hard stop at infinity focus?
No
Length changes when focusing?
No
Focus ring turns in AF?
Yes
Filter size
77mm
Filter ring rotates?
No
Distance encoder?
Yes
Max magnification
0.19x
Min. F/stop
F/22-32
Sony teleconverter compatible?
No
Length changes when zooming?
Yes
Dimensions W x L (my measurements)
3.3″ x 3.5″   83mm x 88mm
Maximum  extended length (my measurements)
3.8″  (96mm)
Weight bare (my scale)
15.2oz  (431g)  16.04oz (466g) with caps
Requisite product shots.

Aug08/km1735ft.jpg
Front
Aug08/km1735box.jpg
Box and lens
Aug08/km1735bk.jpg
Backside
Aug08/km1735sd.jpg
Side shot fully extended
The Sony A700 and Sony A900 were used for this review.  Go to the bottom of the page for full frame results.  For a better understanding of my review methods and terminology, go here.
Check out the comparison review which includes this lens.
The Konica Minolta 17-35mm F/2.8-4 (D) is very similar to the KM/Sony DT 11-18mm F/4.5-5.6.  They’re both about the same size, same weight, same basic front element and filter, and they perform alike.  The barrel extends out 1/4″ (6mm) when zooming.  This lens can be used on a full frame or film camera, unlike the 11-18mm which is for APS-C cameras only.  The focal length scale is marked at 17mm, 20mm, 24mm, 28mm and 35mm.  The lens is matte black, and looks to be made of a mixture of metal and plastic, with a good build quality.  It has no focus distance window but has the distance scale in FT/M.  It has a metal mount.  The lens says Japan so I assume it’s made in Japan.  The “D” means it has a distance encoder for ADI flash metering, most Sony lenses have this, but not all.  Konica Minolta claims the use of aspherical and AD glass in the lens, no word on how many each.  I believe Tamron made this lens for Konica Minolta.
Filter size is 77mm, which is the same as the Sony 70-200mm, 24-70mm, CZ 135mm, and 11-18mm.

Zooming.  Nice and easy, just right.  The focal length marks don’t correspond exactly to the index marks in the EXIF data.  If the lens marks read close to 29mm-30mm, the EXIF data would show 28mm etc.  No big deal.

Focusing.  Auto-focusing is pretty quick and accurate, manual focusing is OK to good.  These less-expensive lenses aren’t really made to be manually focused, especially on a wide angle.  There is sufficient rotational movement (1/4 turn) for an accurate focus though.

Coma.  Moderate to strong with the aperture wide open, at both ends.  Not really noticeable at F/5.6.
Color looks the same as the newer Sony lineup.
Lateral color fringing.  Control here ok, not great, very similar to, and slightly better than the KM/Sony 11-18 DT lens.  Stopping down does nothing.  Pretty common results among super-wide zoom lenses.
Bokeh.   Not too bad in the centers, but on the image periphery it can be harsh.  I prefer the stopped down look as it is more consistent throughout the image.  Overall, smoother towards wide angle.  See crops below.
Aperture/focal length guide for the Konica Minolta 17-35mm F/2.8-4 (D)
Maximum aperture
F/2.8
F/3.2
F/3.5
F/4
Range
17mm-18mm
20mm – 24mm
26mm – 28mm
28mm – 35mm
The numbers above are pretty normal, the overlapping 28mm on the end is also normal and depends on tiny rotational movements of the zoom ring.
Lens distortion below.

Aug08/km1735brl.jpg
Barrel distortion @17mm.
Aug08/km1735pin.jpg
Pincushion distortion @35mm.


Distortion.  Moderate to strong barrel distortion at 17mm, by 22mm it’s flat, then pincushion starting at 26mm, though pretty mild to 35mm.  Very good from 20-30mm.


Example of ghosting below
2008/1735ght.jpg
Green blobs in left center at 17mm, F/8.
Lens Flare/Ghosting.  The KM 17-35mm F/2.8-4 does a decent job with flare, but ghosting can be strong at times around 17mm, with a long line of green blobs from the sun.  The F/8 shot above was taken in the morning, with the sun just out of the frame.  Veiling flare is controlled well.  F/2.8 shots were very similar to F/8, except the green blobs are more diffused as you open the aperture.  The lens comes with a plastic petal type hood, but doesn’t help with the problem above.  Use your hand for much better control.  Do not use this lens if you like to take pictures with the sun close to the center of the image.  Dead center shots look terrible, see below.  Things look marginally better as you zoom in.
Random samples.
        17mm, F/3.5 sun centered
          17mm,  F/22 sun centered
october08/1735sun.jpg october08/1735sun22.jpg
         17mm, F/2.8
          17mm,  F/5.6
october08/km1735bokf28w.jpg october08/km1735bokf56w.jpg
        35mm,  F/4
         35mm,  F/5.6
october08/km1735bokf4tel.jpg
october08/km1735bokf56tel.jpg


These 100% crops were taken from the center of the image where bokeh looks best, towards the periphery, things get a bit busy, especially on the wide end.  I happen to like the stopped down look best, because the blur shape stays more consistent throughout the image.  The 17mm crops come from the center background about 8ft (2.4m) behind the close focused subject.  The 35mm crops also come from the center about 15ft (4.6m) behind the subject.


Light fall-off below.


                        17mm  F/2.8
                        17mm  F/4
2008/km1728vig.jpg
2008/km1740.jpg

Actual results below with real subject.  17mm @ F/2.8

2008/1735vig.jpg
When you look at the 17mm test charts above, light fall-off appears moderate, stopping the lens down a stop or two eliminates most of the issue.  There’s an overall darkening of the frame at 35mm and F/4, but one stop down and it’s mostly gone.  You can also see by the real picture directly above that Light fall-off is not really noticeable, a good reason not to trust test charts.

Next we’ll check out the center sharpness.

17mm real centers.
F/2.8
Aug08/km173528ctr.jpg
F/8
Aug08/km173580ctr.jpg
The centers using the usual US stamp.

17mm US stamp centers.
F/2.8
2008/17ctr28d.jpg
F/5.6
2008/17ctr56d.jpg
The 17mm centers on the Konica Minolta AF 17-35mm F/2.8-4 are pretty sharp wide open, but there are slight benefits to stopping down.  F/5.6-8 is the peak of sharpness when focusing close.  F/8 up -close doesn’t show any sharper than F/5.6 in my opinion.  The real centers at infinity focus appear sharpest at F/8.  The postal stamp shows little difference between F/2.8 to F/5.6.
Corner sharpness.

17mm real corners.
F/2.8
2008/17cns28.jpg
F/8
2008/17cns80.jpg
US stamp corners.

17mm US stamp corners.
F/2.8
2008/1728c.jpg
F/4
2008/1740c.jpg
F/5.6
2008/1756c.jpg
F/8
2008/1780c.jpg
The US stamp corners show a big improvement at smaller apertures, peaking at F/8-11, but real shots are a bit less dramatic, but worth noting anyhow.

Next we’ll check out the 35mm center sharpness.

35mm real centers.
F/4
2008/35ctr40e.jpg
F/8
2008/35ctr80e.jpg
The centers using the usual US stamp.

35mm US stamp centers.
F/4
2008/35ctr40.jpg
F/8
2008/35ctr80.jpg
The 35mm centers are nice and sharp wide open at F/4, actually falling off at one stop down, but not by much as you can ascertain from the image crops above.  Very good performance here.  The real centers showing no difference except DOF, but the cactus is the subject, not the wall in the background.  The stamp crop sharpness difference is tough to make out too.  Again, that’s good.

Corner sharpness.

35mm real corners.
F/4
2008/44a40.jpg
F/8
2008/46a80.jpg

US stamp corners.

35mm US stamp corners.
F/4
2008/3540b.jpg
F/5.6
2008/3556b.jpg
F/8
2008/3580b.jpg
The 35mm corners are soft at F/4 and F/5.6.  You’ll get a big sharpness gain by stopping down to F/8.  Again, really not a big deal.  On a side note; all images above are 100% crops of the original image.

Close focus image next.

Below, check out the maximum magnification sample.  This shot is a 100% cropped portion of the full size picture.  The sample shot was taken with the Sony A 700 12.2MP camera.  The subject is a standard US stamp, 1″x 3/4″ or 25.4mm x 19mm.  Also, note the macro shot was taken as close to the subject as focusing allowed; In this case 6″ (152mm), measured from the front of the lens barrel to the subject.

Close macro. F/8. click for full size crop. 192kb.


This isn’t the best lens for close-up type shots, but it actually produces a decent reproduction ratio, and a sharp one too.


Full frame results using the Sony A900 below.


Check out the differences when using a film or full frame camera below.  I’m only pointing out the noticeable issues as compared to the APS-C bodies, so if I don’t show it here, the results are not significantly different enough to warrant posting an additional set of images in this section.


Light fall-off


         17mm F/2.8
          17mm F/4
october08/km1735lff28w.jpg october08/km1735lff4w.jpg
        17mm F/5.6
          17mm F/8
october08/km1735lff56w.jpg
october08/km1735lff80w.jpg
         35mm F/4
          35mm F/5.6
october08/km1735lff4tel.jpg
october08/km1735lff56tel.jpg


Light fall-off is worse than the APS-C crops shown earlier.  At 17mm, F/2.8 it shows heavy, and rolls off hard.  There are still some dark corners past F/11.  See real 17mm, f/2.8 image below.  At 17mm, F/2.8, regular UV filters cause slightly more light fall-off in the corners, and regular polarizers cause even more.  Zoomed out to 35mm, there’s nothing to be concerned with.


Random shots from A900 below.


Ghosts at F/11
Light fall-off at 17mm, F/2.8
october08/km1735ghst900.jpg october08/km1735vig2.8over9002.jpg


This lens produces some harsh flare and ghosting sometimes with a full frame camera.  The sun doesn’t have to be very close to the image to cause noticeable ghosts.  Use your hand to shield the sun, the hood won’t help much.  When the sun is in the image, you’re going to have some problems depending on the sun location within the shot.  The shot on the left looks much worse enlarged.  The right image illustrates light fall-off with a real picture taken at 17mm, F/2.8.


17mm corner samples next.


         F/2.8
          F/5.6
october08/km1735cnf28w900.jpg october08/km1735cnf56w900.jpg
         F/8
          F/11
october08/km1735cnf8w900.jpg
october08/km1735cnf11w900.jpg


The corners are softer than the APS-C crops show.  Things sharpen up slightly at F/5.6, (I omitted F/4 as it was the same as F/2.8) then look better at F/8,  F/11 is best.  The exposure differences are from light fall-off.  When shooting landscape scenes, don’t be afraid to use F/11, it looks fine with the A900.


35mm corners below.


         F/4
          F/5.6
october08/km1735cnf4900.jpg october08/km1735cnf5.6900.jpg
         F/8
          F/11
october08/km1735cnf8900.jpg
october08/km1735cnf11900.jpg


The 35mm corners look all-around better than the 17mm crops, they’re much sharper wide open.  Things sharpen up a little each time you stop down until F/11.  There isn’t much difference between the images above, and the APS-C shots in my opinion.


Distortion next.


october08/km1735disb900.jpg
Barrel distortion @ 17mm on A900
october08/2870disp900.jpg
Pincushion distortion @ 35mm on A900


There is moderate to heavy distortion at both ends on the A900, but it wouldn’t be all that noticeable unless you like shooting horizons or buildings close to the edge of the frame.


Coma results with full frame.


F/2.8
F/5.6
october08/km1735cma28w.jpg october08/km1735cma56w.jpg


This is coma @ 17mm on the A900.  It look rough, and doesn’t go away until late in the game, like F/11, though this lens is not the worst offender at coma.  At 24mm, F/5.6, no problems, same at 35mm.


Now for the conclusion.

The Konica Minolta AF 17-35mm super wide angle lens turned in a pretty good performance, especially for $300.  It’s really more appropriate for a full frame camera.  The APS-C equivalent is 25.5-52.5mm.  Let’s look at the high points.  It’s fast wide open, and pretty sharp, and the corners look good a couple stops down.  Cranked out to 35mm, the centers are sharp even at F/4, though the corners benefit from closing the aperture by two stops.  A couple of downers are; distortion is about average for a super wide on an APS-C camera, and color and contrast are lacking compared to other full frame super-wide zooms, though you’ll only see this by comparing other lenses using 100% crops—see comparison review.  CA is a about average for a super-wide zoom, but only noticeable is you’re looking very close.

Full frame users; this lens is very inexpensive for a super-wide, and will perform nearly as good as much more expensive lenses.  See the super-wide zoom comparison page.
So who would buy this lens?  This might be a very economical super-wide choice for people with a film or full frame digital camera, it performs similarly to the Sony 16-35mm F/2.8 when stopped down some and viewed at normal sizes.  If you have an APS-C Sony, and don’t plan on upgrading to a full frame, I’d just get the more useful 11-18mm F/4.5-5.6, or the Sigma 10-20mm F/4-5.6, both reviewed here.
Here’s a brief look at the Konica Minolta AF 28-75mm F/2.8  (D) zoom lens.  Scroll down for the main review.

Lens
Konica Minolta AF 28-75mm F/2.8 (D)
Box contents
Front and rear caps, hood and users manual.
Cost
Current eBay prices run between $350-$450.  Check prices here.
Build quality
Good
Additional information
Check out the similar Sony 28-75mm F/2.8 Sam.  Also consider the better built Minolta AF 28-70mm F/2.8 G.  Sony has the CZ 24-70mm F/2.8 for $1599
Specifications below
Optical configuration
16 elements in 14 groups
Angle of view
75°-32° full frame, 54°-21° APS-C.
Aperture
7 blades, circular
Full frame and APS-C
Yes, full frame and APS-C.   APS-C equivalent, 42-112.5mm
Depth of field and focus scales?
Focus distance scale.
Minimum focus, image plane to subject
13″  (330mm)
Minimum focus, end of lens barrel to subject
5.8″  (147mm)
Hard stop at infinity focus?
No
Length changes when focusing?
No
Focus ring turns in AF?
Yes
Filter size
67mm
Filter ring rotates?
No
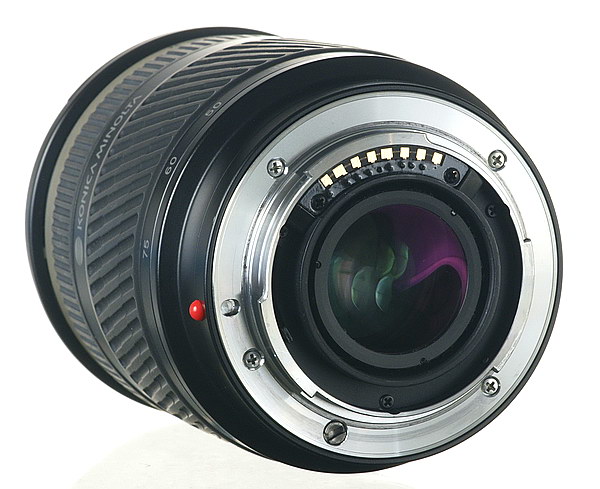
Distance encoder?
Yes
Max magnification
0.26x
Min. F/stop
F/32
Sony teleconverter compatible?
No
Length changes when zooming?
Yes
Dimensions WxL  (my measurements)
2.9″ x 3.7″   73mm x 94mm
Maximum  extended length (my measurements)
5.0″  (128mm)
Weight bare (my scale)
17.9oz  (508g)  18.9oz (535g) with caps
Requisite product shots.

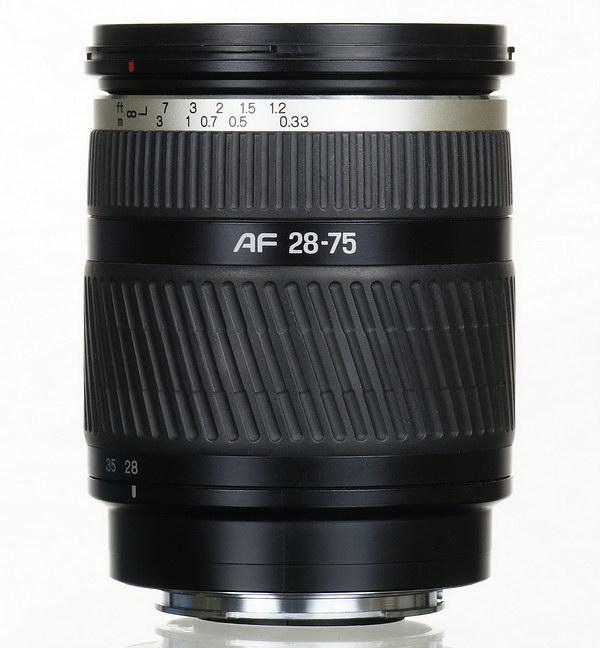
october08/km2875kit.jpg
Box and contents
october08/km2875sd.jpg
Side shot fully drawn in
october08/km2875sdex.jpg
Side shot fully extended
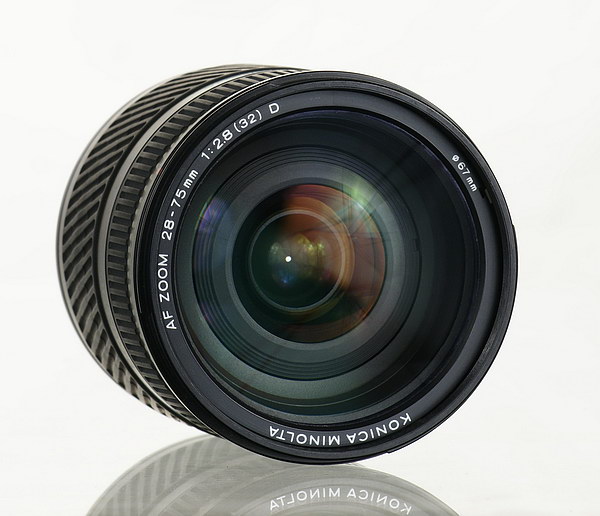
october08/km2875ft.jpg
Front element.
october08/km2875bk.jpg
Backside.
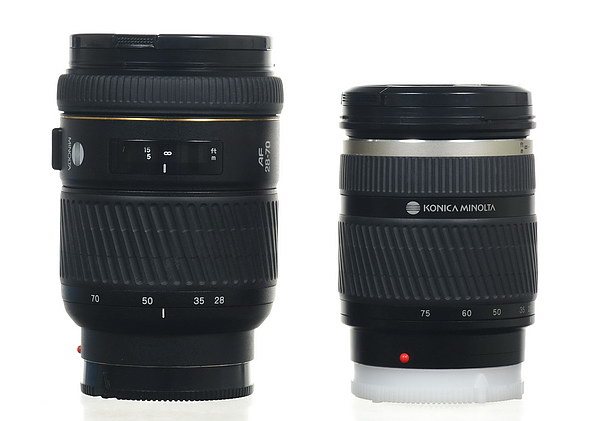
october08/km2875-gcomp.jpg
Comparison to the Minolta AF 28-70 F/2.8 G (on left)
The Sony A700 and Sony A900 were used for this review.  For full frame results, go to the bottom of the page.  For a better understanding of my review methods and terminology, go here.
The (made in China) Konica Minolta AF 28-75mm F/2.8 is a less expensive alternative to the well built Minolta AF 28-70mm F/2.8 G.
This wide to medium range zoom is fairly light, and handles well for the most part.  It has a constant fast aperture of F/2.8 and uses an internal focus design and extending zoom, see images above.  Currently, Sony has a fast lens covering the same basic range as this one, the Carl Zeiss 24-70mm F/2.8, though it’ll cost you three times as much.  The color and texture of the Konica Minolta matches the Sony lenses, but the rubber around the zoom and focus rings looks different.  I like the Konica Minolta rubber better, as it’s easier to wipe off than the closely ribbed rubber of the new Sony lenses.   The EXIF data matches up with the focal length marks, which come at 28mm, 35mm, 50mm, 60mm, and 75mm.  Increments are 5mm apart (after 30mm) in the data, but 65mm is missing, that’s the way it is.  There are no fancy focus lock buttons or limiter switches for you to play with.  The lens is multi-coated with the magenta/green look typical for Minolta the past 10 years.  Konica Minolta claims the use of 3? aspherical, and ? anomalous dispersion (ED) elements in the construction of the lens.
Zooming is easy, and as a consequence, zoom creep is a problem at 28mm.  If you tilt the lens down, it runs out to 35-50mm.  The Tamron version of this lens has a zoom lock switch.
Auto-focusing is quick and fairly quiet, much better than the more expensive Minolta 28-70mm F/2.8 G lens.   It seems pretty accurate, I had no problems with locking focus at F/2.8 in poor light.   Manual focusing takes just over 1/6 of a turn from Close-in to infinity, with no back slop.   This lens has a reversed focus rotation, the same as the 18-200mm and 18-250mm lenses.
Lens flare/ghosting.  Decent, to not very good.  Check out the samples below.  If the sun is near the image, you’ll need to block it with your hand.  If you like taking pictures with the sun in the image, use the Sony kit lens, which has the best control of flare and ghosting of any zoom I’ve tested.  This lens comes with a petal type lens hood, but you need to use your hand for best results, especially at the wide end.  This lens performed better with the sun in, or near the image than the Minolta AF 28-70mm F/2.8 G.
Color fringing.  Very good control here, one of the best lenses in the Minolta/Sony lineup.
Bokeh.  Good at normal viewing sizes, see crops below.  Blur is best wide open, but has an inner circle and is more harsh as you stop down.
Color.  Similar to other Minolta AF lenses.
Coma.  Extremely light at F/2.8, gone by F/4.
Close-up filter.  N/A.
Filter size is 67mm.  This is an odd-ball size, and is used on only one Sony lens, the similar 28-75mm F/2.8 SAM.
Distortion.  See below.  Moderate barrel at 28mm.  Distortion is flat at 35mm, then turns to mild/moderate pincushion.  Average control here.
Distortion examples
october08/2875dis28.jpg
28mm, moderate barrel distortion.
october08/2875dis75.jpg
Moderate pincushion at 75mm.


Random samples


Ghosting and flare, 28mm F/5.6
Sun in picture shot, 28mm F/5.6
october08/2875ghstflre2.jpg
october08/2875ghstflre3.jpg
Bokeh,  28mm F/2.8
Bokeh,  28mm F/4
october08/28752.828cbok.jpg
october08/28754.028cbok.jpg
Bokeh,  75mm F/2.8
Bokeh,  75mm F/4
october08/28752.875bok.jpg
october08/28754.075bok.jpg
Full image extreme examples of flare/ghosting above.  Control is fair at all focal lengths.  In the top left shot the sun was just outside the frame, and sun flare is strong.  With the sun at a more centered position, the results are better, as the right shot shows.  The “sun in picture” shot looks good in this tiny size, the green blob is but one ghost you can see among three that you can’t, you also can’t see a little washed out area by the bushes.  All is not lost though, as this lens performs better than the Minolta 28-70mm F/2.8 G, especially with the sun in the image.  There is no ring present when the sun is centered like the Minolta G always shows.
Bokeh examples above, pretty smooth towards the wide end at F/2.8, then just ok as you zoom to 75mm.  Blur gets a little harsh as you stop down.  Overall, similar results to the Minolta AF 28-70mm F/2.8 G lens.  Samples where taken from the central background area of the image and cropped at 100%.
Light fall-off.
Light fall-off or corner shading is very mild at F/2.8 from 28mm to 75mm.  No problems on a cropped sensor camera, but see full frame results at the bottom of the page.

           28mm F/2.8
             75mm F/2.8
october08/2875vig28.jpg
october08/2875vig75.jpg
Center and corner sharpness.

Below are crops from the image centers at 28mm.

              28mm F/2.8
           28mm F/4
october08/2875wctr28.jpg
october08/2875wctr40.jpg


Now the 28mm corner crops.


           28mm F/2.8
             28mm F/4
october08/2875wcn28.jpg
october08/2875wcn40.jpg
           28mm F/5.6
             28mm F/11
october08/2875wcn56.jpg
october08/2875wcn11.jpg
The 28mm center crops show little improvement by stopping down, what you’re seeing at F/2.8 is a loss of contrast due to spherical aberration.  By F/4 everything is as sharp as it gets, so that’s good.  The 28mm corners are very soft wide open, and don’t sharpen up fully until F/11.  I’ve omitted the F/8 results, but you can extrapolate the difference, which isn’t much.  The sides of the frame are soft also, and sharpen up at F/5.6. Overall, the corners at wide angle don’t look very good, so remember to stop down hard if you’re taking landscape or architectural type shots.
Below, look at the 75mm centers.
           75mm F/2.8
              75mm F/4
october08/2875telctr28.jpg
october08/2875telctr40.jpg


75mm corners below.


           75mm F/2.8
              75mm F/4
october08/2875telcn28.jpg
october08/2875telcn40.jpg
On to the 75mm centers, where the results are pretty much the same as the wide angle shots, pretty sharp at F/2.8, then maybe a hair sharper one stop down, but only visible blown way up on a computer screen.  You can see the spherical aberration at F/2.8 on the side of the A/C unit in both (F/2.8) shots, but there’s still a lot of detail present.   Keep in mind the full images would print out at 45″ (1.14m) long as they appear in the crops using an A700.  The corners really aren’t helped much by closing the aperture, and obviously don’t look as sharp as the centers.
Let’s check out the macro capabilities of this lens.

Below, check out the sample, and click (335kb) to see a 100% cropped portion of the full image.  The sample shot was taken with the Sony A 700 12.2MP camera.  The subject is a standard US stamp, 1″x 3/4″ or 25.4mm x 19mm.  Also, note the macro shot was taken as close to the subject as focusing allowed; in this case 5.8″ (147mm), measured from the front of the lens barrel to the subject.
As close as you can get, F/11.
The Konica Minolta AF 28-75mm F/2.8 has an excellent reproduction ratio of 0.26x, and it turned in a very good shot!  It’s infinitely better at close reproduction than the .09x Minolta 28-70mm F/2.8 G.  This shot was taken at F/11, but there was little difference between that and F/8.

Full frame results using the Sony A900 below.


Check out the differences when using a film or full frame camera below.  I’m only pointing out the noticeable issues as compared to the APS-C bodies, so if I don’t show it here, the results are not significantly different enough to warrant posting an additional set of images in this section.


Light fall-off


         28mm F/2.8
          28mm F/4
october08/2875vigff2828.jpg october08/2875vigff2840.jpg
         28mm F/5.6
          28mm F/8
october08/2875vigff2856.jpg
october08/2875vigff2880.jpg
         75mm F/2.8
          75mm F/4
october08/2875vigff7528.jpg
october08/2875vigff7540.jpg


Light fall-off is worse than the APS-C crops shown earlier.  At 28mm, F/2.8 it shows a little heavy, but isn’t all that noticeable in real shots, see image below.


Full image from A900 below.


october08/2875ffvigl2.jpg


This full scene shows how the light fall-off from 28mm, F/2.8 isn’t as bad as the crops above show.  As I’ve said before, you wouldn’t use F/2.8 in an outdoor, broad daylight scene anyhow!  The small amount you see above is easily cleaned up with vignetting sliders in some photo editing software.


28mm corner samples next.


         F/2.8
          F/4
october08/2875ffcn2828.jpg october08/2875ffcn2840.jpg
         F/5.6
          F/11
october08/2875ffcn2856.jpg
october08/2875ffcn2811.jpg


For some reason, there doesn’t seem to be much different between full frame and APS-C corner crops.  Things sharpen up nicely at F/8, then max out at F/11, maybe one stop down from the APS-C crops.  The centers of these crops are about 250 pixels from the image borders, which would darn near be covered up by a picture frame with a medium sized print.  I’ve deliberately left out the F/8 shots again (here, and below), which don’t look quite as good as the F/11 shots.  The exposure differences are from light fall-off.


75mm corners below.


         F/2.8
          F/4
october08/2875ffcn7528.jpg october08/2875ffcn7540.jpg
         F/5.6
          F/11
october08/2875ffcn7556.jpg
october08/2875ffcn7511.jpg


The 75mm corners don’t change much, you mostly see the elimination of light fall-off.  Things sharpen up a little as you stop down, though it seems there isn’t much point in stopping down.  This is different in what we saw in the APS-C crops earlier.  Such is the full frame predicament.


Distortion next.


october08/2875ffdisw.jpg
Barrel distortion @ 28mm on A900
october08/2875ffdistel.jpg
Pincushion distortion @ 75mm on A900


There is moderate barrel distortion at wide angle, and moderate to slightly heavy pincushion distortion as you zoom out.  The barrel distortion signature resembles a “wave” and is a little harder to completely correct in post-processing.  Overall, an average job at controlling distortion.


Coma results with full frame.


F/2.8
F/4
october08/2875ffcoma28.jpg october08/2875ffcoma40.jpg


This is coma @ 28mm on the A900.  It looks very similar to the Minolta AF 28-70mm F/2.8 G.  It isn’t too bad at F/2.8, one stop down and it’s almost gone.  It doesn’t clear up all that much as you zoom out, and results are mostly the same up to 35mm.  Everything looks good from 50-70mm.  The 100% crops in this A900 section are from the extreme corners and are a portion of the original image.  Printing out the entire image as you might see it on your screen would measure 65″ (1.65m) wide using the A900!


Conclusion. 
For APS-C users; the Konica Minolta AF 28-75mm F/2.8 lens performs very well in the centers at all focal lengths and apertures.  Color fringing, coma and light fall-off are almost non-existent.  There are some drawbacks to consider; the corners need to be stopped down for maximum sharpness.  Figure on at least two stops at wide angle and one stop at the long end.  Additionally, flare and ghosting are not very well controlled, so watch out when the sun is near the image, solve this by using your hand to block the light.  When the sun is part of the image, try to have it centered.  One more item, the image periphery can be soft unless stopped down hard, say F/5.6-F/8.  The zoom range is equivalent to 42-112.5mm, not so great in my opinion.  This lens tested very similar to the Sigma 18-50mm F/2.8.  The sigma has the equivalent range of 27-75mm, much more practical I think, and it may be a slightly better performer depending on Sigma quality control.
For full frame users; you’ll have the same basic problems with flare and ghosting, and more light fall-off.  The corners need several stops adjustment to sharpen up, and the image periphery is not what it should be at the long end-meaning soft even at F/8.  It definitely isn’t as sharp outside the center area as the Minolta AF 28-70mm F/2.8 G lens.  If you really need to use F/2.8, want a smooth bokeh (at wide open aperture), and don’t have much money, this lens may fill your needs.  It’s great for indoor events and people shots, and is currently selling for only half the cost of the Minolta AF 28-70mm F/2.8 G.  Also consider the new Sony 28-75mm F/2.8 SAM.
Here’s a brief look at the Konica Minolta DT 11-18mm F/4.5-5.6 zoom lens.  Scroll down for the review.

Lens
Konica Minolta DT 11-18mm F/4.5-5.6 zoom lens
Box contents
Front and rear caps, hood and users manual.
Cost
$649 retail
Build quality
Good
Additional information
Good lens, but check out the Sigma 10-20mm too.
Specifications below
Optical configuration
15 elements in 12 groups
Angle of view
104°-77°  Sony model reads 104°-76°
Aperture
7 blades, circular
Full frame and APS-C
APS-C only, 35mm equivalent, 16.5-27mm
Depth of field and focus scales?
Distance scale only
Minimum focus, image plane to subject
9.6″  (244mm)
Minimum focus, end of lens barrel to subject
4.4″  (112mm)
Hard stop at infinity focus?
No
Length changes when focusing?
No
Focus ring turns in AF?
Yes
Filter size
77mm
Filter ring rotates?
No
Distance encoder?
Yes
Max magnification
0.125x
Min. F/stop
F/22-29
Sony teleconverter compatible?
No
Length changes when zooming?
Yes
Dimensions W x L (my measurements)
3.27″ x 3.2″   83mm x 81mm  -width is the filter ring, barrel is 2.91″ (74mm)
Maximum  extended length (my measurements)
3.35″  (85mm)
Weight bare (my scale)
12.7oz  (355g)  factory specs
Requisite product shots.

Aug08/km1118ft2.jpg
Front element.
2008/km1118kit97a.jpg
Box and contents
Aug08/km1118sd2.jpg
Side shot drawn in at 11mm.
Aug08/km1118bk2.jpg
Rear element.


The Konica Minolta DT 11-18mm F/4.5-5.6 zoom lens is optically identical to the Sony DT 11-18mm.  I tested both lenses, but decided not to post a seperate review for each one, since they both tested the same, the only difference being the outward appearance, see above.  To find out how the Konica Minolta 11-18mm performed, go to the Sony DT 11-18mm F/4.5-5.6 review.

Here’s a brief look at the Konica Minolt AF DT 18-70mm F/3.5-5.6 zoom lens.  Scroll down for the review.

Lens
Konica Minolta AF DT 18-70mm F/3.5-5.6 zoom lens
Box contents
Front and rear caps, hood and users manual.
Cost
$199 retail by itself, or $100 as part of kit.
Build quality
OK to Good
Additional information
Same as Sony DT 18-70mm F/3.5-5.6
Specifications below
Optical configuration
11 elements in 9 groups
Angle of view
77°-23°  Sony reads 76°-23°
Aperture
7 blades, circular
Full frame and APS-C
APS-C only, 35mm equivalent, 27-105mm
Depth of field and focus scales?
Nothing
Minimum focus, image plane to subject
14.4″  (366mm)
Minimum focus, end of lens barrel to subject
7.9″  (201mm)
Hard stop at infinity focus?
No
Length changes when focusing?
Yes
Focus ring turns in AF?
Yes, lens barrel itself
Filter size
55mm
Filter ring rotates?
Yes, lens barrel itself
Distance encoder?
Yes
Max magnification
0.25x
Min. F/stop
F/22-36
Sony teleconverter compatible?
No
Length changes when zooming?
Yes
Dimensions W x L (my measurements)
2.6″ x 3.0″   66mm x 77mm
Maximum  extended length (my measurements)
3.7″  (93mm)
Weight bare (my scale)
8.3oz  (236g)  9.1oz (259g) with caps
Requisite product shots.

Aug08/km1870ft2.jpg
Front element
Aug08/km1870kt2.jpg
Look at that massive lens hood.


I tested this lens and the optically identical Sony DT 18-70mm F/3.5-5.6, both tested the same so I decided to post just the one review.  If you want to know how the Konica Minolta AF DT 18-70mm F/3.5-5.6 performed, go to the Sony review here.

Here’s a brief look at the Konica Minolta DT 18-200mm F/3.5-6.3 zoom lens.  Scroll down for the review.

Lens
Konica Minolta DT 18-200mm F/3.5-6.3 zoom lens
Box contents
Front and rear caps, hood and users manual.
Cost
$499 retail, but much cheaper when purchased in a kit.
Build quality
Good
Additional information
Plastic lens mount.  Optically identical to the Sony 18-200mm.
Specifications below
Optical configuration
15 elements in 13 groups
Angle of view
75°-8° APS-C.
Aperture
7 blades, circular
Full frame and APS-C
APS-C only, 35mm equivalent, 27-300mm
Depth of field and focus scales?
Distance scale only
Minimum focus, image plane to subject
18″  (457mm)
Minimum focus, end of lens barrel to subject
8.3″  (211mm)
Hard stop at infinity focus?
No
Length changes when focusing?
No
Focus ring turns in AF?
Yes
Filter size
62mm
Filter ring rotates?
No
Distance encoder?
Yes
Max magnification
0.27x
Min. F/stop
F/22-40
Sony teleconverter compatible?
No
Length changes when zooming?
Yes
Dimensions W x L (my measurements)
2.9″ x 3.4″   73mm x 85.5mm  factory specs
Maximum  extended length (my measurements)
5.95″  (151mm)
Weight bare (my scale)
14.3oz  (405g)  factory specs.


Requisite product shots


18200kit.jpg
Box and contents.
18200kit.jpg
Plastic lens mount.
18200kit.jpg
Fully extended.
Aug08/km18200ft2.jpg
Front.


This lens is optically identical to the Sony 18-200mm F/3.5-6.3.  I tested both lenses, but decided not to post two separate reviews because there is no difference other than the outward appearance, which you can see above.  To find out how the Konica Minolta 18-200mm performed, go to the Sony 18-200mm review.

Aug08/kmfrontlens2.jpg
Model
Price
$899 7-05 kit
Effective pixels
6.1
LCD monitor
2.5″  115,000 pixels
Lens
Zoom
Recording media
Compactflash I & II
Image stabilization
Yes, in body
ISO range
100/3200  lo80, hi200
Manual controls
Most certainly
Shutter speed
30 sec – 1/4000 sec
Optical viewfinder
Yes, 95%
Sensor size
23.5mm x 15.7mm   APS-C size
AF assist lamp
Yes, on flash
Timer
10 sec – 2 sec delay
Flash
Yes
Movie mode
No
Power source
NP-400 rechargeable
Dimensions
5.14″w x 3.64h x 2.62d   130.5mm x 92.5h x 66.5d
Weight
21.0 oz – 590g without battery
Additional info
anti-shake in body, less expensive than Maxxum 7D
Below is an explanation of my review methods and terminology.  Hopefully this will help clear up any questions you may have concerning how I test a lens. 
I set up this page the same as a regular lens review, so if you want testing information about something in a certain part of a lens review, go to the same section below.
Lens
SAL-??F28  Sony ??mm F/2.8  This line lists any product code and/or official retail name for the lens.
Box contents
Listed here is what came in the box, such as a case, hood and owners manual.
Cost
I list Manufacturers retail price for Sony lenses.  Street prices are for aftermarket lenses like Sigma which often sell for a deep discount rather than their MSRP.  Used lenses like Minolta are sometimes listed using current eBay prices.
Build quality
Build quality means fit and finish, plus mechanical performance like zoom dampening, and focus control.  The lens doesn’t have to be built heavy with all metal construction to be labeled “very good.”
Additional information
Included here would be information such as “the same as tamron model xx” or “rebadged Minolta” which means in both cases the lens is being used by Sony, though they didn’t design it.  Also, additional info could list lower cost alternatives to the model in review, or any out of the ordinary feature of the lens.
Specifications below
Optical configuration
XX elements in XX groups.  Self explanatory, and not really useful for the photographer.
Angle of view
This is the coverage of the lens, usually measured on the diagonal.  There are different coverages for full frame and APS-C, that’s why I list them separately.  The larger the number, the more area you can see through the viewfinder.  Angle of view numbers tend to be less than accurate for some reason, so don’t try to compare them directly to other similar lenses.  I use the factory specs when available (most of the time), and guess when unavailable (rare).
Aperture
How many blades make up the aperture.  Usually 7 or 9 for Sony, and 6-8 for Sigma.  Sony uses mostly curved blades (circular aperture) now, as opposed to straight blades.  Out of focus areas may look better with curved blades at wide open to two stops down, straight blades may show a polygon shape at that aperture.  When stopped down hard there is no difference between the two.
Full frame and APS-C
All Sony/Minolta/Konica Minolta AF lenses will work on any Sony/Minolta/Konica Minolta AF camera.  This includes compatible after-market lenses also.  If you use a film or full frame digital camera, you may not be able to use the entire area with “DT” lenses, which have a smaller imaging circle, and are built for APS-C cameras only.  If you use a made for full frame camera lens on an APS-C camera, you’ll have to figure in a crop factor of approximately 1.5 (Sony) when figuring coverage.  So a 50mm lens used on an APS-C camera would produce an image with coverage equal to 75mm, 50 X 1.5 = 75mm.
I also list full frame coverages of “DT” lenses which are for APS-C cameras only.  I do this because some of those lenses show almost full coverage when mounted on a full frame camera, so if Sony offers an option in the future which allows use of “DT” lenses without the automatic crop feature, you may be able to cut down on the lenses you carry or have to buy.  It’s not likely to make much difference, but I show it for those people that are curious.
Depth of field and focus scales?
Depth of field scales are usually seen on non-zoom lenses like 50mm F/1.4, 28mm F/2.8 etc, but occasionally come on zoom lenses, like the Sigma 12-24mm.  Focus scales are common, and show up either written on the barrel or in a window.  Cheap lenses usually show nothing.
Minimum focus, image plane to subject
This is the distance the manufacturer gives for the closest focusing distance from the image plane to subject.  The image plane is the film or sensor.  Most of the time you can get closer than these figures.
Minimum focus, end of lens barrel to subject
This is not the same as above, and differs in that the closest focusing distance is measured from the end of the lens barrel, or farthest protruding part.  This is more useful to the average photographer.
Hard stop at infinity focus?
Some lenses cannot be focused past the ∞ mark (infinity), and stop at that point.  Some lenses will focus a short distance past the infinity mark, in part to allow for thermal expansion, and utilize the extra space to achieve proper focus.
Length changes when focusing?
Some lenses focus by extending the front section, usually not more than .5″ (6mm).
Focus ring turns in AF?
When in AF mode, and the AF is actually functioning, the focus ring will turn so you can’t hold that portion of the lens during this time.
Filter size
This is the size of filter that screws on to the front threads, and also is usually the same as the front protective cap, measured in millimeters.
Filter ring rotates?
If the filter ring turns, your polarizer and graduated filter will turn, messing up the alignment.  Now days, only cheap kit-type lenses have filter rings that turn.
Distance encoder?
Distance encoders (integration) are used primarily for proper flash output, and combine readings of the lens focal length, focusing distance and exposure reading .  If your lens has eight pins or square metal contacts on the back, it most likely has distance integration.  Not all Sony lenses have this.  If the lens has only five contacts, it doesn’t have it.
Max magnification
This is the maximum reproduction ratio, or magnification.  This figure will represent the equivalent coverage of 135mm film.  Look for different listing styles, but they mean the same, like 0.3x, which is about a third life size, also written as 1:3.  Also shown on some specs pages (for example), 1:4, which is the same as 0.25x, (quarter life size), 1:1 for 1.0x (full life size), or 1:7.1, the same as 0.14x.  Check this by dividing one by the following number to convert, like this; 1÷7.1=0.14. Or to convert the other way; 1÷.14=7.1.  The closer the number to 1.0, the larger the subject will be magnified.
Min. F/stop
The minimum (smallest aperture at that zoom length) is listed first at the wide part of the zoom, and the last is the telephoto end, such as F/22-F/29 etc.  Example; a Sony 24-105mm lens will have a minimum aperture of F/22 at 24mm, and F/29 at 105mm.  On a non-zoom, there’s only one minimum.  Also, the minimum F/number may be different if you use exposure steps in 1/2 EV, or 1/3 EV.  The default setting from Sony is 1/3 EV, and that’s the setting I use to list the minimum aperture numbers.  If the minimum aperture reads F/29 on your camera, it may read F/27 using 1/2 EV, that’s why there’re some discrepancies in these numbers from the Sony site specs, and my specs.  It’s no big deal, nobody uses those small apertures anyways, diffraction softens up the image immensely.
Sony teleconverter compatible?
Is this lens compatible with Sony tele-converters?  Any lens will take an after-market tele-converter, but I wouldn’t buy one at any price.  purchase only Sony tele-converters for Sony lenses for the best results.
Dimensions W x L (my measurements)
Width is the widest point on the barrel, though sometimes I give extra measurements from the filter ring, or a switch, which sometimes is the widest part.  The length is from the lens mounting surface to the end of the barrel at the shortest length, zoom fully retracted and focusing fully drawn in.
Maximum  extended length (my measurements)
Maximum length after zooming and any focus extension.  Measurements are from the lens mounting surface to the end of the barrel.
Weight bare (my scale)
I have my own calibrated scale, and use that for weighing the lens bare, and with caps and sometimes accessories, like tripod collars etc.  This may be different from the factory specifications.  Don’t trust Sony’s figures, they are sometimes way off.
Requisite product shots.
october08/20mmft2a.jpg
Bulging front element
october08/20mmkita.jpg
Box contents with no box
october08/20mmxrayb.jpg
X-ray view, Sony screen grab.
The product shots above (just a couple of random samples ) are used to identify the lens reviewed, with views showing the back, side, zoom extended, interesting features, box contents, front element and X-ray and/or MTF data.  All shots are of the actual lens reviewed, taken by me.  MTF data, when available, is usually incomplete, this is all I can find from the manufacturer, so I offer it to those that like to check out the graph for kicks.
In the section below the product shots, I provide information on cameras used for testing, build quality, focusing, interesting qualities or features, and all around performance.
Filter size.  As I said above, the size of the front threads, and the lens front cover size.
Normal filters.  Do the use of filters on the front cause any problem like vignetting, also called dark corners or light fall-off.  Most of the time I indicate the issue with regular filters, not the thin type which are more expensive, but cause fewer problems.
Coma.  Coma is an artifact of spherical aberration, and shows itself as oblong shapes mostly in the corners of images at wide apertures in wide angle lenses.  I usually provide sample crops.
Color.  How does the color look (on an image) as compared to other lenses from Sony, Minolta or Sigma?  I’m not talking about the actual color of the lenses or coatings, rather, the color produced on an image by that lens.  This is mostly hard to define, as the camera may process consecutive shots just a little differently, and is only noticeable as you flip through images on your computer.  I’ve found most Sony/Minolta lenses product a very similar color, and I’m not likely to mention any difference unless it’s very noticeable.
Bokeh.  How does the background highlight blur look?  Do bright points of light look like donuts or ring washers etc, or do they have the same smooth consistency from edge to edge?  I usually provide sample crops.  Background and foreground blur can look different, but background blur is much more common in general photography.  I may comment on foreground blur if it looks substantially different than background blur.
Color fringing.   Are there colors like red/green/purple or blue that occur along the image edges in areas of harsh contrast?  This is called lateral color fringing, and will not go away by stopping down the aperture.  Less common color fringing is called axial, and it can occur anywhere in the image, and is identified by a single color all the way around an in-focus object.  You may notice it in the central area, however, this type of color fringing is normally only visible at large apertures, and it goes away as you close the aperture a stop or two.
Random shots below.  Here I use sample crops and small, re-sized complete images to show how the lens performs optically.
Sun centered, F/5.6
Ghosting
october08/20mmsunctr.jpg october08/20mmffsunretro.jpg
Bokeh, F/2.8
Bokeh, F/4
october08/20mmbok28.jpg october08/20mmbok40.jpg
Coma general scene
Coma scene normal shot
Jan2009/comalmx.jpg Jan2009/cmaover2.jpg
Coma, F/2.8
Coma, F/4
october08/20mmcma28.jpg october08/20mmcma40.jpg


In the top row I usually show re-sized full images of light fall-off, and how things look with the sun in the picture.  Sometimes certain lenses will show a great deal of ghosts, also called color blobs, when the sun or other very bright light or reflection is close to, or inside the image.  The ghosts can become more, or less noticeable depending on the angle of the light source inside your shot.  I often show another example of how the image looks when the sun is centered.  This is usually only a problem for wide angle lenses as some of them show a large ring or “wagon wheel” around the sun when the sun is centered.  This may cause problems with rising/setting sun type shots.  Flare problems are shown here too, alongside ghosting.  Sometimes I use the term “veiling glare” which is a type of flare that may cover the whole image, giving it a soft, low contrast look.  Keep the following in mind when viewing the shots above; the severity of flare and ghosting as it appears on your image depends on many factors, including exposure level, angle of sun or strong light source, aperture, focal length and background content.


The last item to check in the top row or two would be light fall-off, vignetting or corner shading, all the same thing, use whichever term you prefer.  Here I occasionally show how the lens handles this in real pictures, as opposed to the light fall-off samples farther down the page.  I show the worst case, usually at the wide end, with the aperture fully open.


The middle crops show the image bokeh.  Here I take sample crops from out of focus areas, usually the central part of the image not far from behind the subject.  Typically, the points of light should be fairly smooth and even looking, not like donuts or ring washers as I said above.  The look of bokeh depends on many factors, including, background content, lighting intensity, distance from in-focus subject, aperture and of course, the lens itself.  Bokeh can have a different look between foreground blur and background blur.  Background blur is much more common in general photography, that’s why I show the background blur crops.  I use crops from the widest aperture, and one or two stops down.  If it’s a zoom lens, I provide samples from the widest and longest setting.  Keep in mind the crops are displayed at full size, and wouldn’t be very noticeable, if at all, in a normal sized print.


The last row, (or rows) show the signs of coma.  These small crops come from the corners of the image.  Coma turns points of light at the corners into weird blobs, sometimes resembling bats, airplanes or birds.  Most of the time you see this with normal to wide angle lenses with a large aperture, like F/1.4 or F/2 etc, but sometimes it’s bad on a super-wide lens with a F/2.8 aperture.  When stopped down to F/4, the problems diminish greatly.  Aspherical elements help solve this issue, but as expected, the worst coma problems comes from lenses which have no aspherics, such as the following that I’ve reviewed; Minolta 28mm F/2, Sony/Minolta 50mm F/1.4, and the Sony/Minolta 20mm F/2.8.  Don’t worry about this if you don’t take pictures in low light, with sharp points of light around the image periphery.  I don’t show coma crops if there are no problems with coma.


I use clear miniature lights on a fake tree in the corner of the room for determining the severity of coma.  I show the worst of coma, with the aperture wide open, and one or two other crops at smaller apertures.


Distortion below.


october08/20mmdis700.jpg
Barrel distortion.
Jan2009/24105pinx.jpg
Pincushion distortion.
Jan2009/55200disx.jpg
No distortion.


Distortion sample shots come from a house window.  The top image makes the window look like it is bulging out, and is called barrel distortion.  The middle image seems to suck the window in, and is called pincushion distortion.  The last image is flat, and lacks any distortion, this is ideally what you want in a lens, but most often don’t get.


Light fall-off.


F/2.8
F/4
october08/20mmvig28.jpg october08/20mmvig40.jpg
Light fall-off,  vignetting or dark corners all mean the same thing.  I usually take pictures of a white acrylic panel with a light in the back.  I try to show the worst case, which comes with a wide open aperture at either the widest angle or fully zoomed in.  Stopping down the aperture helps greatly to reduce light fall-off.  These are full re-sized images, and haven’t been cropped.
october08/20mmffover.jpg


This is a real life shot of light fall-off, and doesn’t seem to be so bad as compared to the test shots in grey.  I always shoot this image at the setting that shows the most light fall-off, again, at the maximum aperture, wide angle or full zoom.


Sharpness crops.


Jan2009/cornersmpxz.jpg


Here is the general location of the corner corps in the full image.


         F/3.5
          F/5.6
Jan2009/cornersmlcp2.jpg Jan2009/cornersmlcp.jpg


These crops are from the red box in the bottom left corner of the image above, I don’t normally show the whole image.  I start off at the widest aperture, then stop down in one stop increments up to where things don’t get any sharper, usually around F/8-11.  On zoom lenses I show crops from the widest setting, a middle setting, and the longest setting.  I list the focal length above the boxes.  These shots are almost always taken at infinity focus, and always re-shot at least twice to confirm accuracy.  Manual focusing is used and bracketed to make sure the shots are as sharp as they can be.


The centers next.


Jan2009/ctrcpoverz.jpg


Here is the general location of the center corps in the full image.


         F/4
          F/5.6
Jan2009/ctrcpzblr.jpg Jan2009/ctrcpz.jpg


These crops are from the red box in the center of the image above, I don’t normally show the whole image.  The same procedures are used for the center crops as the corner crops.  I use manual focus, and bracket the shots until I get the absolute sharpest shots for each focal range, and aperture, then shoot the set.  Also, I use infinity test distances on most lenses, (except some telephoto) so there are no DOF issues to worry about.


I now put the sharpness crops at the end of the review because of my table width issues.


Close focus sample.
The standard text for this section follows, and is self explanatory.  Below, click for larger image.  Check out the close focus shot, a 100% cropped portion of the full image.  The sample shot was taken with the Sony A 700 12.2mp camera.  The subject is a standard US stamp, 1″x 3/4″ or 25.4mm x 19mm.  Also, note the macro shot was taken as close to the subject as focusing allowed; In this case, x.x” or xxxmm, measured from the front of the lens barrel to the subject.
Jan2009/testmacx.jpg


This is typically the whole scene, or approximate capture area.  I crop the stamp portion and display it at 100%, most of the time with a link to a larger image.  I do this to save on bandwidth, and avoid excessive download times for people with dial-up service.  If the cropped size ends up being small, I don’t use a link to a larger image, the image on the page is as big as it gets.


Since this page was written, I’ve changed to a different stamp, but they’re both about the same size with the same detail.


october08/20mm41mac.jpg
Close focus shot.
My procedures for the stamp test shot at close focus are as follows; a tripod is used, then I start off at the maximum aperture of that lens, and work my way down to about F/11-16.  I use three testing methods for getting the sharpest shot.  The first is manual bracket focusing, I do this to allow for mistakes in auto-focusing, and mistakes by simply looking through the viewfinder to see what looks the sharpest to my eye, which may not be the sharpest shot on a computer screen.  The second procedure is using the auto-focusing system, and setting the stamp to just within AF range and shooting as you normally would.  The third and final method is moving the stamp board ever-so-slightly back and forth with the focus ring turned all the way to close focus, and using manual focus.  Tiny incremental movements in distance can cause noticeable changes in image sharpness when the lens focusing system remains unchanged.
Getting the sharpest macro, or close focus type shot can be extremely hard, and may require considerable thought and set up, especially using large apertures.  The higher the magnification, the harder it is to achieve the best shot.  Lenses with poor close focus ability are not so finicky, and may produce the best shot by simply using the AF system.
Finally, I post the sharpest shot out of the bunch, then show what aperture was used for that image.  Most lenses will have the sharpest test shot around F/8, or about two stops down from the maximum aperture.  Close focus type shots can be far different from infinity focus when comparing sharpness to aperture.  Don’t worry too much about the results of this section, because most people don’t take test shots of stamps, or other super fine detailed objects.  I only include it to show people what they can expect if they would like to indulge in this kind of activity.
Full frame section using the Sony A900.
In this section I show the differences in results when using a full frame (or film) camera, as opposed to the cropped sensor or APS-C sensor (as I call it) camera above.  The full frame sensor is larger, and uses the entire lens’ imaging circle, instead of the middle portion like that of the APS-C sensor when using a full frame compatible lens.  The middle of the lens is the good part, the periphery of the lens is what messes up the incoming light, and causes problems with your pictures.
Most of the differences between the two are light fall-off, corner sharpness, distortion and coma.  Normally, you need to stop down one or two stops to get the same results as the APS-C camera, that’s just the way it is.  Good full frame lenses may show almost the same results as the APS-C crops.  Distortion is the only item not affected (or helped) by stopping down, but most of the time it’s easy to correct in photo imaging software.
My final thoughts.

This section concludes the review with thoughts about how the lens functions on both APS-C, and full frame cameras.  I also include some information on topics such as ultra wide-angle use, or why a person would buy a lens of this type, and any good alternatives etc.


My newer reviews have the test crops in this area, which is at the very bottom of the page.  I do this as the crops tables take up more width than the standard page, and it makes it easier to view the rest of the review without having to scroll across the page.


I hope this page helps you understand my testing methods and the terms I use to describe results.  Let me know if I can do better.

I thought I’d take a few pictures for reference while tearing apart the Minolta AF 28-85mm F/3.5-4.5…the same one used in the “dirty lens article.”  I’m posting the images here just for kicks, I’m not trying to advocate lens repair or adjustment.  I’ve never looked at the guts of a lens, and thought I’d share what I found, so here’s your chance to get a quick glimpse of the different parts used in its construction, and how it all goes together, or comes apart!!  I’m not a lens repair expert, so some of my parts identification terms will not match factory repair manual nomenclature.


April2009/ltd4z.jpg
This is what the lens looked like before I killed it.  If you’re interested to know why I destroyed a perfectly good lens (at first glance), go here and scroll down to the bottom of the page and read the conclusion.
April2009/ltd4z.jpg
It takes quite a jolt to break the front element.  If you want to know how well it takes pictures with this kind of damage, go to the link above.
April2009/ltd4z.jpg
We’ll start by removing the four screws around the mount, then carefully remove the other screws that attach the plastic focal index ring, and electrical contacts.  Some of these tiny screws seem to have some sort of thread locker (Loctite) compound on them, which makes removal extremely difficult, I rounded off several screw heads and ended up having to break something to remove the part.  I had no problem with the mount above, which came off very easy.  Most problems occurred with the very small screws deeper inside the lens.  Also, check out the focusing screw at five o’clock, and the aperture lever at seven o’clock.
April2009/ltd4z.jpg

This is where we’re at so far, and about as far as the amateur will want to go without causing possible irreparable damage.  The rear lens element at the top of the picture unscrews, and would be a easy replacement for the average mechanically inclined person.  The focusing screw will come loose, but is easily put back into place before setting the mount on.  The long spring you see in the center of the image wraps around the inside of the mount, and is used to keep the aperture wide open.  The spring came off during disassembly, so if you want to put your lens back together, make sure you re-installed the spring correctly for the aperture to work.  Also make sure you place all shims back in their proper place and sequence.


April2009/ltd19.jpg


This is the correct position of the aperture return spring.


April2009/ltd7.jpg

This is the only electrical part of the lens, and this particular portion is what carries information to the 5 pin contact strip on the back mount area of the lens, see third image from the top.


April2009/ltd7.jpg


Here we have the focusing screw and transmitting gear assembly that turns the ring around the focusing barrel.


April2009/ltd7.jpg


I call this the transmitting gear, that’s probably not the real name.  It comes out easily with two screws.


April2009/ltd7.jpg


This is the focusing screw, you see the slot-end of this (right side of image) in a hole on the mount.  The camera has a motor and blade that turns this screw for auto-focusing.


April2009/ltd9a.jpg


Here’s a better picture portraying how it works.  The focusing barrel is on top, with the ring gear visible.  The transmitting gear bottom drives the barrel, and the focusing screw drives the top portion of the transmitting gear.  You see the mount at the bottom of the image, the focusing screw slot-end sticks through that hole, and that’s what you see when you look at the bottom of the lens.


April2009/ltd9a.jpg


This is the way the lens looks so far.  If you’ve taken your own lens apart this far, you probably just ruined it.  Oh well, it’s fun to tear something apart, even if you can’t put it back together!!  Notice a couple of lens elements fell out of the front!  The first one was broken of course, the element behind that one might have been held with a band, I can’t remember, the third one is the thick two element(?) piece you see in the image above directly by the lens barrel.


April2009/ltd18.jpg


I call this the aperture housing because it houses the aperture assembly.  You’ll notice the pin on the aperture assemble, and the slot in the housing.  The aperture assemble pin simply fits with the slot in the tang, inside the housing so you know the orientation.  Then a cap fits over the top.  The camera moves the other side of the tang, which sticks through the mount, (shown earlier) then moves the aperture pin and blades.  On a side note; the aperture assembly has three screws around the side, I took two out before I discovered it just falls out after you take the top off.


April2009/ltd18.jpg


This is the orientation as you would see it mounted on your lens, without the covers and all.  Notice the aperture assembly has an element over the blades.  Obviously, the aperture assembly would be inside the housing.


April2009/ltd18.jpg


You’re looking at the other side this time.  The cover on the right has an element inside, and screws over the top.


April2009/ltd18.jpg


Now we have a view with the zoom ring removed.


April2009/ltd18.jpg


This is the zoom ring.  The two cavities you see here hold pins attached to the zoom housing, which in turn, move the barrel, see below.


April2009/ltd18.jpg


I would consider this the zoom housing, though it holds most of the contents of the lens.  I’m sure it’s called something different by the factory.  I believe in macro mode, the silver screw is all the way over to the left.  Right now I think it’s at 28mm.


April2009/ltd18.jpg


This is near full extension.  The silver part sticking up (with threads) screws into the front extension barrel, which houses the front elements.


April2009/ltd18.jpg


The end of the dissection.  Going this far requires either skill and knowledge, or stupidity and muscle, I used the latter.


Interesting facts; I found only seven individual glass elements, including the one I broke.  I’m assuming most are considered multi-element.  The specs say this lens has 13 elements in 10 groups.

 

The only plastic parts I found were the zoom ring and focal index ring.


That’s all folks.  I hope you’ve enjoyed watching me ruin a good lens, hopefully, you won’t be curious enough, or dumb enough to do this yourself.

Konica Minolta AF 17-35mm F/2.8-4 (D) Review

Here’s a brief look at the Konica Minolta AF 17-35mm F/2.8-4 (D) lens.  Scroll down for the review. Lens Konica Minolta AF 17-35mm F/2.8-4 (D) Box contents
Front and rear caps, hood, and a users manual. Cost $250-$300 on eBay Build quality Good Additional information
No longer produced and no Sony equivalent yet. Specifications below
Optical configuration 14 elements in…

Read more »

Konica Minolta AF 28-75mm F/2.8 (D) Review

Here’s a brief look at the Konica Minolta AF 28-75mm F/2.8  (D) zoom lens.  Scroll down for the main review. Lens Konica Minolta AF 28-75mm F/2.8 (D) Box contents
Front and rear caps, hood and users manual. Cost Current eBay prices run between $350-$450.  Check prices here. Build quality Good Additional information
Check out the similar Sony 28-75mm F/2.8 Sam…

Read more »

Konica Minolta AF DT 11-18mm F/4.5 – 5.6 Review

Here’s a brief look at the Konica Minolta DT 11-18mm F/4.5-5.6 zoom lens.  Scroll down for the review. Lens Konica Minolta DT 11-18mm F/4.5-5.6 zoom lens Box contents
Front and rear caps, hood and users manual. Cost $649 retail Build quality Good Additional information
Good lens, but check out the Sigma 10-20mm too. Specifications below
Optical configuration 15 elements in…

Read more »

Konica Minolta AF DT 18-70mm F/3.5 – 5.6 Review

Here’s a brief look at the Konica Minolt AF DT 18-70mm F/3.5-5.6 zoom lens.  Scroll down for the review. Lens Konica Minolta AF DT 18-70mm F/3.5-5.6 zoom lens Box contents
Front and rear caps, hood and users manual. Cost $199 retail by itself, or $100 as part of kit. Build quality OK to Good Additional information
Same as Sony DT…

Read more »

Konica Minolta AF DT 18-200mm F/3.5 – 6.3 Review

Here’s a brief look at the Konica Minolta DT 18-200mm F/3.5-6.3 zoom lens.  Scroll down for the review. Lens Konica Minolta DT 18-200mm F/3.5-6.3 zoom lens Box contents
Front and rear caps, hood and users manual. Cost $499 retail, but much cheaper when purchased in a kit. Build quality Good Additional information
Plastic lens mount.  Optically identical to the Sony…

Read more »

Lens Review Methods and Terminology

Below is an explanation of my review methods and terminology.  Hopefully this will help clear up any questions you may have concerning how I test a lens.  I set up this page the same as a regular lens review, so if you want testing information about something in a certain part of a lens review, go to the same section …

Read more »

Scroll to Top