
At first glance, the Olympus 35 SP appears to be just another compact rangefinder camera from the early 1970s with a simple auto exposure system, full manual controls, and ghost image rangefinder focusing, just like all the rest in this price range. Everything says ‘boring’ when you pick up the camera and do a hand-held inspection. Yes, the build quality and mechanics are good, however, it’s easy to miss the very best part of the camera; the lens. It’s not just the F/1.7 maximum aperture, which was pretty fast back then for a mid-priced fixed lens rangefinder; or the nice 42mm focal length, or even the precise Seiko FLA shutter. The brilliance and value of this camera is the G. Zuiko lens; it’s comprised of seven elements in five groups in a double gauss configuration, and would be considered a good quality lens even by today’s standards, almost fifty years after it’s initial release! Sony, Canon and Nikon currently use this type of design in their newest 50mm F/1.8 mirrorless and DSLR lenses.
The Olympus 35 SP has a fully automatic program mode using either a center weighted evaluation, or a ‘spot’ metering system that was quite rare for the late 1960s and early 1970s. The auto exposure system runs on a tiny battery, and draws so little current, there isn’t even an on-off switch. Luckily for us manual control freaks, the camera will work just fine with a dead battery, or no battery at all; only the auto exposure system won’t work.
Olympus brags in their owner’s manual that the 35 SP is not only a ‘masterpiece of camera crafting’ but the finest rangefinder camera available today! Well, is it?
With the pleasantries out of the way, let’s check out the camera more thoroughly.
Name; Olympus 35 SP
Manufactured by; Olympus Optical company LTD, Tokyo, Japan.
Made in; Japan.
Date of manufacture; 1969 to early 1970s. My review camera was probably made in 1970-71 based on the serial number.
Price; I can’t find any accurate info on the original MSRP but most likely well north of $200, maybe close to $300. Current eBay prices range anywhere from $150 to $400 depending on condition and if it comes with the original box or is refurbished etc.
Build material; appears to be mostly metal with a little bit of plastic. Fit and finish is ordinary to very good.
Box contents; not sure, at least an instruction manual in multiple languages, maybe a snap case and strap too.
Weight; my measurements; camera with film and battery, 21oz (600g).
Dimensions; my measurements; 5.1″ (129mm), 3.1″ (82mm) tall, and 2.4″ (61mm) deep. All dimensions include protrusions.
Focal length; 42mm. 55° diagonal angle of view, 44° horizontal.
Aperture; F/1.7-F/16 manually set, and F/22 in auto mode. One stop increments only from F/2.8-16, however, you can use in-between settings if you want.
ISO; 25-800 (DIN 15-30) manually set, but only used for auto mode or taking exposure settings for manual operation.
Focusing distance; 2.8′ to infinity, or 0.85m to infinity.
Viewfinder; bright and clear, with a bluish hue. The rangefinder patch is a bit dim and yellow. The exposure indicator needle runs along the top, see picture below. Parallax correction marks, but does not auto compensate.
Light meter; CdS, angle of acceptance of average reading; 20°, or 6° spot.
Approximate resolution; good film and technique will make very sharp 11×14″ prints. See sample images farther down the page.
Lens; G. Zuiko 42mm F/1.7; amber/blue multi-coated 7 elements in 5 groups using a double gauss design. The lens produces almost zero distortion, but does have some axial and longitudinal color fringing. Uses 49mm filters, B&H, Amazon, eBay. Also noticeable is significant rearward facing field curvature; for instance, when I set it at wide apertures like F/1.7 and focus on a subject, usually around 5-10m away, the subject is sharp, and just around the subject periphery the distant background is soft as it should be, however, the background along the sides of the picture is much sharper than the central background. This look can be a bit distracting, but some people may find ways to be creative with it.
Shutter and speed; Seiko FLA leaf shutter with ‘ee’ electric eye, has five straight aperture blades; 10 speed shutter going from 1 second to 1/500 second, plus bulb mode.
Features; ‘coincidence’ double image rangefinder focusing, dual auto metering modes, 9 second self timer, and manual ASA settings.
Film; standard 35mm cartridges.
Flash; does not have a built-in flash.
Power; manual states PX625 1.3V battery, however, the current PX625 batteries are rated at 1.35V. I don’t think the minor differences in voltage matter. I’ve been using those in the camera with good results. Available at these shops; Amazon, eBay. I put a wein battery in when I bought the camera in 2016, and it’s still good as of this review.
Accessories for this model; a 35SP plastic hood, and two flashes, one Olympus CL flash holder using an AG-1 or AG-3N flash bulbs, and one Olympus electronic flash, PS100G.
Crippling features and omissions; nothing really bad, although I’d like a smoother trigger pull. Also, the CdS meter is above the lens, so you have to manually compensate when using filters.
Good features; of course the excellent fast lens, and the auto exposure system with neat instant ‘spot’ button, uses inexpensive and very common 49mm filters, and works fine without a battery.
Quirks; when shooting at long distances where you would normally be setting the focus to infinity, my copy is just a hair sharper when set slightly back from the infinity mark, maybe in the middle of the first swirl, or around 1mm back, but only at F/1.7, the other apertures don’t seem to show any change.
Other versions; there are several similar versions from Olympus with this lens such as the 35 LE, which was program only I think and had a Copal x shutter. The 35 LC, which lacked the auto mode had a Copal x shutter. The 35 SPn, and 35 UC, used different trim and had a battery check button, but otherwise they’re the same as the SP. The Olympus 35 RD and 35 DC have a different six element F Zuiko 40mm F/1.7 lens with Seiko shutter.
Olympus has a long tradition of using letters to indicate the number of elements in their lenses. So the ‘G’ in G Zuiko is the seventh letter in the alphabet. An ‘F’ Zuiko has six and so on. The least I’ve seen is a three element ‘C’ Zuiko on one of their early 35mm cameras.
Go here to see the owners manual, and make sure you tip the site owner.
Product shots with descriptions. Click pictures for larger versions.

Original camera case, camera, and a slip on lens cap.

On top we have the film rewind crank on the left. The hotshoe will accept most flash units, either bulb or electronic. On the top right is the shutter button with threaded insert for a cable release. Below the shutter button is the film counter window with auto reset. If the film is threaded properly, the counter will move up as you crank the winder; once past no. 1, it shows even numbers only, with dots in between, for a total of 37 shots. I get about 39 on a roll if I thread it right and close the back, then advance it only about two times and start shooting; you don’t have to advance it all the way to no. 1. Note; use manual mode for threading and advancing the film, otherwise the shutter may hang up if the lens cap is on, or you’re in a dark place.
In this shot you can see the forward most ring with the shutter speeds. Oddly, for some reason changing the speeds after you advance the film seems smoother, which is usually the opposite of the typical shutter design. The little cutout past 1/500 is for showing light values. Here you transfer the reading from the light meter (say 14) and set the shutter and aperture to 14 in the cutout. Once set, you can keep the same light value number by turning both rings simultaneously. Note; in auto mode, the shutter will lock up at speeds lower than 1/15s, or over 1/250s. Use manual mode to avoid this.
Personal note; I checked my shutter speeds for this camera and they were almost dead-on for each speed except 1/500, and that clocked in at 1/330, which is common for a leaf shutter at 1/500.
The aperture ring indicates openings in one stop increments, except from F/1.7 to F/2.8, that’s a stop and a half. The aperture will go down to F/22 in auto mode, but only F/16 in manual mode. The flash guide numbers are green, set to the appropriate number based on your flash guide number and film ASA (ISO) rating, and when you focus, the camera magically sets the correct aperture for exposure.
The focusing scale is at the bottom of the lens, and shows both feet and meters.

On the bottom we have the film rewind button on the left, an off-set 1/4-20 tripod socket, the coin slot battery cover, and a cut-out for inserting the film cartridge. The little silver lever to the right is for opening the back cover.
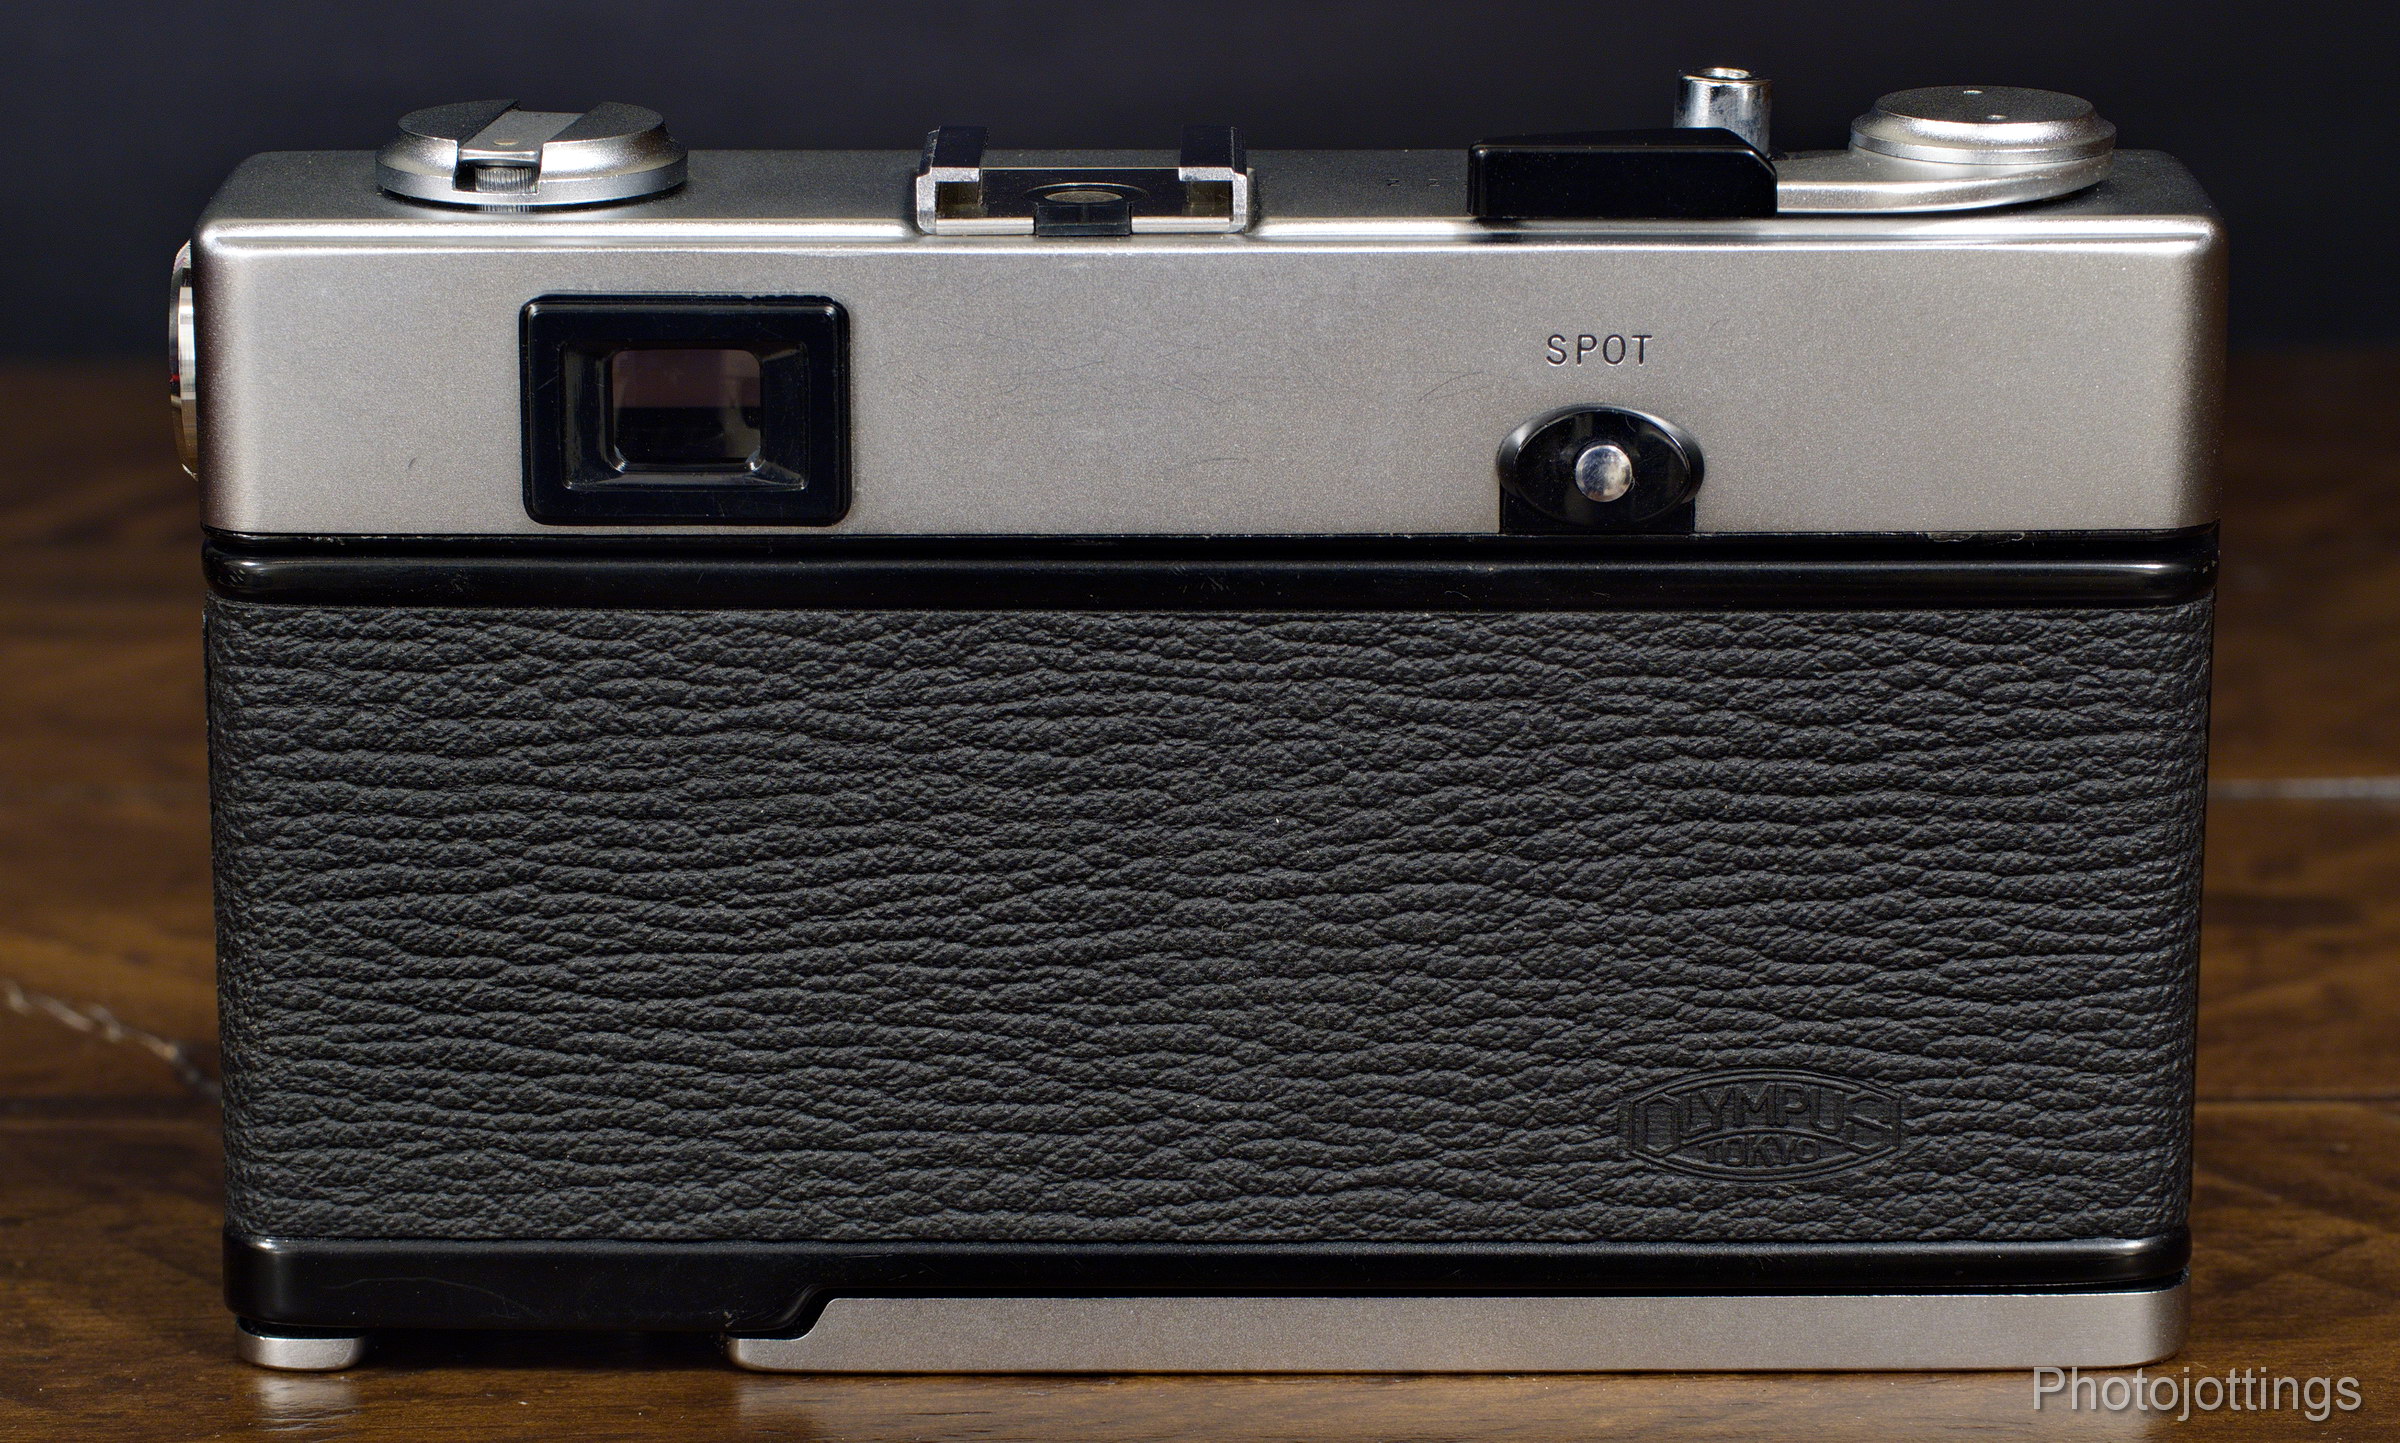
The back of the camera is uncluttered; the top plate holds the viewfinder and spot meter escutcheons, both of which are black plastic.

The catch on the left bottom opens the rear cover. The film gate is metal, but the sprocket wheel and take up spool are plastic. The back cover holds the film tensioner and pressure plate. The cut-out in the bottom plate is for easy insertion of the film cartridge.
The front of the camera shows the right and left strap lugs. Unfortunately, they’re placed too low on the body, and when you have a flash attached, the whole thing will flip over. So if you have the camera strap adjusted so it hangs around your lower stomach as I often do, the flash will now wind up hitting you in the groin when it flips, and down you’ll go in the fetal position for the next five minutes, so don’t do that!
Front filter threads are 49mm, which are inexpensive, and very common. Don’t forget, you have to manually compensate the exposure when using a filter, as the metering window is above the lens. The hood uses the filter threads too, so you can’t use the hood and a filter at the same time. I don’t have the factory hood, but I imagine it would interfere somewhat with the viewfinder and rangefinder window. The narrow translucent strip above the lens to the left is the viewfinder metering illuminator, see image below. Directly in the center is the rangefinder window, to the right of that is the viewfinder window, and metering cell. The small circular button below the viewfinder window is a standard PC port for flash.

Scene through the viewfinder. The red, yellow and orange strip above is lighted by the narrow translucent panel described above. The red zone to the left warns of over-exposore. Yellow is the safe area, and orange on the right warns of under-exposure. The lens barrel is just visible in the lower right.

The ASA (ISO) dial is on the left side of the camera, close to the metering window. It goes from 25-800 or DIN 15-30 in 1/3 increments.

Finder and meter window. Notice the square opening in the right window; this is connected to the ASA dial, and when you change the setting, it changes the physical opening size and allows for correct metering. The lower the ASA, the smaller the window opening becomes, and vice-versa. This feature is a good way to add some exposure compensation. For instance, if you’re using ISO 400 print film and want +1.0ev to keep the shadow detail up, you simply set the dial to ASA 200. You can also use this feature as a way to compensate for filter factors.
Sample shots below.
Here are a few samples for your viewing pleasure. They’re between 3000-4000 pixels wide, so click image for a larger version.

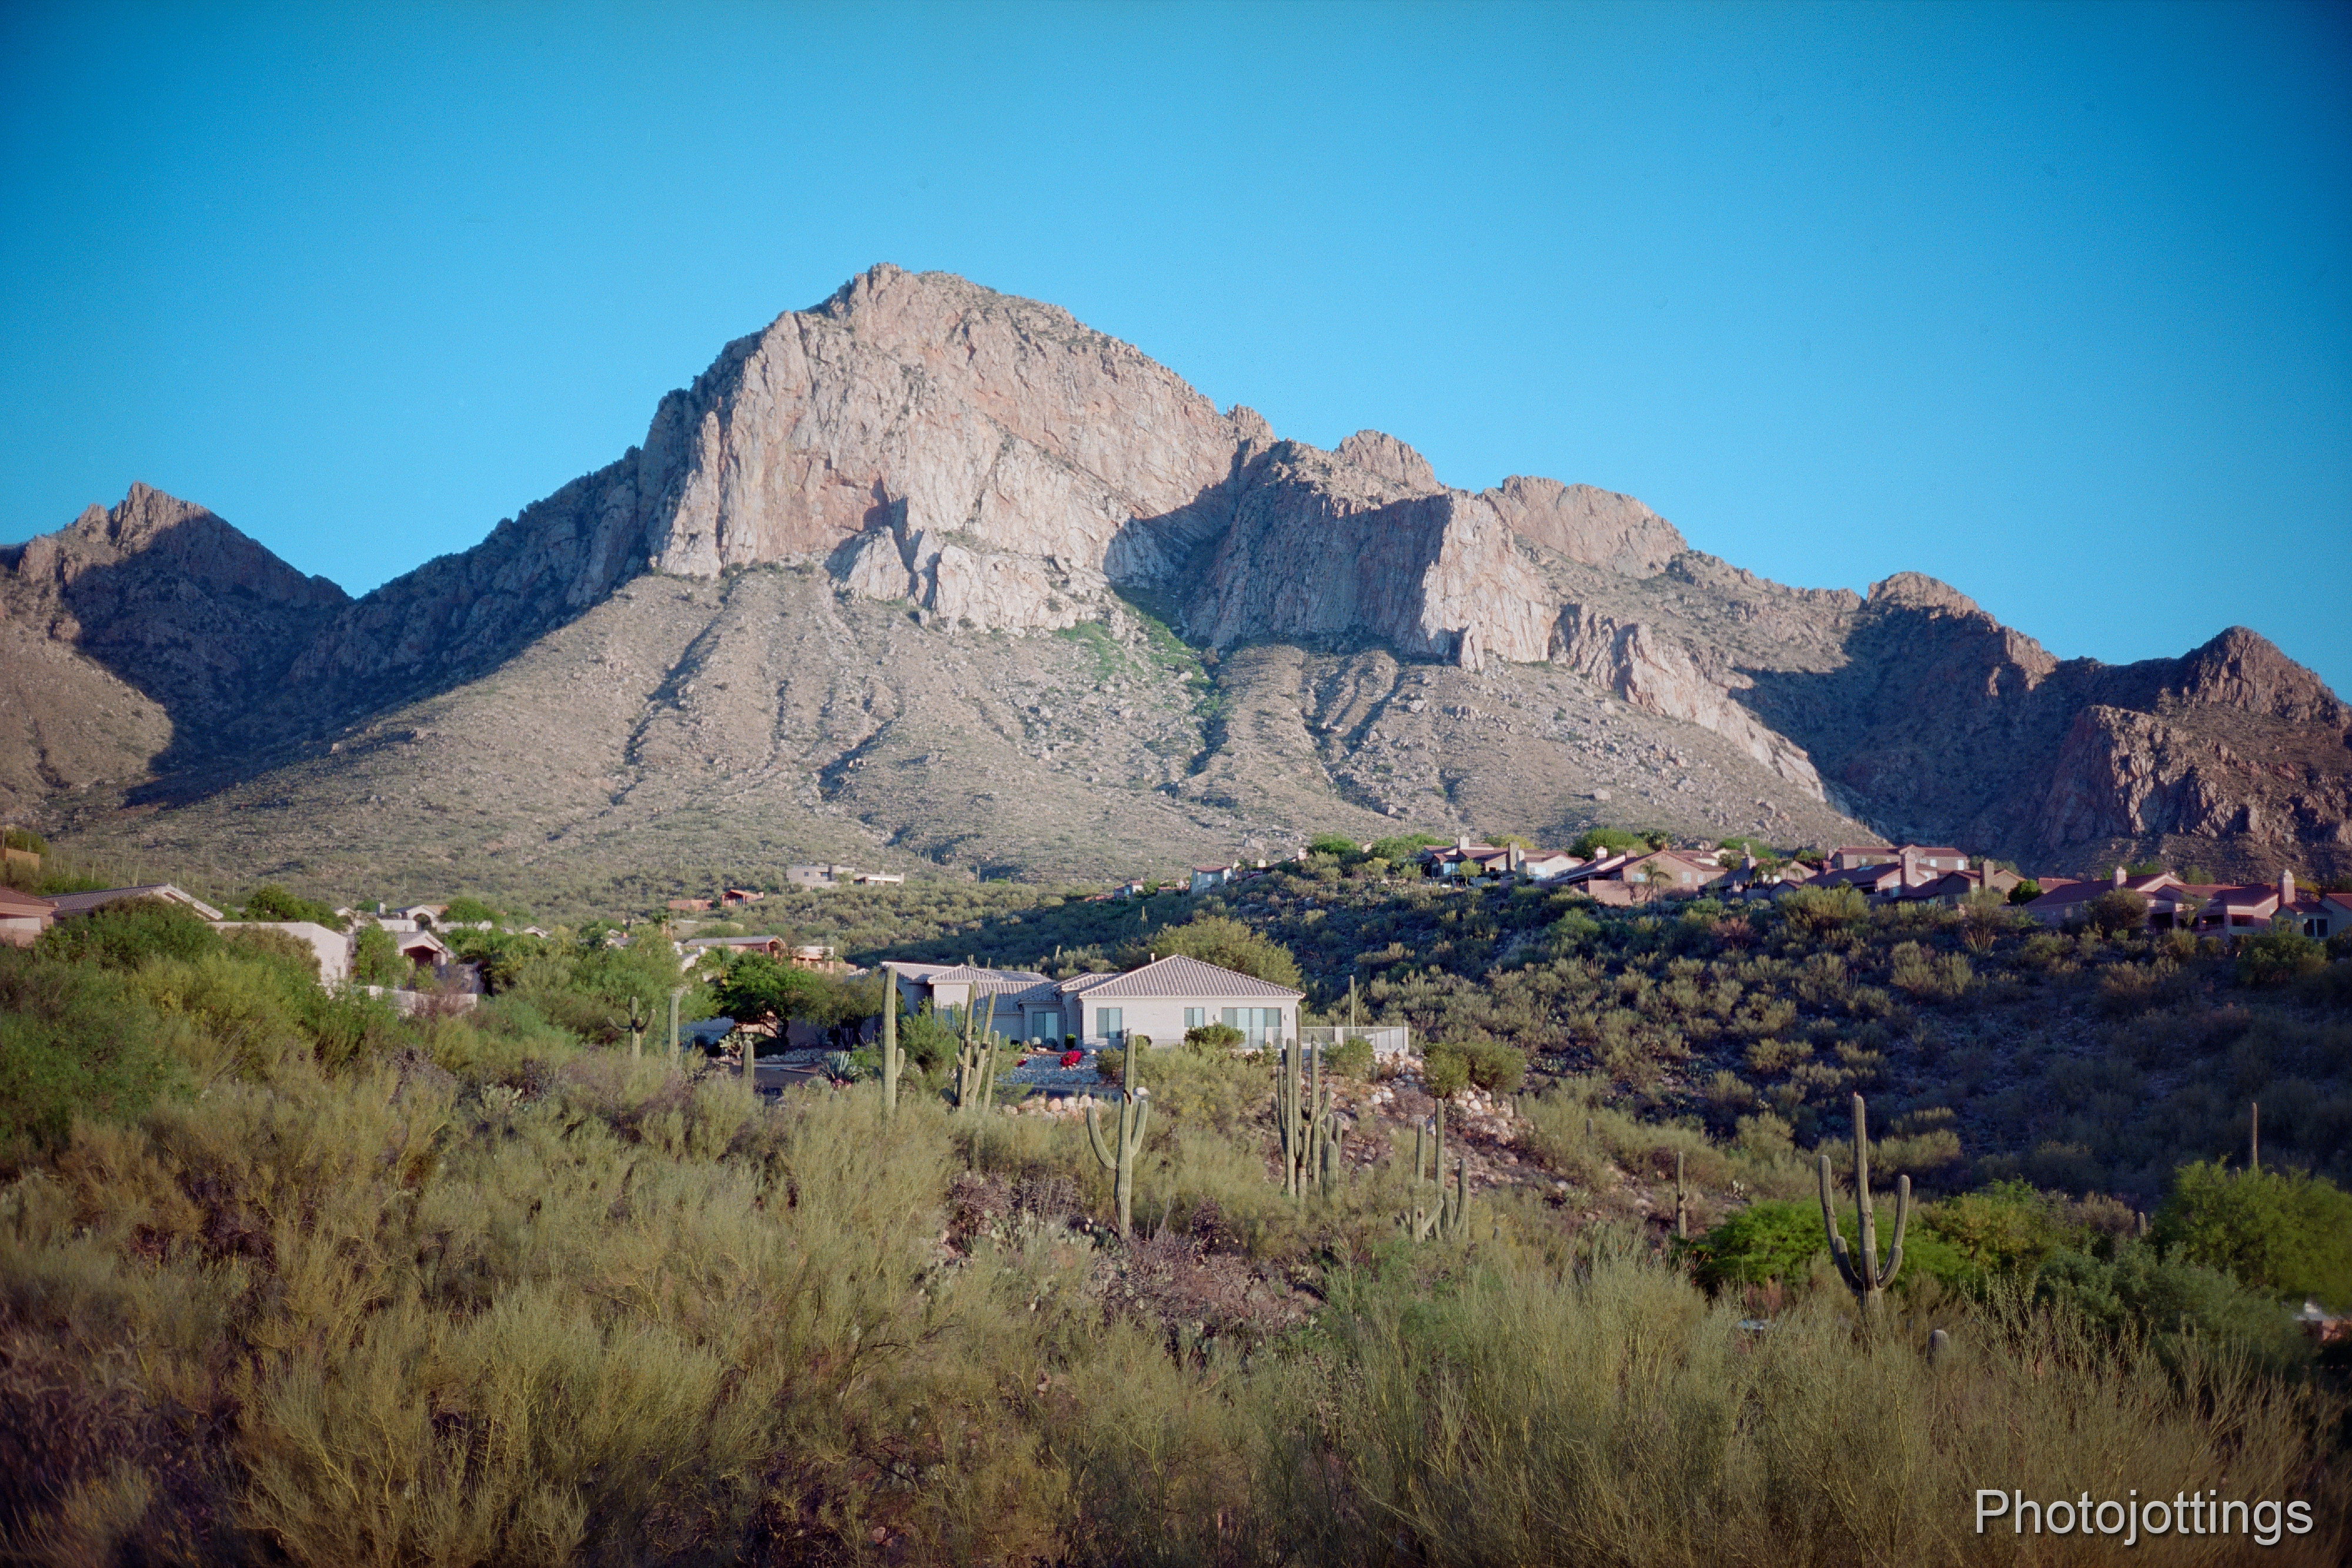
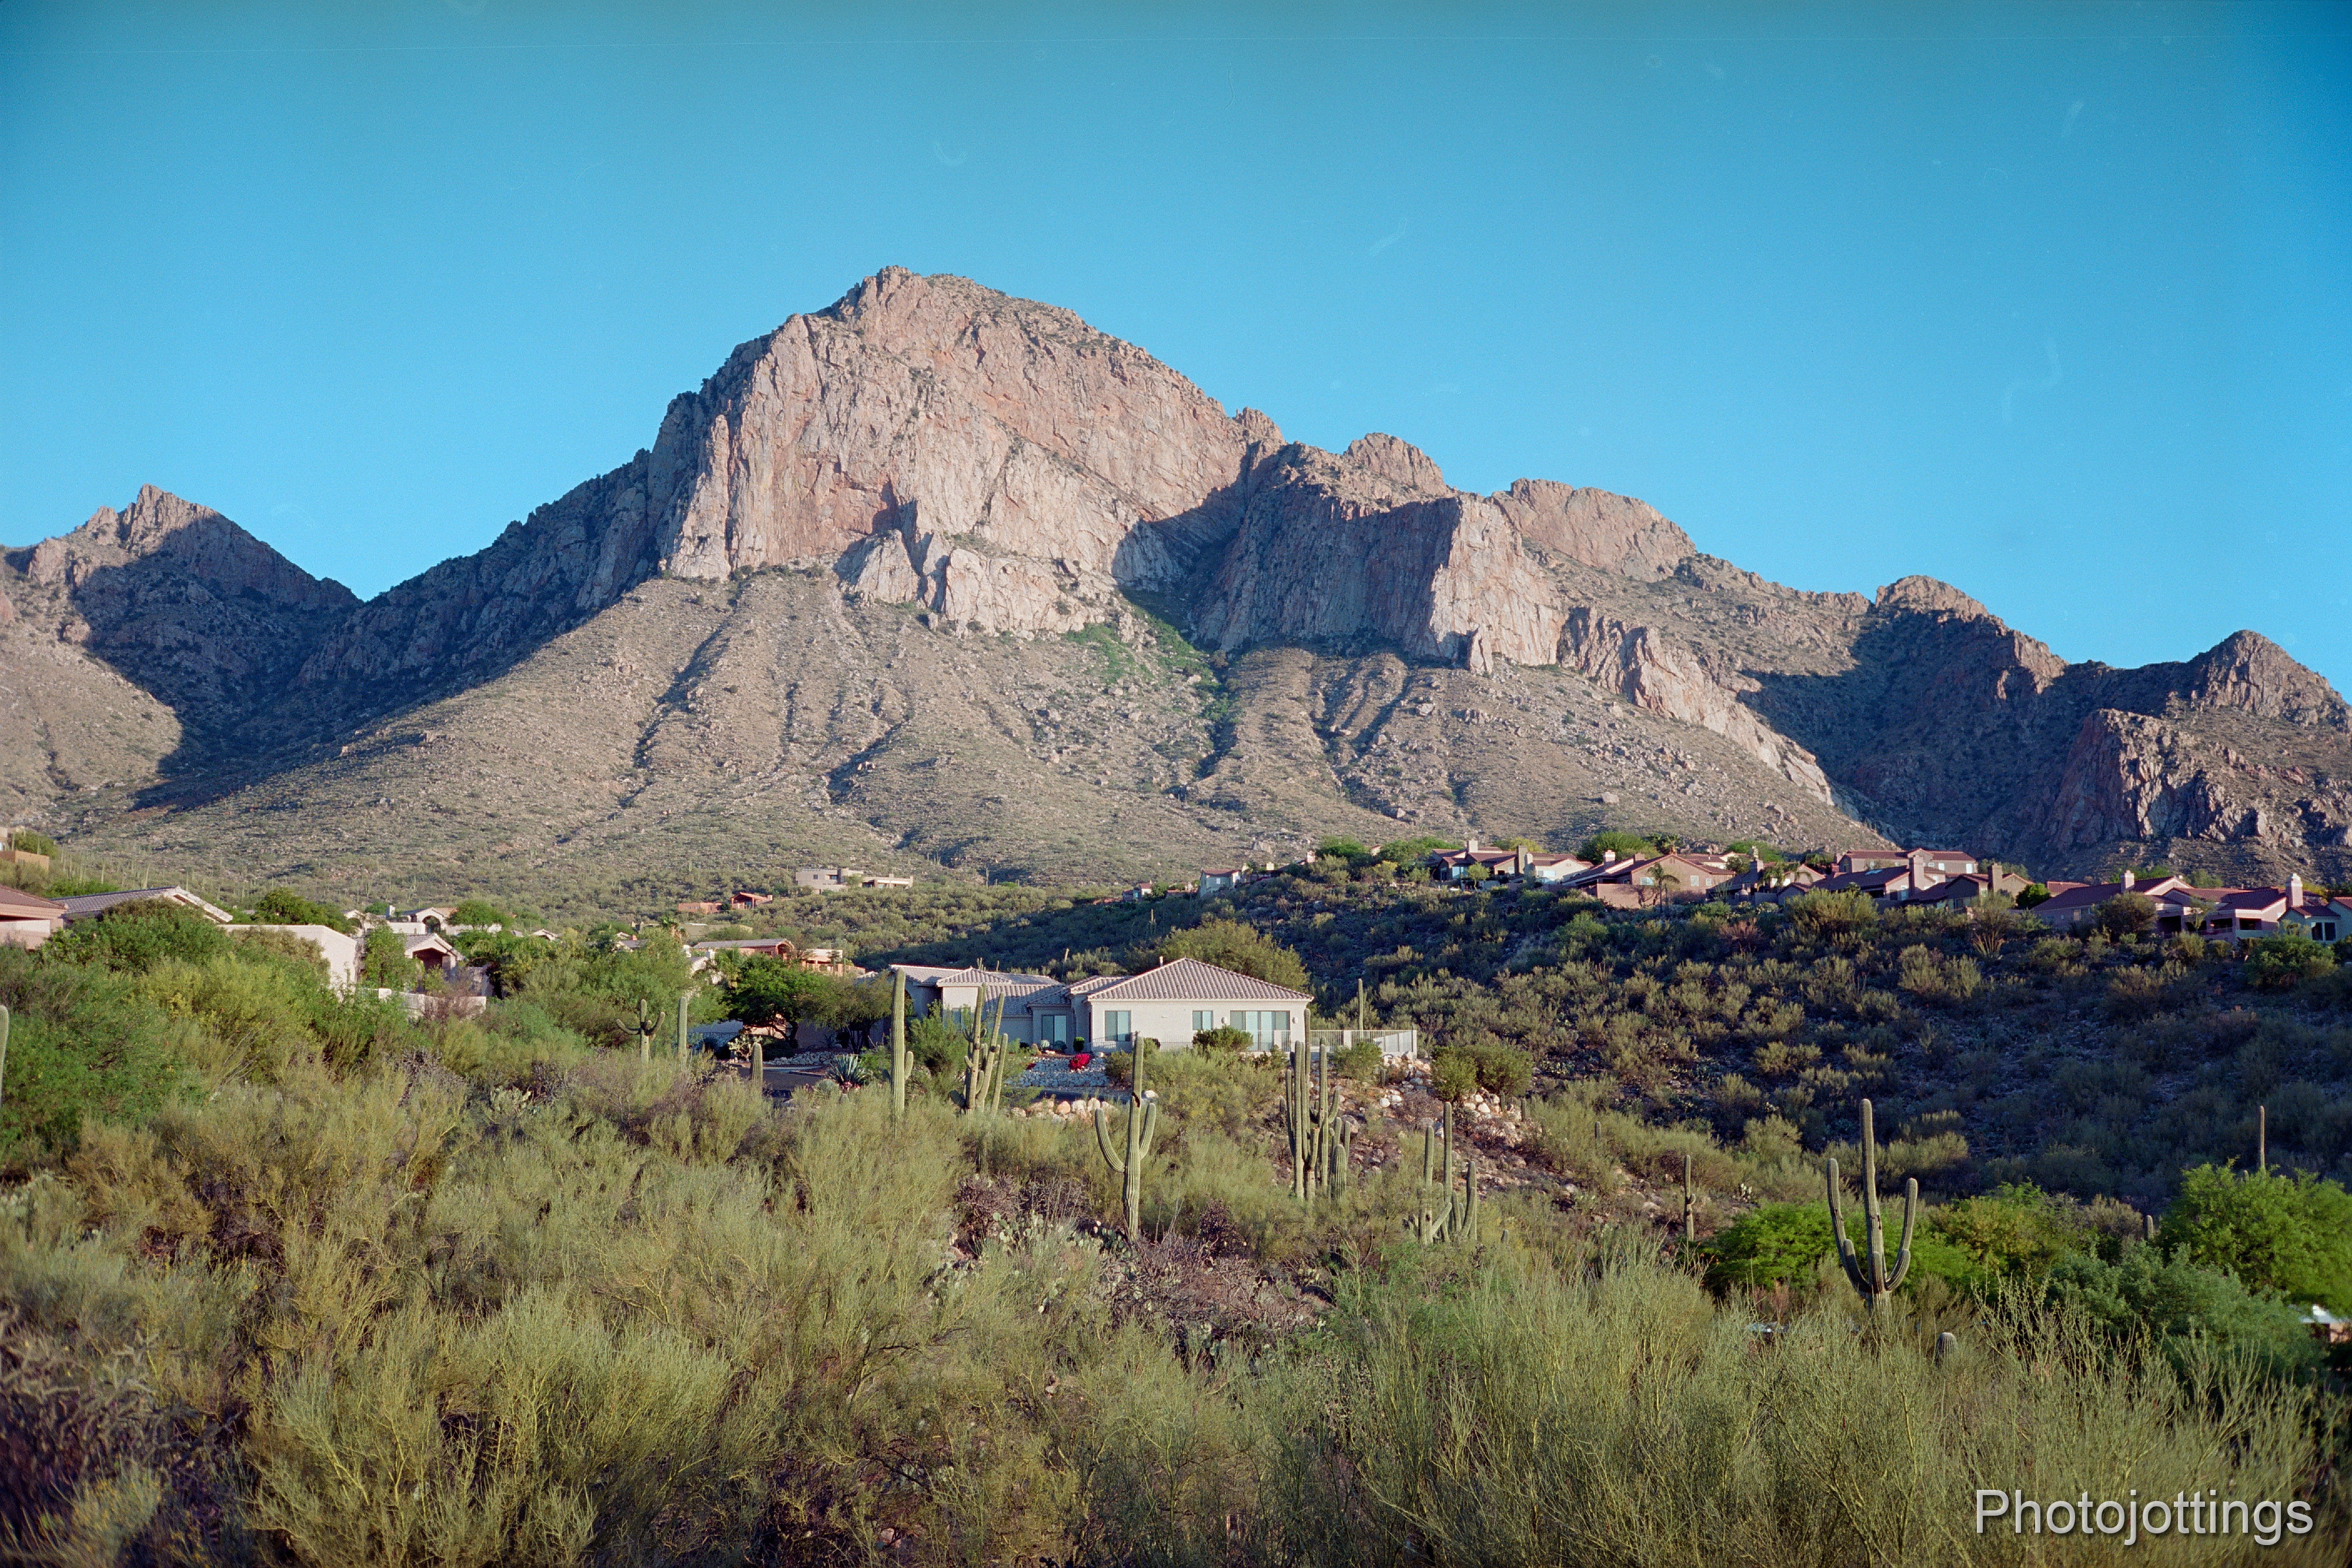
F/8. A very bright, and very sharp image, even along the extreme sides and corners. Fuji Velvia 100

Wide open at F/1.7. This camera is completely usable at high noon in bright light with the aperture wide open, just make sure you have print film!! Kodak Gold 200.
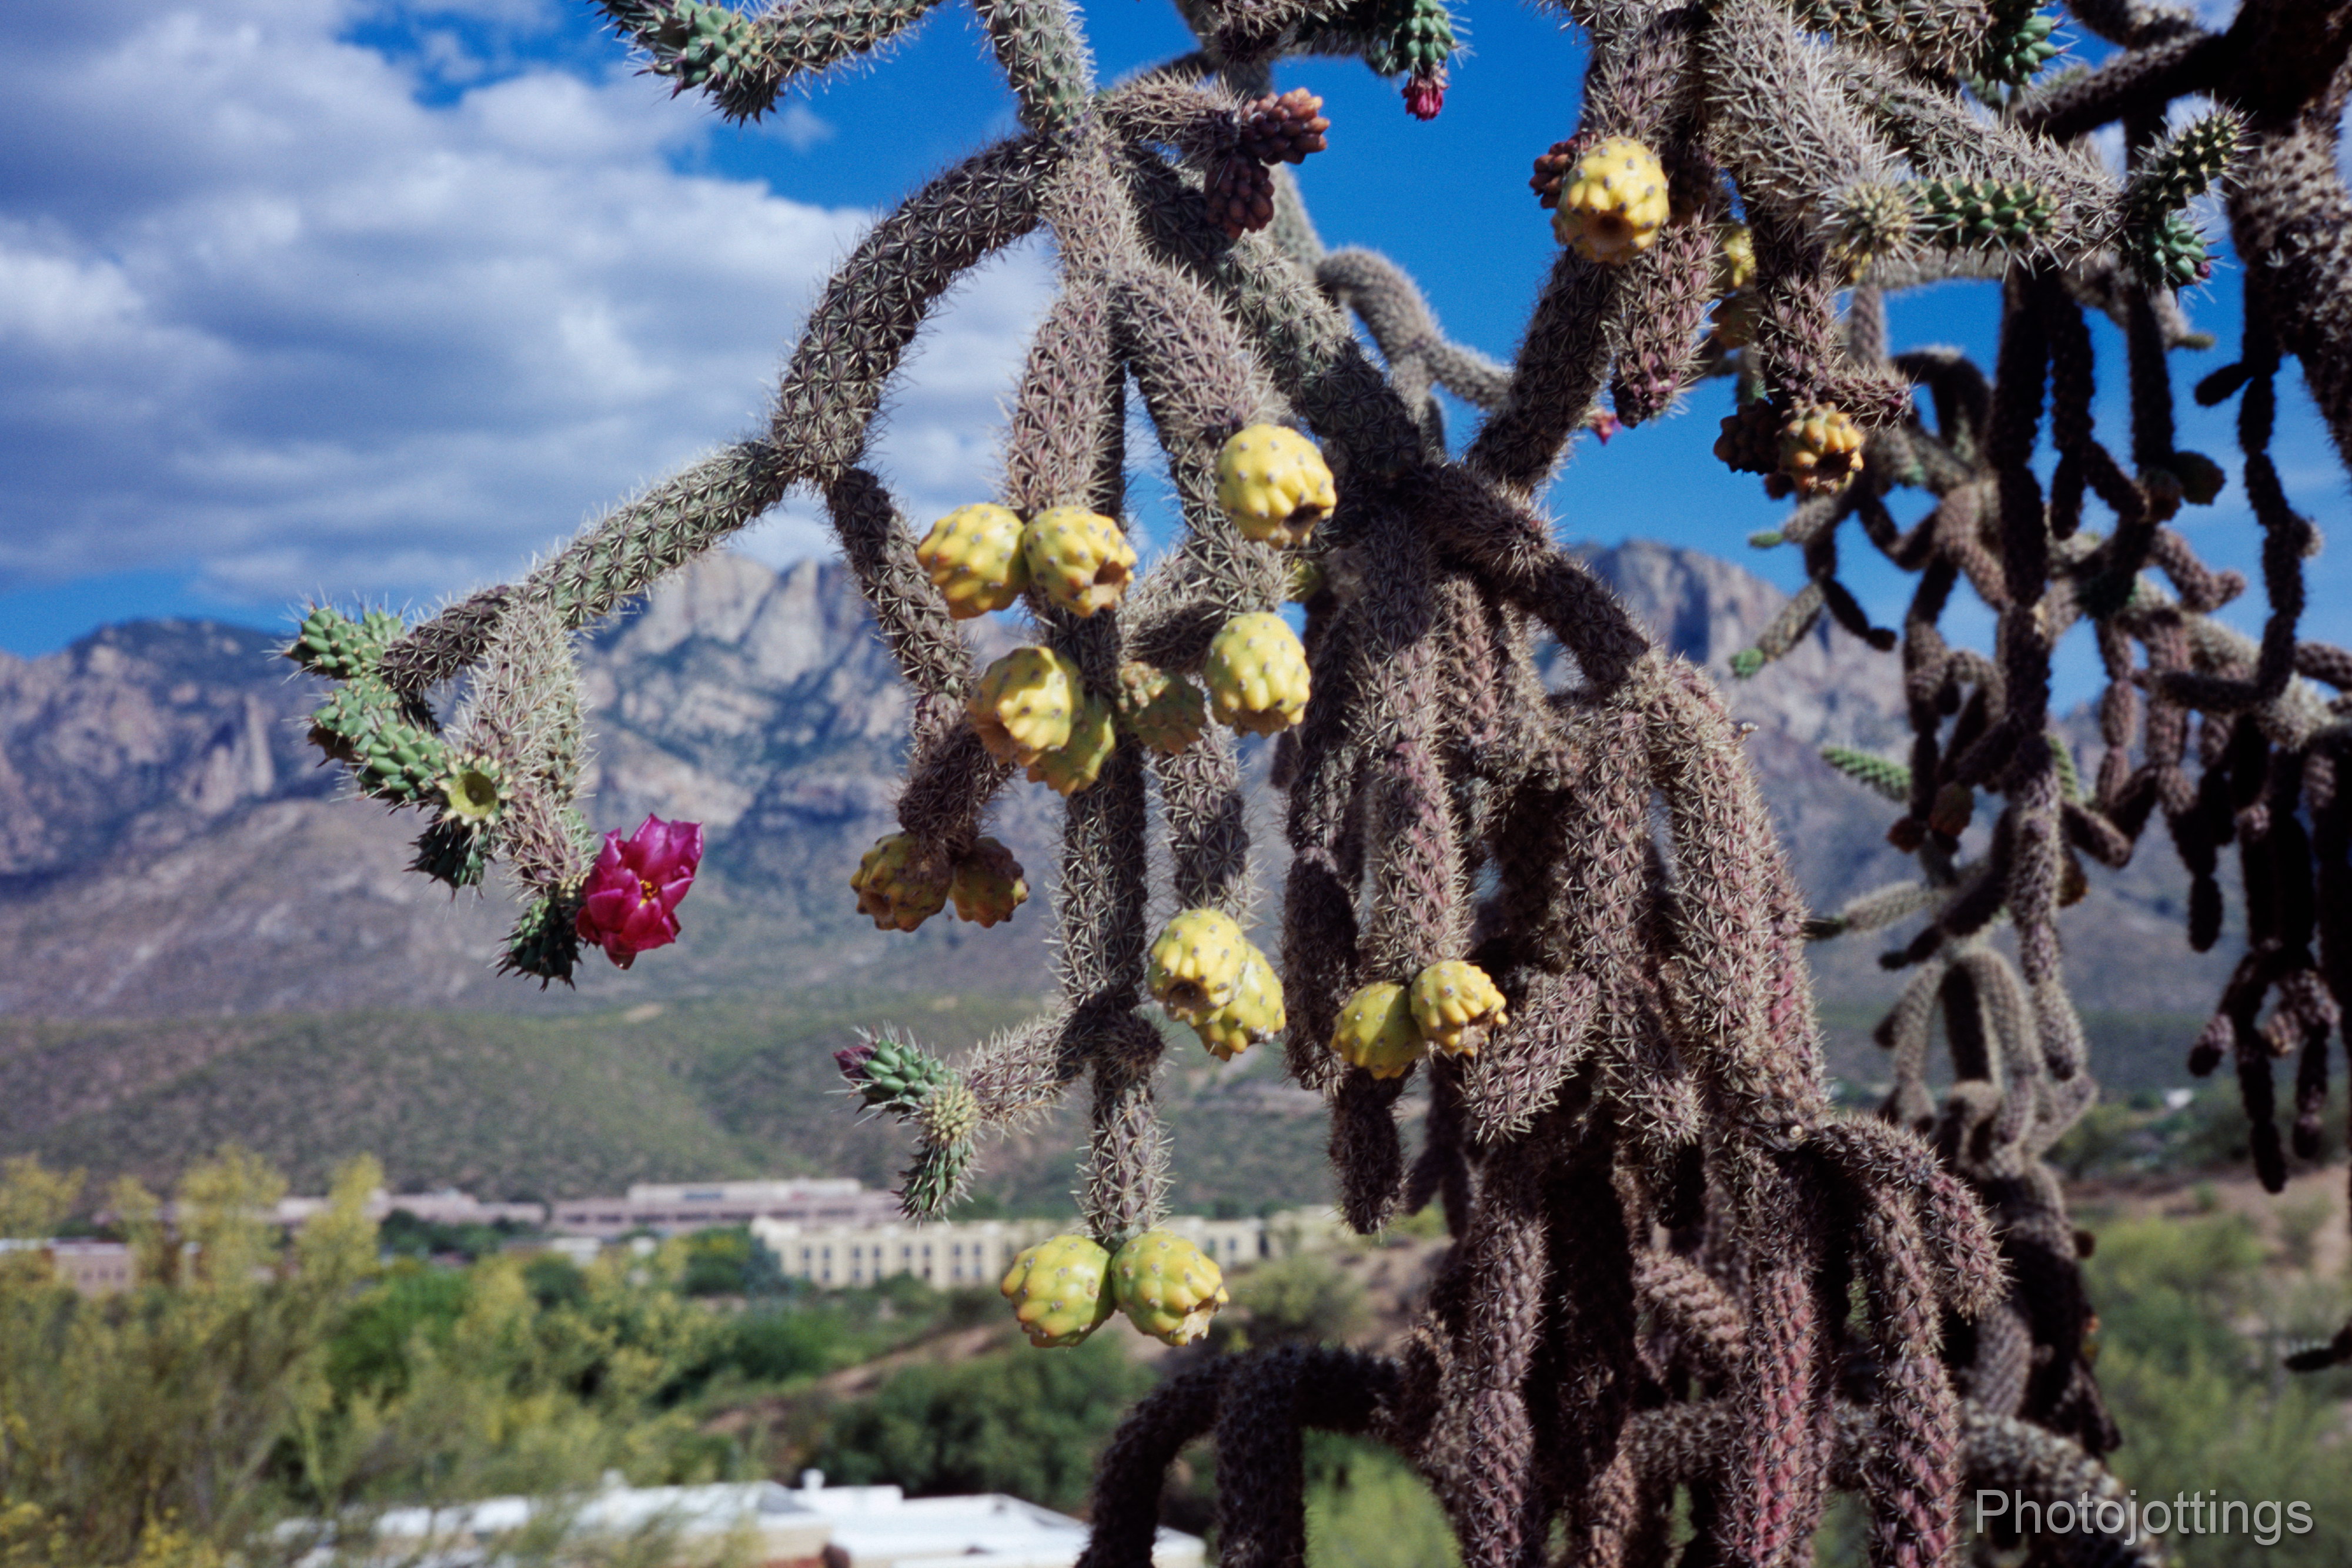
Close focus at about F/8. The red flower is supposed to be in focus but I think I just missed it. Fuji Velvia 100.

Taken wide open at F/1.7. Notice the awful background highlight blur, and rearward facing field curvature. The central background blur is very diffused, but the sides are more in line with the focus plane and are sharper. Kodak Portra 400.

In or out. Gotta love that Kodak Ektar 100 for some color. The individual needles are visible on the saguaro cactus through the open door way in the back. I think this shot was about F/8-11.
Test scene below.
All test shots are displayed at 4000 x 2667 pixels wide when enlarged, and that’s all the resolution included in the film. Scanned on a Nikon Coolscan 9000 ED.
Tripod used, no filters. Kodak Ektar 100.
F/1.7. Good sharpness here, but veiling haze is noticeable wide open, and the sides are lacking contrast. Light fall-off is heavy in the extreme corners. As stated in the quirks; when shooting at long distances where you would normally be setting the focus to infinity, my copy is just a hair sharper when set slightly back from the infinity mark, maybe in the middle of the first swirl, or around 1mm back, but only at F/1.7, the other apertures don’t seem to show any change.

Moving down to F/2.8 gets rid of the veiling haze and bumps the contast up, although the sides are still a little soft. Light fall-off is still heavy in the extreme corners.
F/4. The whole image is very sharp now, and the centers and mid-sections are about maxed out in resolution. Light fall-off is greatly diminished.

F/5.6, looks about the same as F/4, with the extreme sides looking just a bit sharper.

At F/8 the extreme sides are very sharp and light fall-off is mostly gone.

F/11, the same as F/8, but the center resolution is softening very slightly due to diffraction.
See some samples of CineStill 800T film, all shot around F/1.7 .
Conclusion.
The Olympus 35 SP is one of the very best 35mm rangefinders from yesteryear. The 42mm F/1.7 lens is an excellent focal length in my opinion, and it’s totally usable at F/1.7. Another big plus is the camera takes inexpensive and commonly available 49mm filters; I’d recommend a polarizer, and a 2 stop graduated neutral density filter for slide film use; usually to keep the clouds from blowing out. I also really like the fact that it works fine in manual mode with no batteries, or when the battery dies during your photo outing, the only thing you’ll lose is the exposure meter.
The auto exposure system is excellent for print film, but it’s really not necessary. Print film is very forgiving of over-exposure, so I’d recommend the sunny 16 rule for good light, and with lower light simply shoot at the lowest shutter speed you can safely hold the camera steady, and select an appropriate aperture. Unfortunately, slide film is different, and the rudimentary exposure meter on the camera may not work very well, especially in back-lit situations. If you have a roll of 36 exposures, you can always bracket your shots and get at least one good one per set!
The Olympus 35 SP is a thoughtfully designed camera for the picky photographer, but may not meet the needs of people that want more modern features like auto focus, auto advance and rewind, and a good exposure meter for slide film. If that sounds like you, I’d recommend the Nikon 35 Ti, it has those features plus a lens that’s just as good as the Olympus’, but not as fast at F/2.8.
Two thumbs up for the wonderful and outrageously brilliant Olympus 35 SP! Please consider buying through my links and help support the site. Thanks for visiting!