
The Kodak Bantam Special has been reviewed by just about every site connected with photography it seems, digital and analog, so I thought I’d join the crowd and try and add to the conversation, hopefully in a meaningful way.
What jumped out at me the most when I first encountered the Kodak Bantam Special was not just the shiny black Piano finish, the art deco styling, the clever modified clamshell design, or the resemblance to a black pinstriped suit, but at how small it was. It’s actually smaller than a modern mirrorless camera (see pic below) with a pancake lens, and it’ll fit in a shirt or pants pocket for great convenience, however, it is a bit weighty, so maybe a small waist pack would be a better carrying device during your photo outings.
Our review Camera was manufactured in the late 1930s, and used 828 roll film with backing paper for a total of just eight shots. The capture area for this film is 28mm x 40mm; a little larger than 135 format film. Although 828 film in no longer available as it was properly manufactured back in the day, there are some ways to use the camera today. One method would be by slicing 120 film and respooling it complete with the backing paper, that would be the best way as you’d get the original aspect ratio and capture area of the lens. Another way would be to use 135 format film: you’d cut it and begin to spool it, then complete the spooling in the dark, and finish by sealing off the shot window and back cover gaps with black tape: see how to do this here. I used 135mm film for the sample images below, and cropped out the sprocket holes.
As with all miniature film cameras of yesteryear, and even some of today’s digital pocket cameras, there are problems with handling. The Kodak Bantam Special has a very ‘slippery’ finish, with tapered grab areas at both ends. To make matters worse, the shutter trip arm is located near the bottom of the lens, so you end up holding the camera with your thumbs and index fingers, and tripping the shutter with your right middle finger; thankfully, it doesn’t really take too long to get used to doing this.
The Kodak Bantam Special is a folding miniature camera, and has an inconspicuous bellows (similar to the folding Kodak Retinas) that allows the lens to extend out into the proper shooting distance. Focusing is done at the lens mount, and the entire lens and shutter combination moves, but not by extending the bellows.
Before we move on with the rest of the review, I might mention this Walter Teague designed art deco ‘Bantam Special’ model is not to be confused with the very plain Kodak Bantam ‘Special’ sporting the 47mm F/4.5 Anastigmat ‘special‘ lens; they’re totally different cameras; so specify the 45mm ‘Ektar’ F/2 lens of our review model when searching online.
Name; Kodak Bantam Special.
Manufactured by; Eastman Kodak Company, Rochester NY, USA.
Made in; Rochester NY, USA
Date of manufacture; 1936 to 1948. My review camera was probably made in the very late 1930s based on the serial numbers from the body and lens.
Price; about $87.50, including the leather case, but it may have spiked at one time as there are period magazine ads that state the camera is at its ‘new low price’ or ‘reduced’ price of $87.50. Current eBay prices range anywhere from $250 to $600 or more depending on condition and if it comes with the original box etc.
Build material; cast aluminum, nickel brightwork, and finished in black lacquer.
Box contents; not sure, at least an instruction manual, and maybe a leather case with the deluxe kit.
Weight; my measurements; camera body, no film: 16.04oz (466g).
Dimensions; my measurements; 4.85″ (124mm), long; 3.2″ (82mm) tall; 1.8″ (46mm) deep closed, and 3.8″ (96mm) deep extended.
Focal length; 45mm; 54° diagonal angle of view.
Aperture; marked in one stop increments from F/2-16.
ISO; none, and no reminder dial.
Focusing distance; 3.0′ – inf, (1.0m – inf).
Viewfinder; very small, short relief, but bright and clear. No parallax compensation marks.
Light meter; none.
Approximate resolution; standard print enlargement size at the time was 4″ x 2¾.” Good film and technique will make very sharp 11×14″ prints. See sample images farther down the page.
Lens; uncoated Kodak Ektar 45mm F/2 six elements in four groups; in a double gauss configuration.
Shutter and speed; Compur Rapid, has ten straight aperture blades and five shutter blades; 9 speed shutter going from 1 second to 1/500 second, plus bulb and time mode.
Features; coupled ‘coincidence’ double image rangefinder focusing, compact design, adjustable rangefinder eyepiece and sharp, fast lens.
Film; capture area on film; 40mm x 28mm, (which is larger than 24mm x 26mm using 135 film so the image overlaps the sprocket holes). Uses 828 roll film, which is no longer available new, but sometimes can be found from sellers that slice 120 film, or re-roll 35mm film. When using 135 film and cropping out the sprocket holes, the aspect ratio is about 16:9, or a HDTV screen.
Flash; does not have a built-in flash or PC socket.
Power; no batteries.
Accessories for this model; tan leather combination case, and three lens attachments, (probably colored filters). Outer diameter of lens ring is 32mm.
Crippling features and omissions; no front filter threads, and quite awkward to hold.
Good features; magnified rangefinder view, and very compact design.
Quirks; you have to push the focusing arm all the way to infinity and hold it hard over before you start folding up the case.
Other versions; there’s the early version like mine with a Compur Rapid shutter from 1936 to around 1941, and then Kodak used their own Supermatic shutter up to the end of the model run in 1948.
Go here to see the owner’s manual, and make sure you tip the site owner.
Product shots with descriptions. Click pictures for larger versions.
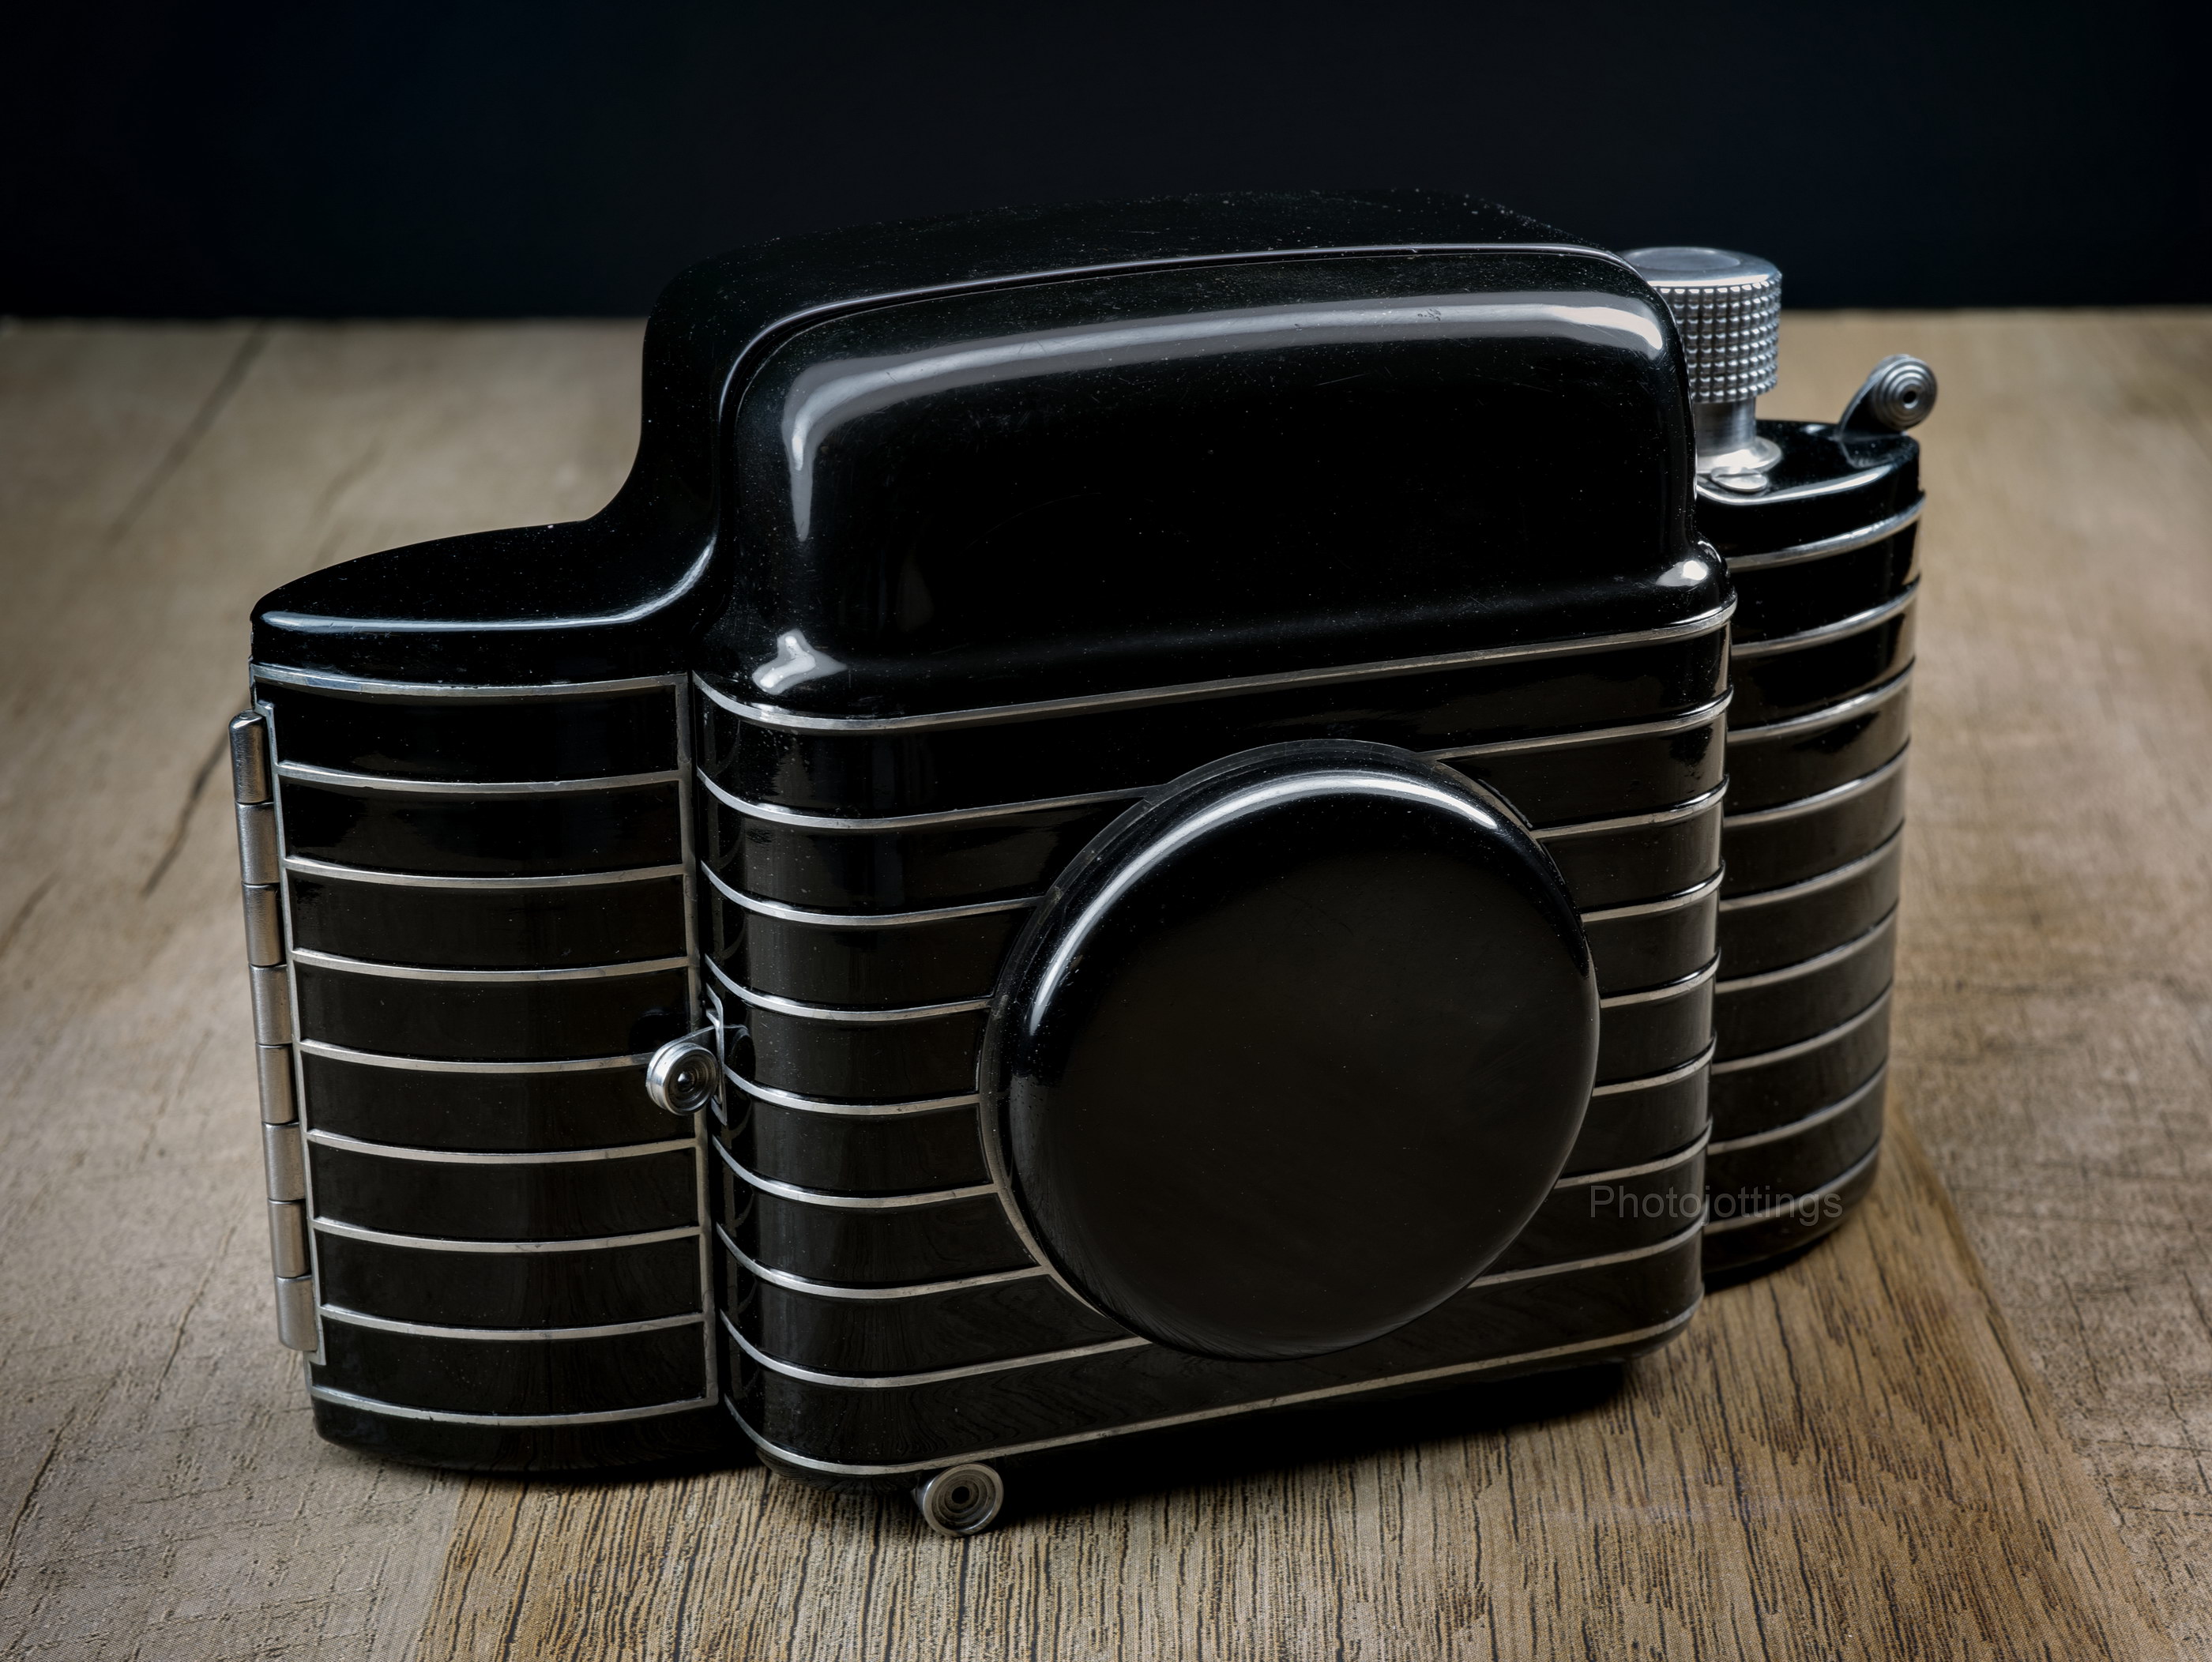
The Kodak Bantam Special is one good looking camera, especially folded up on display. But that’s not what it’s for right? Open the camera by pushing the little round button along the seam midway between the body and front section.

Once the opening button is pushed, the lens will swing open, but probably won’t lock in the fully open position, so you’ll have to do that manually. I’m not sure if that’s the way it was designed, or is a result of age.
The shutter cocking lever is at the 11 o’clock position by the shutter speed ring, and just below at 10 o’clock there is a cable release socket, but here it’s covered with a screw. At the 7 o’clock position is the shutter release lever.
The circular eyepiece on an ‘L’ bracket above the lens is used for the rangefinder, and it’s adjustable, but don’t fool with it unless you know what you’re doing.
Notice what looks like spots showing inside the lens, they’re actually reflections of the white letters on the front element ring.
Closing the camera requires you to push the focusing arm all the way over to infinity, and until it won’t move anymore; then you can fold the camera up. The focusing arm is just above the ‘CLOSE→’ mark on the focusing distance scale.

Vertical tabletop shooting. Notice the vertical leveling arm (kickstand) that extends from the clamshell cover; you pull it all the way out, move it 90° and then push it in until it’s tight. The camera serial number is stamped on one side of the stand.

There isn’t much on the bottom of the camera other than a ¼-20 tripod socket. The little multi angled tab on the lens mount with a flat blade screw is part of the lens locking device.

On the back of the camera we have a few items of importance. The small arm on the left opens the back cover when pulled up. The large round knob advances the film, and the knurled top portion will extend up to clear the rangefinder housing making it easier to wind. Just below the advance knob is the winding lock button: you press it in momentarily and release, then wind until the knob locks, and you’re ready to shoot. This was intended for use with 828 film, which has one registration hole per frame, but it won’t work properly with hacked films, so you’ll have to hold this button in and wind the film until you get the shot number in the center of the window, and then release.
Moving up to the top of the camera, and on the left we have the rangefinder eyepiece. The relief is shallow for eyeglass wearers, however, it’s also adjustable so you should be able to set the proper ‘diopter’ that’s comfortable for you. When looking through the eyepiece, the view is highly magnified, and it’s quite easy to see the two images, and line them up accordingly; see image farther down.
The right circular protrusion with a rectangular window is the viewfinder. It also has a shallow relief, and is not adjustable. The image through the viewfinder is decent, but nothing to write home about.
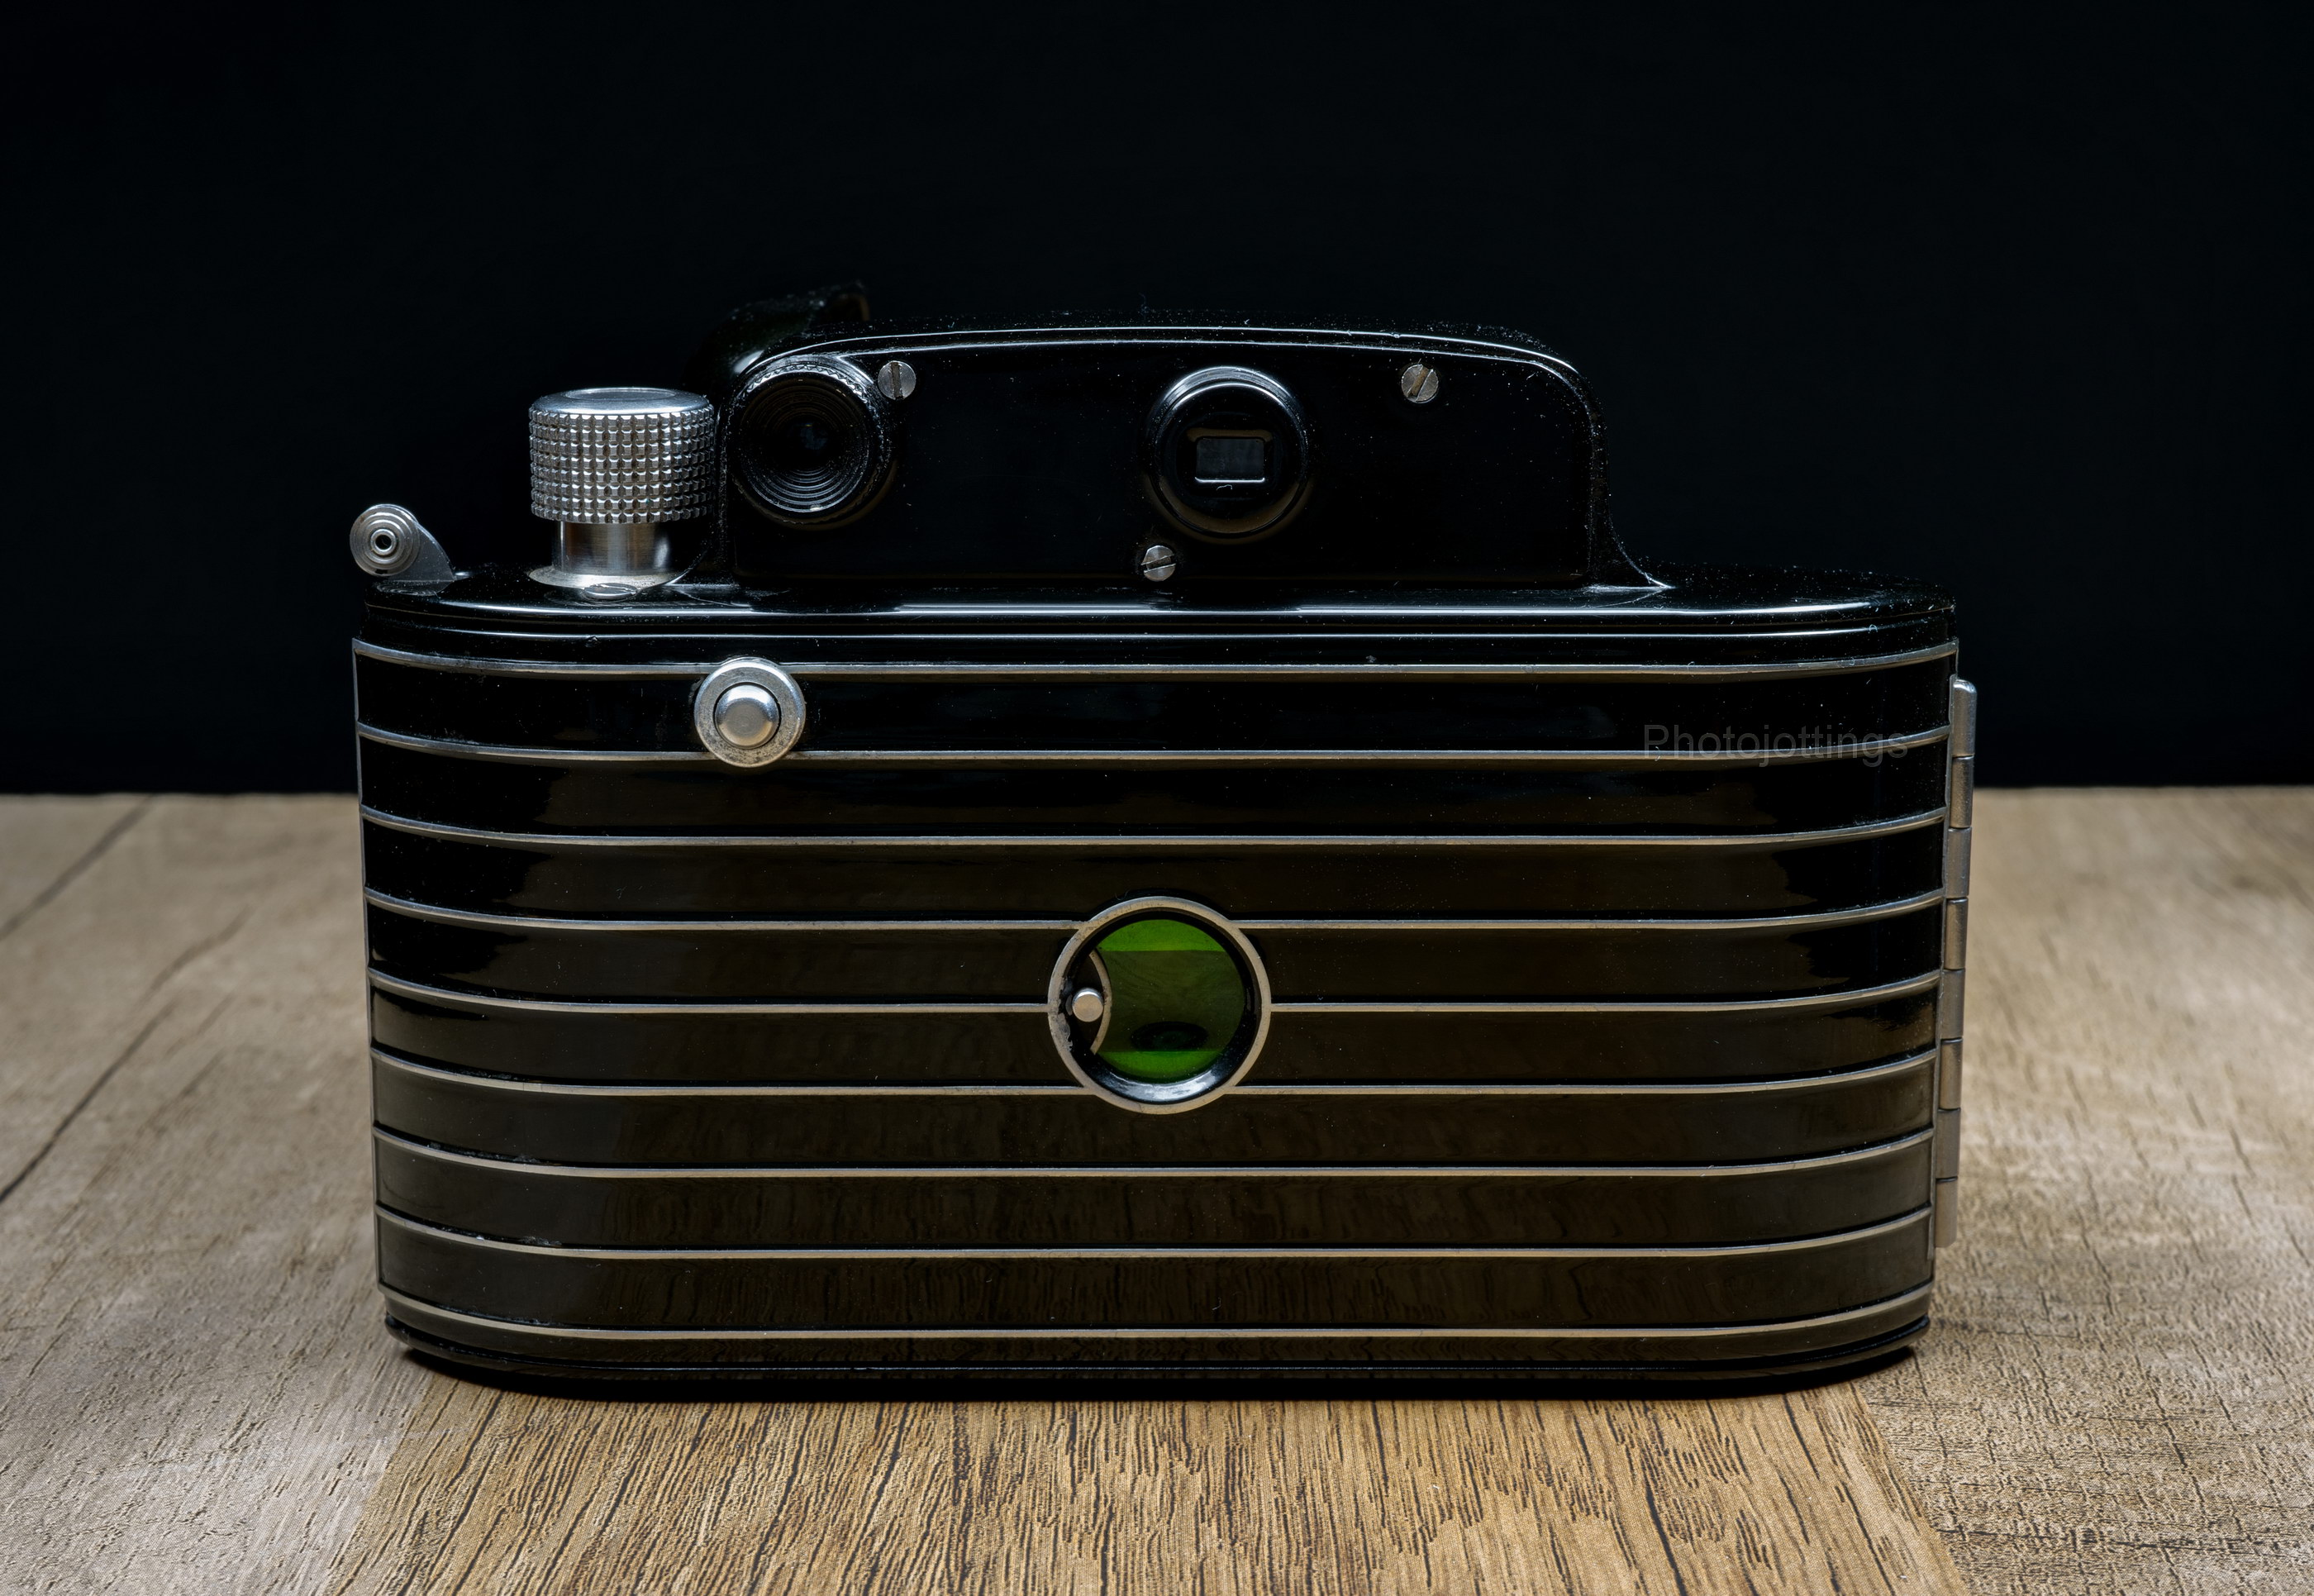
The shot counter window (with a green filter instead of the more common red) cover slides open by pushing it to the left in the direction of the arrow, see pic above. Note; my copy is quite stiff to open, and I can just barely do it with a fingernail.

With the back cover opened we can see the metal film gate, film tensioner and pressure plate. The end of the long arm by the pressure plate has a nipple that helps catch the single hole per shot that 828 film has. The original style empty take up spool on the left looks like a shortened 127 spool, but they’re actually completely different.

The Kodak Bantam Special is noticeably smaller than the Sony A6000 with pancake lens on the right.

The view through the rangefinder eyepiece. When you align the two images, the focus is correct, assuming your rangefinder is working correctly. My copy is off quite a bit, so I had to use ‘guesstimate’ focusing.

The original leather carrying case, it has ‘Kodak Bantam Special’ embossed on the bottom.
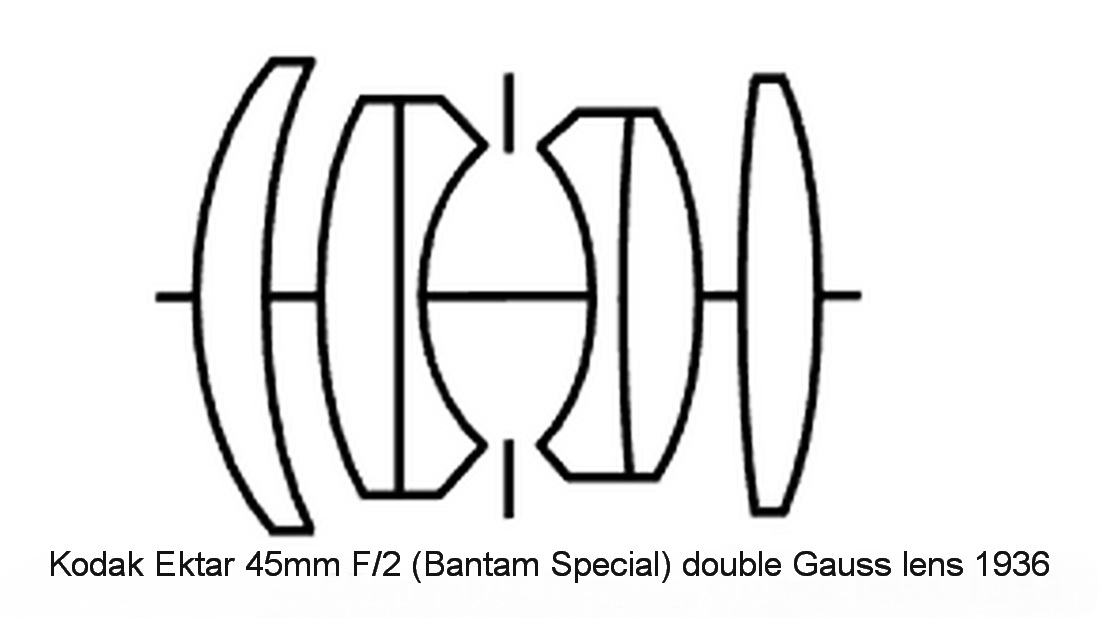
Lens schematic presumably (not Kodak sourced) showing the Bantam Special Ektar 45mm F/2 lens design.
Sample shots below.
Here are a few samples for your viewing pleasure. They’re 4000 pixels wide, so click image for a larger version.
The images below were take with Kodak Tri-X 400 speed film; and I’m not sure of the expiration date or storage conditions of the film.

Fountain of the aged. F/8. Everything looks pretty sharp here expect for the extreme edge at the top of the picture. Kodak Tri-X 400.

Dining nook, F/11 at 2 seconds. Kodak Tri-X 400.

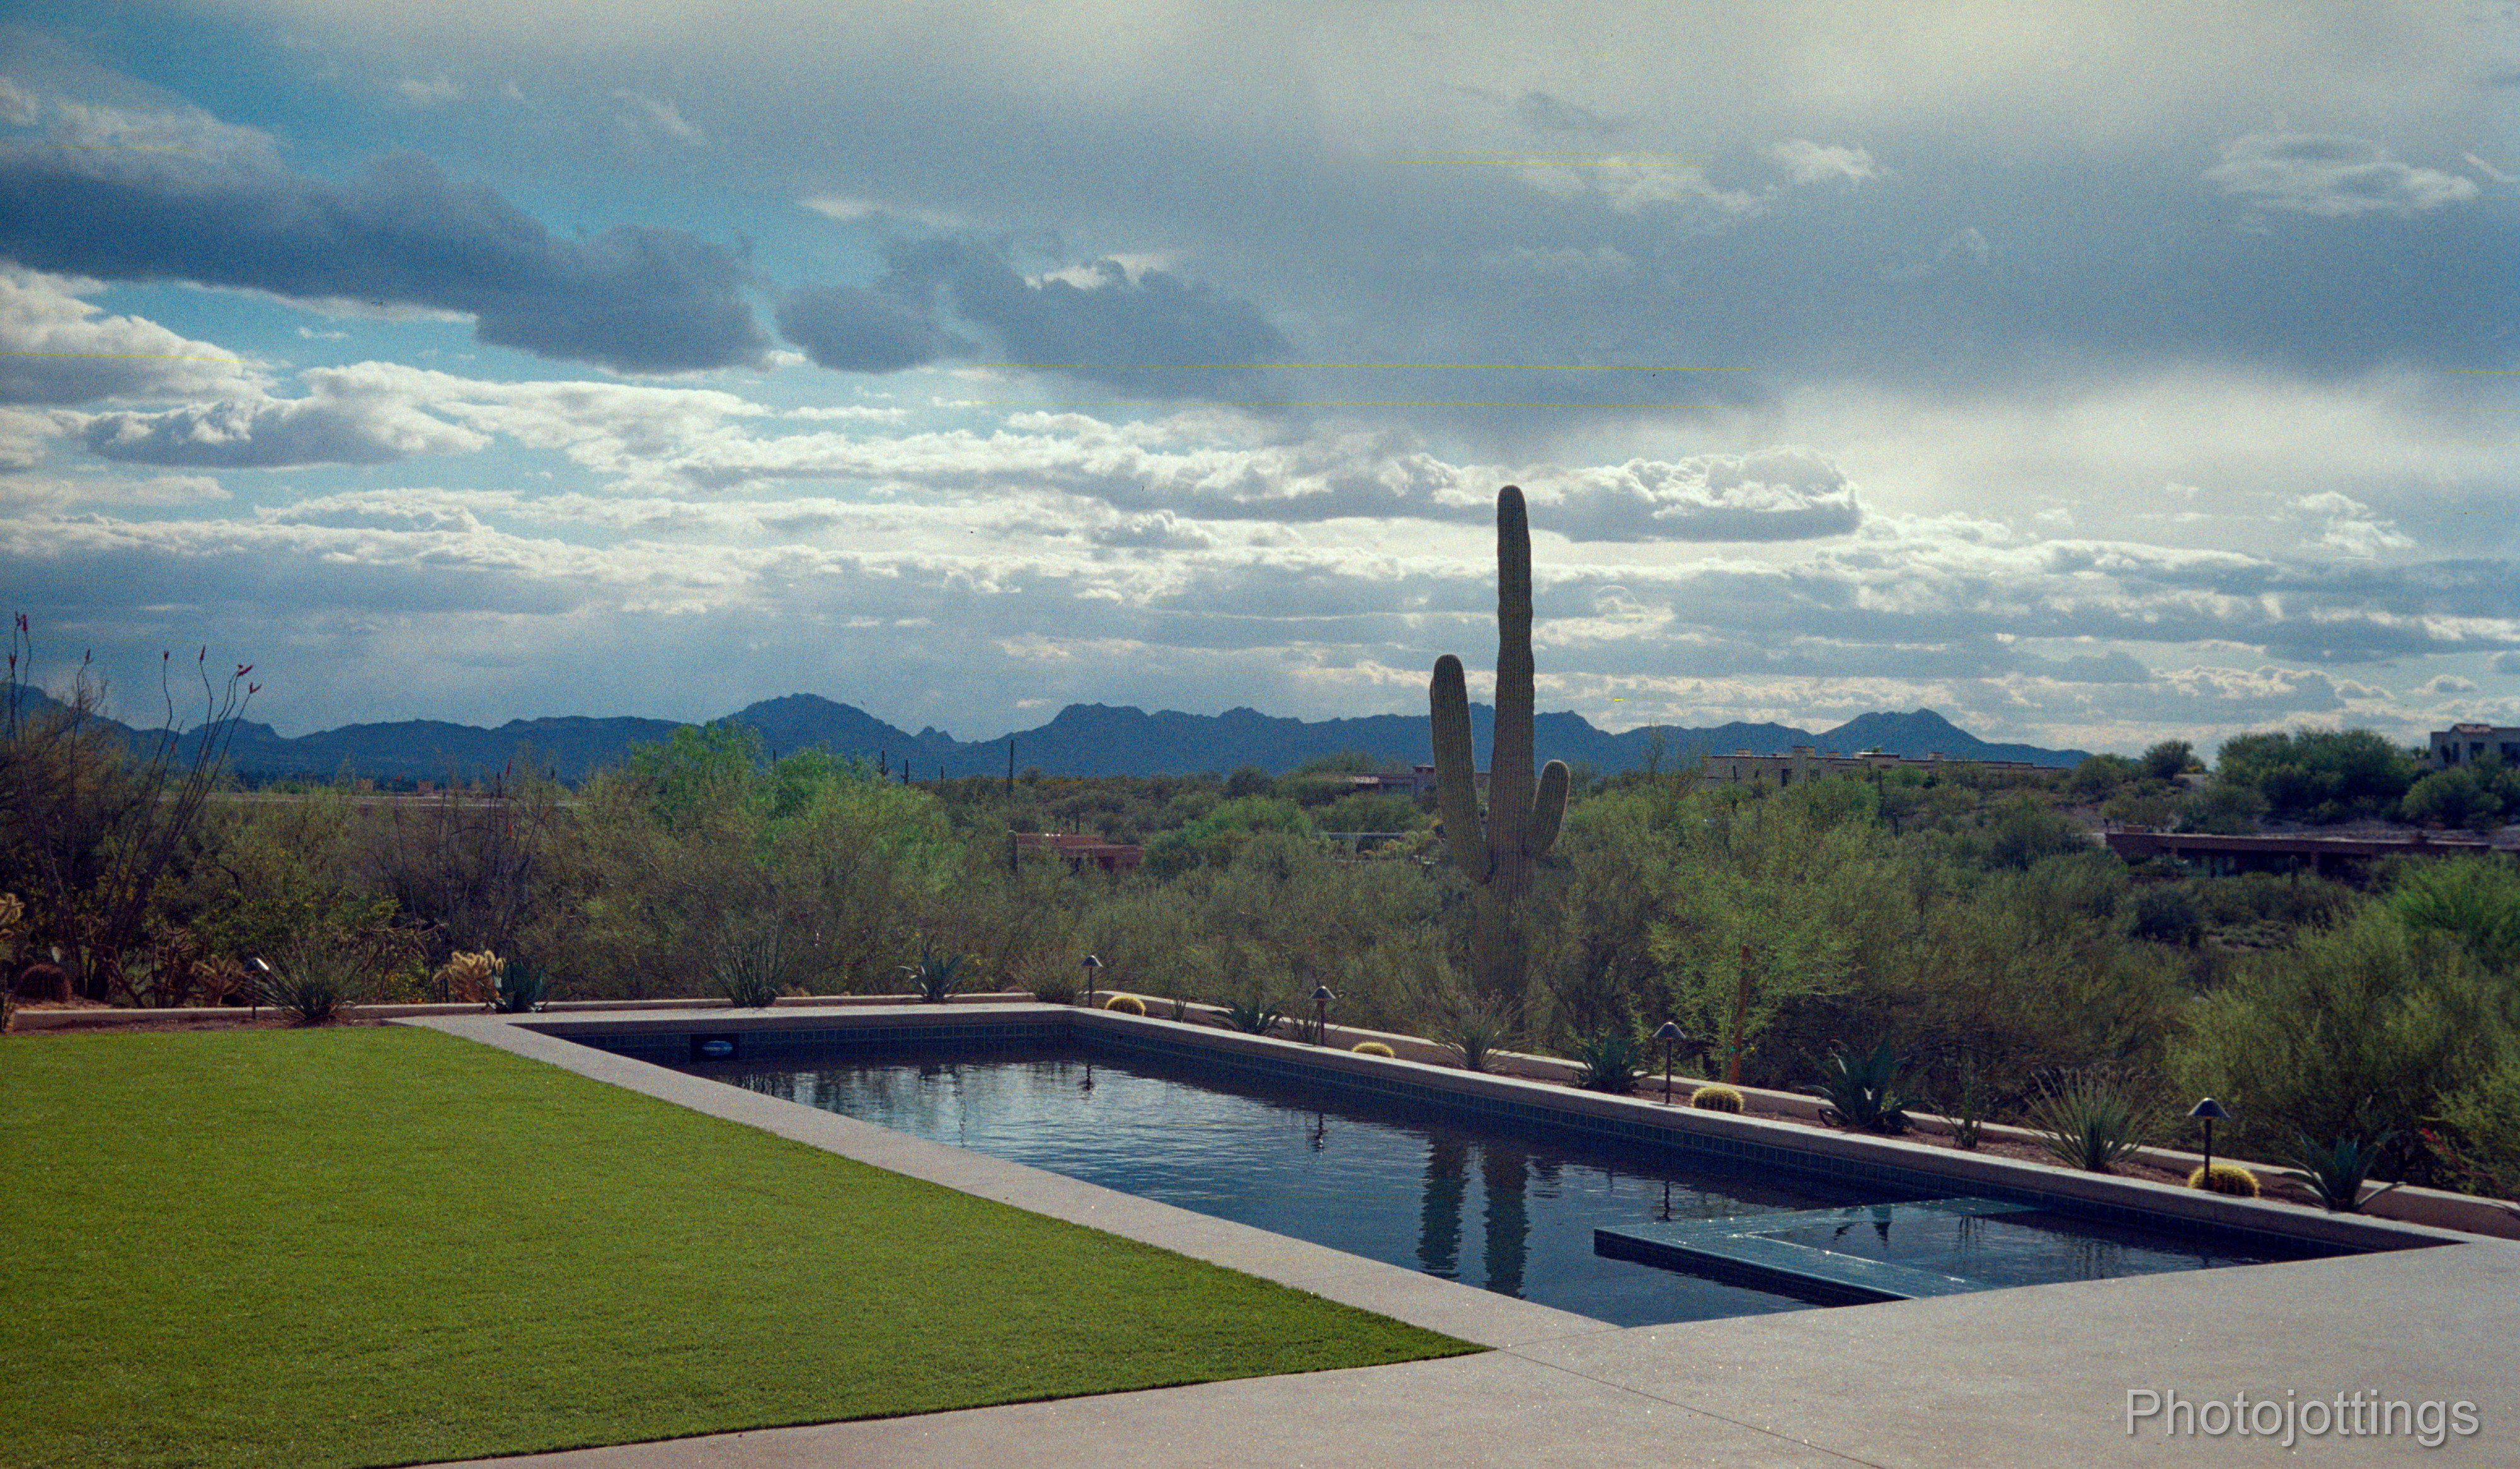
After the storm, around F/8. The color here is awful, and probably the result of sub par film and a hazy lens. Kodak Ultra Max 400.

Mid Century re-do. I think F/8-11 using Kodak Ultra Max 400.
Looking the other way, F/8-11, same awful film, Kodak Ultra Max 400. The yellow lines look like marks from the roll developing machine, or respooling problems.
Test scene below.
All test shots are displayed at 4000 pixels wide when enlarged, and that’s all the resolution included in the film. Scanned on a Nikon Coolscan 9000 ED.
Tripod used, no filters. Kodak Tri-X 400.
Kodak Tri-X 400 is not normally what I test cameras with, but it’s what I had on hand that day; I’m not sure of the expiration date or storage issues. Lines along the length are probably from respooling or the Roll developing machine.

F/2-2.8. Good sharpness here in the central area, but lacking contrast as you go towards the sides. Impressive results from a 1930s camera with the aperture at or near wide open.

Moving down to F/4-5.6 shows nice improvements all around, mostly noticeable along the sides.

F/8. The whole image looks sharp; pretty good results from 400 speed B&W film; I’m guessing fine grained film like Tmax 100 or even Ektar 100 would look great.
Conclusion.
The little Kodak Bantam Special turned in a good review, even when using questionable film as I did here, but is it really worth taking an 80+ year old camera to your photo outings? After all, it’s an expensive collectors camera, and film is also expensive if you plan on using it.
Although the feature set is good for a very small camera, I seems most people will buy the Kodak Bantam Special for the sole purpose of displaying it on a shelf. I do like it a lot, it has a very distinctive look; it’s a work of art for sure, and this one will be on display when not in use, but I’m not ready to relinquish the old gal to the shelf just yet. I’ve run a mere two rolls through it, and I feel like I need a few more to properly appreciate the characteristics of the camera.
Let’s talk about the positives. The Ektar lens is quite sharp, especially if you look past the grainy film I used for the test photos. When reading online reviews of the Bantam Special, owners tend to report disappointing lens performance. I think part of the problem is the film; original outdated film has to be over exposed by quite a bit due to loss in sensitivity, and may not have the dynamic range and characteristics of fresh film, either color or B&W. All current fresh film has been ‘hacked’ by someone either by respooling 135 film, or slicing 120 rolls. Both of these methods are not nearly as precise as what Kodak produced. Another problem is the lens has probably been messed with at some point in its long life, either by removal for cleaning, drops, or other misuse. My copy has a cloudy rear element, about what you’d get if you breathed on the lens to clean it, so I didn’t expect perfect color and contrast. Unfortunately, I couldn’t remove the rear lens with my current tool inventory, so I had to live with the results for now; but what if the lens was nice and clean? I’m guessing the color and contrast will be quite good, even for an uncoated lens. Another positive is the magnified rangefinder, it’s actually easy to see the converging lines and set the proper focus, that is if the rangefinder is calibrated correctly!!
There are a couple of negatives to discus; the handling of the camera is not the best; it’s too slippery in the hand, especially when it’s hot out, and you might wind up turning your pristine camera into a pile of junk with one slight handling miscue!! Fortunately, with each roll, I’m getting more accustomed to the awkward handling, so that shouldn’t be a problem in the long term. And then there’s the film issue. As of this review, there is no native original fresh film available, so you’ll probably end up using 35mm film, and respooling it, and of course you’ll have to live with the issues that may come with it, like soft areas from film flatness, scratches and light leaks.
My plans moving forward are getting the haze removed from the rear element, calibrating the rangefinder, and eventually running some fresh color film through it in the native film size. I’ll update the review when I have more pictures to show.
Anyhow, a thumb and a half up for the superb Kodak Bantam Special! Please consider buying through my links and help support the site. Thanks for visiting!