Minolta AF 300mm F/4 APO G (HS) Review - Photo Jottings

Minolta AF 300mm F/4 APO G (HS) Review

Here’s a brief look at the Minolta AF 300mm F/4 APO G lens.  Scroll down for the main review.

Lens
Minolta AF 300mm F/4 APO G (high speed)
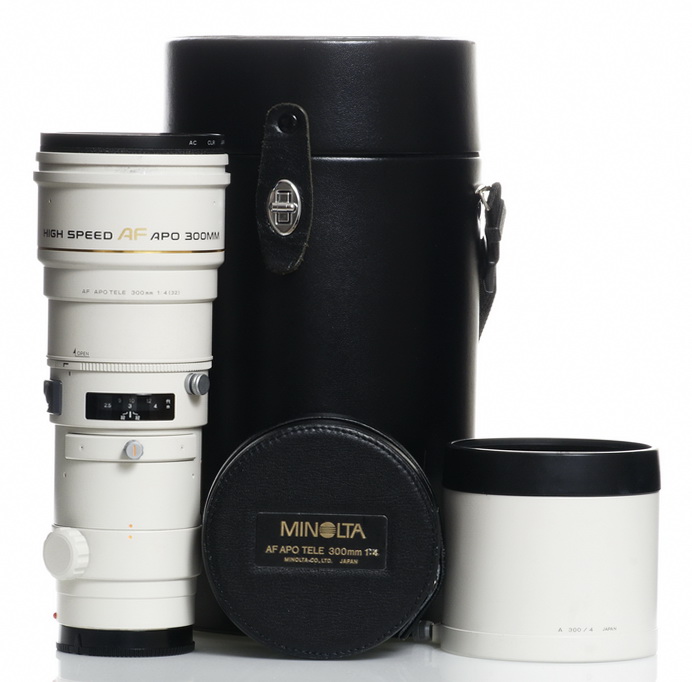
Box contents
Possible contents are: Vinyl clad hard case with strap, 82mm clear filter, vinyl front cover, and hood
Cost
in 2018, around $750-$1200, in good condition.
Build quality
Very good
Additional information
The Minolta AF 300mm F/4 model reviewed here is dated 1994.  It’s also smaller and lighter than it looks.
Specifications below
Optical configuration
9 elements in 7 groups, drop-in filter included in element count.
Angle of view
8° 20′  full frame, 5° 10′  APS-C.
Aperture
9 blades, curved
Full frame and APS-C
Yes, full frame and APS-C.   APS-C equivalent, 450mm
Depth of field and focus scales?
Focus distance window, with DOF hash marks at F/32
Minimum focus, image plane to subject
98.5″  (2500mm)
Minimum focus, end of lens barrel to subject
84.5″  (2146mm)
Hard stop at infinity focus?
No
Length changes when focusing?
No
Focus ring turns in AF?
Yes
Filter size
82mm at front, and 42mm drop-in.
Filter ring rotates?
No
Distance encoder?
No
Max magnification
0.14x, or 1:7.1
Min. F/stop
F/32
Sony teleconverter compatible?
Yes
Length changes when zooming?
N/A
Dimensions WxL  (my measurements)
3.58″ x 8.94″   91mm x 227mm.  Widest at inner hood mounting ring.
Maximum  extended length (my measurements)
11.89″  (302mm) with hood attached.
Weight bare (my scale)
3lbs, 2oz (1404g) bare (includes built-in 42mm filter).  In-use, includes lens, front filter and hood, 3lbs, 10oz (1638g).  Stored; (lens, filter, hood and caps) 3lbs, 12oz (1717g)  Front 82mm filter is 2.2oz (63g)  Hood is 6.1oz (172g).  Front canvas cover is 2.3oz, (66g).
Product shots.
March2010/300f4box.jpg
Box contents
March2010/300f4sd.jpg
Side view without hood attached
March2010/300f4sdhd.jpg
Side view with hood
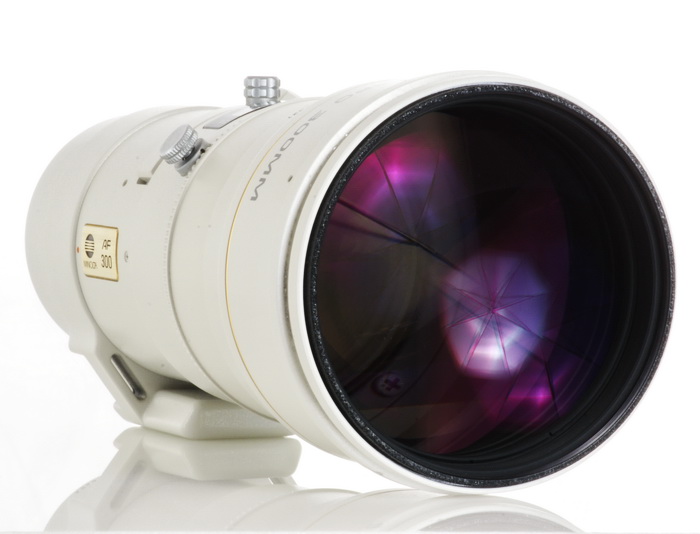
March2010/300f4ft.jpg
Front element without filter
March2010/300f4ft2.jpg
Front element with filter
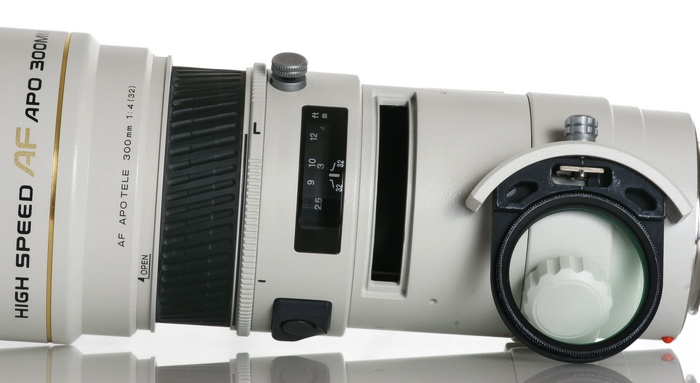
March2010/300f4flter.jpg
Filter slot
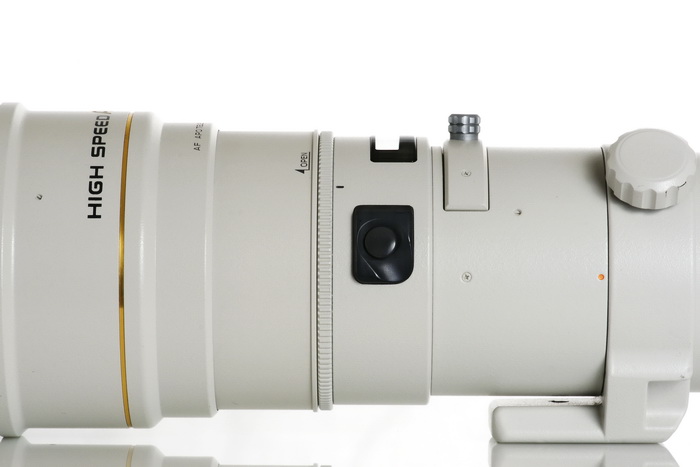
March2010/300f4covon.jpg
Focus ring cover in closed position
March2010/300f4covoff.jpg
Focus ring cover in open position
March2010/300f4bk.jpg
Backside mount with strap lugs visible
March2010/300f4comp.jpg
comparison to the Sony 70-400mm
The Sony A700 and A900 were used for this review.  For full frame results, go to the bottom of the page.  For a better understanding of terms and methods used in this review, go here.
This 300mm telephoto lens (made in Japan) features a relatively fast aperture of F/4 with a very good build quality.  It’s smaller and lighter than most people would think, and it’s fairly comfortable to use for shooting small animals or birds without a tripod.
There might be earlier versions of this lens, but I’m not sure, so I can only comment on what this lens has on it, and how it performs.  The lens reviewed here is dated 1994, but may have been purchased new as recently as the early 2000s.
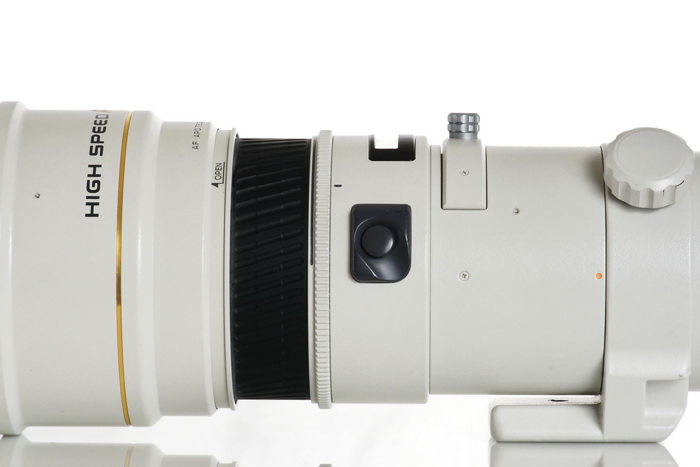
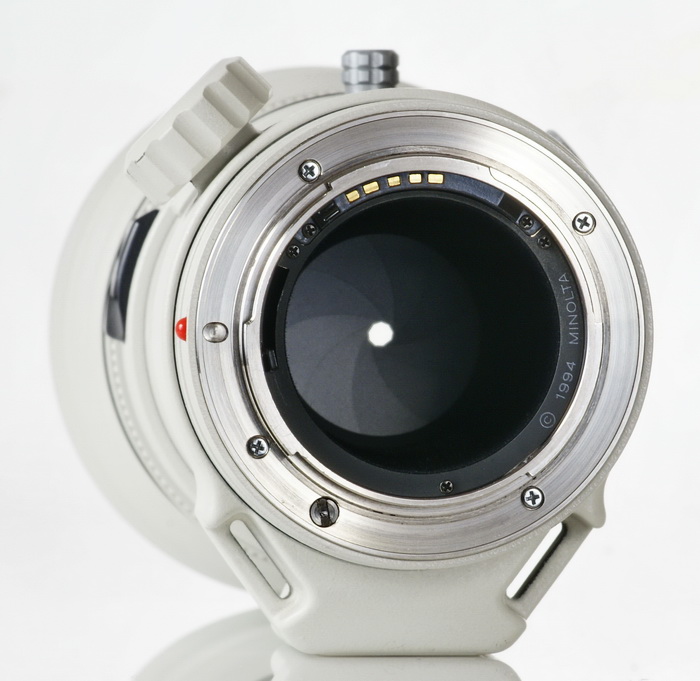
The Minolta AF 300mm F/4 APO G has some useful features on it.  For starters, it has a focus hold button, which can be changed to DOF preview on certain cameras.  It also has a sliding cover over the focus ring to keep your fingers from interfering with the action, (it moves during AF), and locks closed by a simple twist, see product shots above.   Near the mount is the requisite tripod collar that is unfortunately not user removable, however, it can be adjusted and locked in any position.  There are strap lugs attached to the tripod mount for carrying.  You might notice from peering through the back of the lens that there is no glass until you pass through the aperture blades and come to the drop-in filter, so it’s important to keep this lens closed or capped off when not mounted on the camera, and don’t forget to keep the drop-in filter in place at all times too. Dust entering these areas will be very difficult to get out later.
In the box (more than likely) is the lens, metal hood with a nice felt-type anti-glare covering on the inside, black vinyl clad hardcase, vinyl front cover, 82mm clear filter, and a 42mm “normal” drop-in filter.  As a side note; the hood mounts to the barrel by using a set screw with spring.  You simply pull up on the screw, align the three pins from the hood in the barrel groove and release the set screw, then tighten the screw to secure the hood.
Focusing.  The focusing ring is at the middle-to-front of the lens, and does turn during auto-focusing, that’s why you want to close the focus ring cover during AF.  Manual focusing takes just over 1/4 turn from Close-in to infinity, and doesn’t add any length to the lens.  AF speed is fast and fairly accurate most of the time.  It’s a little faster focusing than the Sony 70-400mm SSM G lens, but not quite as accurate based on my use.
Last, but not least of the interesting features is a handy mechanical focus limiter ring, that’s the thin white metal ring just below the focus ring.  It’s a free range type, so you can lock out focusing up close, or distance focusing.  To block close focusing, turn the silver thumb screw (on right side of distance window) counter-clockwise until the limiter ring turns freely, then turn both the focusing ring and limiter ring to the close focus point or all the way clockwise as you’re holding the camera and lens.  Next, turn the limiter ring counter clockwise, and it will engage the focus ring and they will turn together.  Set the desired minimum distance in the window, and lock the thumb screw by turning clockwise and tighten.  To block infinity or distant focusing, simply reverse this procedure and turn both rings all the way to infinity, and turn the limiter ring clockwise to engage the focus ring and set to the desired maximum distance in the window, then lock the thumbscrew.  There is a black hash mark on the limiter ring, and an index mark on the barrel, lining both of these marks up and locking the thumb screw will make the focusing stop exactly at the infinity mark, and will not allow it to go over, it’ll also keep the limiter ring from turning so you don’t mess up the focus with your hand.
Lens flare/ghosting.  Average control for a telephoto lens.  If you point the lens in the area close to the sun, you’ll get heavy veiling glare, and the hood doesn’t really do much to help mitigate this, but it does help some.  Definitely use the hood for stadium type lighting, and front element protection.  See sample images from the A900 at the bottom.
Color fringing (CA).  Strong lateral color fringing (along the sides), especially noticeable on a full frame camera.  I see moderate amounts of axial color fringing (can occur everywhere) at F/4 and very minor amounts at F/5.6-8 when focused properly.  Thankfully axial color fringing goes away as you stop down, and the severity depends on how accurately you focus; sharp focusing results in little color fringing, very slight mis-focusing can cause much more noticeable color fringing.  Check out the examples below the center and corner crop set.
Bokeh.  When looking closely there is spherochromatism, which makes the outer rings of highlights more noticeable with either green or magenta tinges depending on where the blur occurs.  At F/4 there is a ring around the disc, however, just one stop down and the ring nearly goes away leaving a smooth blur.  Overall, very good, even at F/4.  Look below for sample crops.
Color.   Similar to other Minolta and Sony lenses.
Close up filter.  N/A
Coma.  None.
Regular filters.  The 82mm front filter causes no problems on APS-C or full frame.
Filter size is 82mm on the end of the lens, and uses 42mm for the drop-in filter, which is the same drop-in type for the Sony 300mm F/2.8 SSM G.
Sony tele-converter use.  The lens works ok (typical washed out look) with the Sony TCs, so you’ll need to stop down one stop (or two) to get some contrast and resolution back, for a total of F/8 for the 1.4x, and F/11-16 with the 2.0x.  Focusing speed is reduced with the 1.4x TC, and the 2.0x is manual focus only on this lens.  The pincushion distortion with full frame coverage is rendered flat when using either TC, and very slight barrel distortion on APS-C.  Just in case you aren’t aware, when you mount the 1.4x TC, the Minolta 300mm F/4 becomes a 420mm F/5.6, and a 2.0x TC results in a 600mm F/8.  Go here to see how this lens performs using the Sony TCs.
Distortion.  None on APS-C, and very minor pincushion on full frame.  Check out the cropped sample below.
Distortion example directly below.
March2010/300f4disa700.jpg
No distortion.
Bokeh crops next.
           F/4
             F/5.6
March2010/300f4bok40b.jpg
March2010/300f4bok56b.jpg

These crops help illustrate what I was talking about above.  The F/4 bokeh has a ring around the disc, with a green ting with background blur, (or magenta with foreground blur).  If you stop down to F/5.6, things look smoother.  These 100% cropped examples are very harsh, when the highlights aren’t so bright, bokeh looks very smooth.

Real bokeh shots below.

March2010/300f4bokb.jpg
F/4
March2010/300f4bok2b.jpg
F/4

The full images above show real world background blur focused somewhat close at F/4, and looks smoother in some cases, like the top picture, or similar to the F/4 100% crop above, like the bottom picture, it depends on distance from subject, highlight intensity etc.  I was trying to catch a bird in the top pic, but it flew off as I pressed the shutter.

Light fall-off.

Light fall-off or corner shading is not noticeable in real pictures at any focal length or aperture using an APS-C camera.  Close focusing results in a little more light fall-off than at longer distances at F/4, both full frame and APS-C, but again, it’s not noticeable in real use.
            F/4
              F/5.6
March2010/300f4vig4.jpg
March2010/300f4vig56.jpg

Below are crops from the image centers and corners.

         F/4 center
          F/4 corner
March2010/300f40ctr.jpg
March2010/300f40cn.jpg
         F/5.6 center
          F/5.6 corner
March2010/300f56bctr.jpg
March2010/300f56cn.jpg
         F/8 center
          F/8 corner
March2010/300f80ctr.jpg
March2010/300f80cn.jpg
         F/11 center
          F/11 corner
March2010/300f11ctr.jpg
March2010/300f11cn.jpg
These images were taken at or near infinity, and show that F/4 is as sharp as it gets when used outdoors at longer distances.  The crops show no sharpness change, and may look worse at some apertures than others because of heat shimmer.  I see some axial magenta fringing at F/4, diminishing by F/8, and gone completely at F/11.  Along the sides (corner crops) I see lateral color fringing, (purple here), which doesn’t go away as you stop down.

Color fringing examples from the center.

           F/4, poor focus
             F/4, good focus
March2010/300cfbd.jpg
March2010/300cfgd.jpg

These crops help illustrate what I was talking about in the beginning of the review concerning focusing correctly to help reduce axial color fringing.  Both shots were taken at F/4, but the left crop is out of focus, which exacerbates axial color fringing.  If the subject is perfectly in focus, as in the right crop, there isn’t too much to be seen.  The 100% crops above were taken from the center of the image, focused at infinity.  It’s easy to see the left shot is out of focus at this size, but may not be so noticeable when viewing smaller screen sized images.  Bottom line; if you see a bunch of color fringing in the central part of your image, the image is probably a little out of focus.


Let’s check out the macro capabilities of this lens.

Below, check out the 100% cropped portion of the full image.  The sample shot was taken with the Sony A 700 12.2MP camera.  The subject is a standard US stamp, 0.87″x 1.0″ or 22mm x 25mm.  Also, note the macro shot was taken as close to the subject as focusing allowed; in this case whopping 84.5″ (2146mm), measured from the front of the lens barrel to the subject.
This lens has a reproduction size of 0.14x which is somewhat small by today’s standards, although it did produce a fairly sharp shot of the postage stamp.   As a side note; the “1996” on the bottom left of the stamp measures a mere 1mm wide.
March2010/300f4798af56b.jpg
As close as you can get. F/5.6. No larger image


Full frame section next.

Full frame results using the Sony A900 below.

Check out the differences when using a film or full frame camera below.  I’m only pointing out the noticeable issues as compared to the APS-C bodies, so if I don’t show it here, the results are not significantly different enough to warrant posting an additional set of images in this section.

Light fall-off

            F/4
              F/5.6
March2010/300ffvigf40.jpg
March2010/300ffvigf56.jpg

Light fall-off is only slightly stronger with full frame coverage when used wide open.  This isn’t noticeable in real pictures.

Lateral color fringing below.

March2010/300f4cf.jpg
Minolta AF 300mm F/4
March2010/70400cf.jpg
Sony 70-400mm

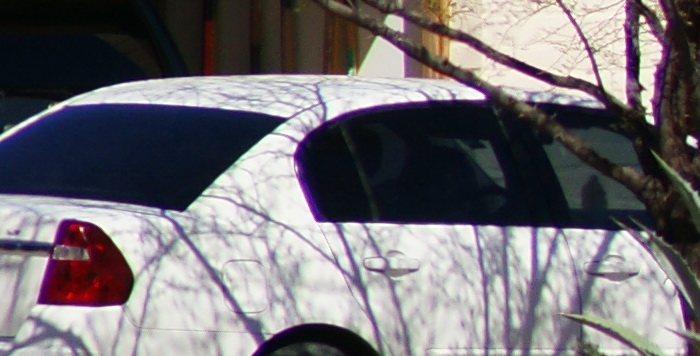
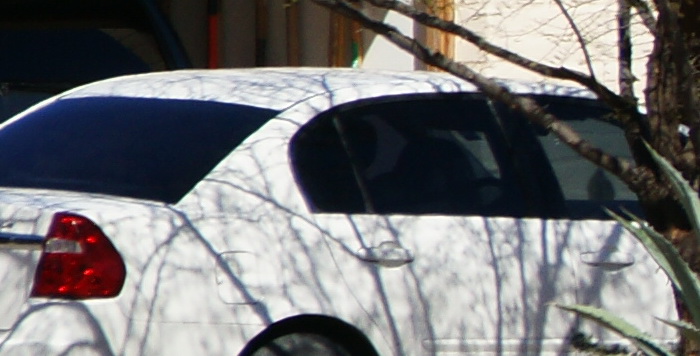
The top image is from the Minolta 300mm F/4 @F/5.6, the lower image is from the Sony 70-400mm at 300mm, F/5.6, and both crops were taken from near the last 700 pixels of the image on the middle left side.  The Minolta is showing its age as color fringing is poorly controlled by today’s standards.  The new Sony has excellent control.  Don’t try to discern sharpness differences between the two crops because I used AF, and there was a lot of clutter in the focus area, so I’m not sure if the AF chose the same distance.

Corner samples next.

     F/4
     F/5.6
March2010/30040ffcn.jpg
March2010/30056ffcn.jpg
     F/8
     F/11
March2010/30080ffcn.jpg
March2010/30011ffcn.jpg
     F/4 from center
     F/4 from corner
March2010/30040ffctr.jpg
March2010/30040ffcn.jpg

The corners are somewhat lacking in contrast, but do show good detail on a full frame camera.  Unfortunately, color fringing is much more apparent, and seems to get worse the more you stop down.  The two bottom crops show the F/4 center, and F/4 corner side-by-side, for what it’s worth.  I deliberately chose the above shots to point out the color fringing at its worst, if you don’t have very bright areas against dark areas in your pictures, this color fringing won’t be nearly as noticeable as it is here.

Distortion below.

March2010/300f4dis.jpg
slight pincushion distortion on A900

There is minor pincushion distortion with full frame coverage and the amount doesn’t seem to change between close and long distance focusing.  The signature is even across the frame, and easy to correct in post processing.

Flare and ghosting.

           F/5.6 sun in shot, offset
             F/5.6 sun out of shot by a third of a frame
March2010/gstm300in.jpg
March2010/gstm300out.jpg

This lens does a pretty good job of holding back ghosting artifacts, and flare seems about average among telephoto lenses.  In fact, it’s about the same as the super expensive Sony 300mm F/2.8 SSM G.  Don’t worry about this as you need to have the front element pointed almost directly at the sun to show what you see above.  Ignore the unsightly power lines and foreground debris, I was working against the clock for these shots.  Full resized images from the Sony A900.


Test shots From Sony A900 below.  The focus was on the house, the bottom and top of the image is not within the depth of field at these apertures.  These full size pictures are an addition to the original review, and were not intended to be shown in their entirety.

F/4 F/5.6 F/8 F/11

Click yellow buttons for full size versions.

Conclusion. 
 The Minolta AF 300mm F/4 lens turned in an overall very good performance.  When shooting real subjects outdoors, F/4 is as sharp as it gets.  Test charts look best a stop down or so.  The corners are pretty sharp at all apertures, with a slight degradation using full frame coverage.  This lens is built tough, but isn’t all that big and heavy, in fact, it’s about the same size and weight as the Sony 70-200mm F/2.8 G, so it could be used without a tripod.  Whether or not you can hold it steady is another story.  I found myself using this lens at F/4 most of the time, mainly to keep the shutter speeds up and avoid blur from camera movement.

Focusing is quite fast, but I found accuracy can sometimes be a little off if you look at 24mp images at huge sizes on your computer screen.  I also see an abundance of color fringing, both lateral and axial, however, Sony camera bodies may correct lateral type for you automatically, although I’m not sure if it’s in the current lens profile.  Full frame coverage exacerbates lateral color fringing, but perfect focusing keeps axial fringing to a minimum, and of course stopping down enough eliminates it.

Overall image quality is very good if you don’t have bright and dark subjects together like I show in the crops above.

The Sony 1.4x TC works good with this lens, but contrast suffers at all apertures.  The 2.0x is manual focus only, and doesn’t seem to be all that helpful at capturing extra detail unless stopped down hard and perfectly focused.

An alternative to the Minolta AF 300mm F/4 might be the Sony 70-400mm F/4-5.6 SSM G, or the mirrorless FE 100-400mm GM lens with adapter.  Obviously they’re a stop slower, and may focus slower, (but more accurately at longer distances based on my use) and cost more.  However, contrast seems slightly better, (go here for a comp), they’re more versatile, and color fringing is almost non-existent.  If color fringing doesn’t bother you, the Minolta may be a better choice, especially if you need F/4.  Bird shooters will need at least 300mm to pick up feather detail at longer distances.  For the ultimate in 300mm enjoyment, get the uber-expensive Sony 300mm F/2.8 SSM G.

The Minolta AF 300mm F/4 APO G would be a good candidate for an upgrade by Sony.  Get rid of the color fringing, and you’d have a great lens.  Unfortunately I don’t see that happening too soon, but we can always dream right!

Scroll to Top