Here’s a brief look at the Sony DT 18-250mm F/3.5-6.3 zoom lens. Scroll down for the review.
|
Lens
|
SAL18250 Sony DT 18-250mm F/3.5-6.3 zoom lens
|
|
Box contents
|
Front and rear caps, hood and users manual.
|
|
Cost
|
$650 retail
|
|
Build quality
|
Good
|
|
Additional information
|
Same as Tamron 18-250mm, but Tamron costs less money.
|
| Specifications below |
|
|
Optical configuration
|
16 elements in 13 groups
|
|
Angle of view
|
75°-6° APS-C.
|
|
Aperture
|
7 blades, circular
|
|
Full frame and APS-C
|
APS-C only, 35mm equivalent, 27-375mm. Will work on full frame, massive vignetting at all lengths, but A900 will crop image using APS-C size capt.
|
|
Depth of field and focus scales?
|
Focus distance scale only
|
|
Minimum focus, image plane to subject
|
18″ (457mm)
|
|
Minimum focus, end of lens barrel to subject
|
8.3″ (211mm)
|
|
Hard stop at infinity focus?
|
No |
|
Length changes when focusing?
|
No
|
|
Focus ring turns in AF?
|
Yes
|
|
Filter size
|
62mm
|
|
Filter ring rotates?
|
No
|
|
Distance encoder?
|
Yes
|
|
Max magnification
|
0.29x
|
|
Min. F/stop
|
F/22-40
|
|
Sony teleconverter compatible?
|
No
|
|
Length changes when zooming?
|
Yes
|
|
Dimensions W x L (my measurements)
|
2.95″ x 3.4″ 75mm x 86mm
|
|
Maximum extended length (my measurements)
|
6.5″ (165mm)
|
|
Weight bare (my scale)
|
15.5oz (440g) 16.5oz (467g) with caps
|
Requisite product shots.
 |
| Here’s the box and contents in the US, and no more silver color on the box, now it’s just white. |
 |
| Side shot, fully extended |
 |
| Rear shot, looks just like the Tamron. |
 |
| Front view, notice zoom lock button in back |
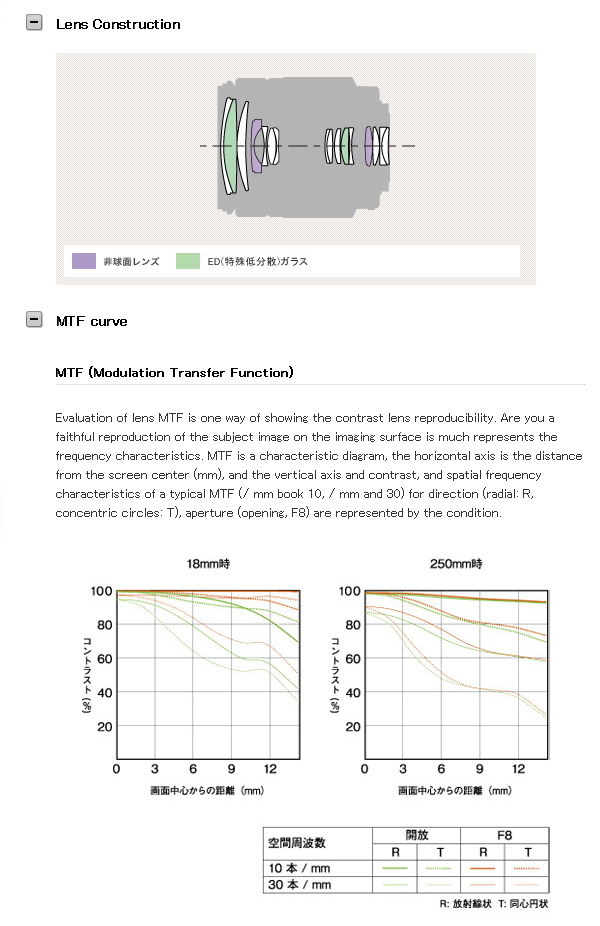 |
| Sony X-ray view and MTF chart |
The Sony A700 was used for this review. For a better understanding of my review methods and terminology, go here.
The Sony 18-250mm is about the same size as the other super zooms, like the Tamron 18-250mm, or the Sony/KM 18-200mm, and is fairly compact for the focal length. I think it’s the same as the Tamron 18-250mm, which I reviewed also. The Sony 18-250mm looks to be made mostly of plastic, but has a metal mount—not like the Sony/KM 18-200mm which has a plastic mount. It also has a zoom lock, which works only at the 18mm drawn-in setting, meaning you can’t set it at any focal length. If you don’t lock it while you’re walking around, it’ll extend all the way out, hindering your stride. It says made in Japan. Fit and finish are good. It has a rubber-like ribbed grip area around the zoom and focus rings, typical for Sony now. The lens has the focus distance marks (white and orange letters) with the standard FT/M. The focal length index marks are at 18mm, 35mm, 50mm, 70mm, 100mm, 200mm, 250mm. The last two coming very close together. The EXIF data matches the marks on the lens. This lens is for APS-C size sensors, and is not designed for film or full frame cameras, but will work in crop mode using full frame cameras. Sony says they use two “ED” elements and two or three aspherical elements in the construction of the lens.
This lens focuses a little slow out past 150mm, but it’s accurate with the A700. It likes to focus in “steps” mostly at the long end. Overall, it was on par with other lenses of this type—super zoom type. It seems to focus more accurately than the Tamron, but not by much. The manual focus throw is about average, it only takes about 1/5 of a turn from close to infinity focus. Sharp focus is tough as the ring has a little play in it, so it’s easy to overshoot your in-focus area. In everyday use, set to AF, it’s pretty good though. The closest focusing distance from lens barrel to subject is 8.3″ (211). It has the usual Sony in-body motor noise which may scare people who have grown-up accustomed to “silent wave motors” or “ultrasonic motors” and all that fancy stuff.
Aperture/focal length guide for the Sony 18-250mm F/3.5-6.3 This lens has overlapping numbers, for instance; you can get F/4 or F/4.5 at 35mm, depending on tiny movements of the zoom ring, this is quite common. Look below for guide.
|
Maximum aperture
|
F/3.5
|
F/4
|
F/4.5
|
F/5
|
F/5.6
|
F/6.3
|
|
Range
|
18mm-24mm
|
24mm – 35mm
|
35mm – 50mm
|
55mm – 75mm
|
75mm – 150mm
|
150mm – 250mm
|
Flare and ghosting. The lens glass is close to the end of the barrel. Flare and ghosting are a problem from 18mm to around 50mm, so use a hood for this one. Sun flare (rays) can be strong at times at the wide end, see sample below. With the sun centered, things look good, but at wide angle and max aperture you’ll see a faint ring around the sun. The lens comes with a petal type hood, which is pretty small. It works ok, but doesn’t eliminate most problems. I don’t normally use hoods, but I would with this one. This is one of the very few lenses I’ve tested where I would recommend keeping the hood on at all times. Use your hand for best control of flare and ghosting when the sun is outside the image, hoods do no good when the source of strong light is inside the image frame. Replacement cost for this hood is $25.
This lens is multi-coated and has the mild green/amber/magenta look and it appears to be about the same as other similar lenses, both from Sony and Tamron.
Filter size. 62mm. Other Sony lenses using this size are: 70-300mm G, CZ 16-80mm, 16-105mm, 24-105mm and the 18-200mm.
Filter use. No additional vignetting when using regular filters.
Coma. Medium at maximum aperture from 18mm-35mm, one stop down and it’s nearly gone. See crops below.
Color. Looks the same as other Sony lenses.
Color fringing control is about average, to below average on this lens, It’s most noticeable at the end of the zoom. Stopping down makes it worse at 250mm and beyond because of soft shots at F/6.3, where color fringing can hide itself, stopped down to F/11 where things are pretty sharp it’s more noticeable. Look for purple and red. Check the corner shots towards the end of the review. I noticed some center color fringing, which goes away as you stop down, see samples below. In regular pictures, it’s not all that apparent unless you’re shooting telephoto and looking closely.
 |
| Super strong barrel distortion. 18mm (27mm equiv.) |
 |
| Pincushion at 250mm. |
Barrel and pincushion distortion. The distortion at 18mm is very strong, and shows up in regular pictures, like horizons. At 28mm it’s flat, from then on, pincushion sets in and stays for the duration. I would describe the distortion on this lens as very strong at 18mm, and moderate to strong pincushion as you extend the zoom all the way.
Lens Bokeh. The Sony 18-250mm F/3.5-6.3 doesn’t have a very appealing bokeh in my opinion, it’s a little harsh or “busy” looking, similar to the 18-70mm, and 18-200mm lenses. See samples below.
light fall-off (directly below) looks moderate at 18mm and F/3.5, then clears up nicely a stop down. At the long end, there’s some moderate but evenly dispersed light fall-off at F/6.3, at F/8, there’s no problem.
|
18mm @ F/3.5
|
18mm @ F/5.6
|
 |
 |
|
250mm @ F/6.3
|
250mm @ F/8
|
 |
 |
Random samples below.
|
18mm @ F/3.5 sun flare
|
18mm @ F/5.6 ghosting
|
 |
 |
|
18mm @ F/3.5 bokeh
|
18mm @ F/5.6 bokeh
|
 |
 |
|
250mm @ F/6.3 bokeh
|
250mm @ F/8 bokeh
|
 |
 |
|
18mm @ F/3.5 coma
|
18mm @ F/5 coma
|
 |
 |
|
250mm @ F/6.3 color fringing
|
250mm @ F/11 color fringing
|
 |
 |
The top left shot above shows a rare flare occurrence which comes at wide angle and maximum apertures, the sun isn’t very close to the frame edge, no, it’s not a cloud. You can see the light fall-off too, which is noticeable here, but exacerbated by the smooth blue sky. Don’t worry about this in real pictures as you would be using a stopped down aperture in this kind of light. On the right side is a typical case of ghosting with this lens at the wide end.
The middle rows are bokeh, characterized by harsh edges with a busy look, it looks nearly the same as on the 18-200mm, and 18-70mm lenses. Stopped down it looks a little smoother. Cropped from center of image.
The next row is coma, and it’s moderate from 18-35mm at maximum apertures, one stop down and it clears up. Cropped from lower left corner.
The last row shows some center of frame (axial) color fringing at 250mm. Lots of blue in this shot at F/6.3. Thankfully, this kind gets better as you stop down. Cropped from center.
Corner softness. See cropped images below.
|
18mm @ F/3.5
|
18mm @ F/5.6
|
 |
 |
|
250mm @ F/6.3
|
250mm @ F/11
|
 |
 |
The corners from 18mm-50mm are just a little soft, but very acceptable. one stop down and they sharpen up, and you don’t need to stop down any more because they stay the same until F/11, at which point they soften up. The corners at the long end are really not much different from the centers, soft at F/6.3, a little sharper at F/8, and the sharpest at F/11. In normal telephoto shots, it’s hard to tell the difference between F/8 and F/11. If you like taking pictures of test charts and stamps, you definitely need to stop down to F/11-16. Close focus macros are real soft at F/8. Also notice how the color fringing looks worse as the image sharpens up. Some people think stopping down the aperture gets rid of color fringing, but not the kind occurring along the periphery. Cropped samples above.
Center samples next.
|
18mm center crops below.
|
|
|
F/3.5
|
 |
|
F/5.6
|
 |
|
F/8
|
 |
| F/11 |
 |
Look at the boring shots above and below. I’m only including the two focal lengths so I don’t get too long winded, but it’ll definitely give you a good idea of what’s happening on the wide and long end. The 18mm wide setting is pretty sharp on this lens, even at F/3.5, max sharpness comes at F/5.6-F/8, then diffraction softens the F/11 image. There is very little difference between each shot, and I’d be completely satisfied with the F/3.5 top image. Comparing frames at 100% is often fruitless.
|
250mm center crops below.
|
|
|
F/6.3
|
 |
| F/11 |
 |
In this example you can see improvements in sharpness by stopping down the lens to F/11, just make sure you watch your shutter speeds. This is a 300 meter shot, where atmospheric conditions can wreak havoc on fine details. The F/6.3 image is a little soft at 250mm, at F/8 it’s better, and F/11 is the sharpest aperture. There isn’t a huge difference, but worth pointing out.
Below, you’ll see the difference between the 18-200mm lens at 200mm, and the 18-250mm lens at 250mm.
 |
| 200mm, 300mm equivalent. |
 |
| 250mm, 375mm equivalent. |
Check out the macro shot.
Below, check out the sample and click the picture to see a 100% cropped portion of the full image, (337kb). The sample shot was taken with the Sony A700 12.2MP camera. The subject is a standard US stamp, 1″x 3/4″ or 25.4mm x 19mm. Also, note the macro shot was taken as close to the subject as focusing allowed; In this case, 8.3″ or 211mm, measured from the front of the lens barrel to the subject.
Below, check out the sample and click the picture to see a 100% cropped portion of the full image, (337kb). The sample shot was taken with the Sony A700 12.2MP camera. The subject is a standard US stamp, 1″x 3/4″ or 25.4mm x 19mm. Also, note the macro shot was taken as close to the subject as focusing allowed; In this case, 8.3″ or 211mm, measured from the front of the lens barrel to the subject.
This lens has a good reproduction size, 0.29x, but it isn’t very sharp until you stop down to at least F/11, the shot below was taken at F/14, it looks pretty much the same at F/11.
 |
| Full macro shot, 337kb, 100% crop F/14 |
Conclusion
This lens is a step-up from the 18-200mm zoom lens offered by Sony in kit form on select bodies. The ($650) Sony 18-250mm has a 35mm equivalent of 27-375mm. It costs $100 more than the Sony 18-200mm ($548) if you buy retail. For the extra $100 you get a little extra reach, a metal mount and a handy zoom lock, but that’s not a big deal. The very similar Tamron 18-250mm costs even less.
This lens is a step-up from the 18-200mm zoom lens offered by Sony in kit form on select bodies. The ($650) Sony 18-250mm has a 35mm equivalent of 27-375mm. It costs $100 more than the Sony 18-200mm ($548) if you buy retail. For the extra $100 you get a little extra reach, a metal mount and a handy zoom lock, but that’s not a big deal. The very similar Tamron 18-250mm costs even less.
The wide angle setting has some issues, like strong distortion from 18-20mm, moderate light fall-off wide open at max aperture, and some flare and ghosting at wide angle. Towards the end of the zoom you’ll get somewhat soft images at F/6.3, and plenty of color fringing. If you look at your pictures at 100% on a computer screen, you’ll see all the previously mentioned issues, but if you make normal prints and view at regular sizes, you won’t see all this stuff and shouldn’t worry about it. Just enjoy the convenience factor.
The bottom line: This is a do-it-all lens, and it’s really pretty good, and very handy. If you’re only going to take one lens on a vacation, this is the one to take. Make sure you keep the lens stopped down hard (with sufficient light) when at 100mm or above for best results, just remember to keep your shutter speeds up to avoid blur, otherwise you defeat the purpose of stopping it down. Bump your ISO to 200 or 400. When taking maximum magnification shots, keep it stopped down to F/11.