
Our review camera for this week is the Kodak No. 1A Series III with Carl Zeiss Jena Tessar F/6.3 lens. I purchased this ‘high end’ folding Kodak a few years ago, and have used it on several occasions. Recently I ran a couple rolls of 120 film using some adapters for 6×11 images, but more on that farther down in the review. Apart from the nice lens, the 1A has a focusing scale in both feet and meters, and uses a thumbscrew to move the lens and shutter assembly back and forth to get the correct focus. Another neat feature is what Kodak calls rise, (and sometimes ‘slide’ but not on this model); it’s used for correcting keystoning when you point the camera up, as in a picture of a tall building; however, the correction doesn’t show up in the viewfinder, so you have to guess what’s happening, and hope you have the subject in the frame; so maybe it’s not so ‘neat’ or ‘useful.’ I’ve used this feature on a larger camera, (Kodak 3A), and it works quite well, but only if you check it with a ground glass back, which is not an option on the 1A.
Our fully working review camera was manufactured around 1932, at the very end of the ‘Autographic’ film era (and apparently when Kodak finally got tired of producing film with this special feature that nobody really used); in fact, there is no mention of the ‘autographic’ feature at all on the camera other than the obvious window and ‘A’ in the A116 film designation stamped on the back. It’s a somewhat small camera, but not really lightweight, and certainly not something that you would put in your shirt pocket. Early 1A models used the term ‘pocket camera, but no such language exists on the later series.
I have nine good sample images for you, including some from the 1930s; one from the early to mid 1970s, and two from using 120 film in the camera recently.
With the introduction out of the way, let’s head back to the 1930s and take some snaps!
Name; Kodak No. 1A Series III, 116 film, 2½ x 4¼ (6.5x11cm) negative.
Manufactured by; Eastman Kodak Company, Rochester, NY.
Date of manufacture; around 1932.
Price; I’m guessing around $50-$60 new, but this model was apparently for the UK market according to this book. Current eBay prices range anywhere from $75 to $150 for a good working model depending on condition and if it has the box etc. My camera is in fully working condition, and equipped with the Zeiss Tessar lens, along with the Compur eight speed shutter and a light leak free bellows.
Build material; metal, with a leather bellows. Incidentally, a receipt shown online indicates a camera company charged $4.50 for a bellows replacement on the No. 1A in 1954.
Box contents; probably just the camera and instruction manual.
Weight; camera only, 29.4oz (834g).
Dimensions; 3.25″ (83mm) wide, 8.25″ (210mm) tall, 1.5″ (40mm) deep, and 6.7″ (170mm) when extended at 100′ focus.
Focal length; 130mm. The camera ‘sees’ about the same as a 50mm lens in 135 format.
Aperture; F/6.3-F/45 manually set using a lever.
Focusing distance; 6′ to 100′, or 2m to 30m. Scale on side marked in feet and meters. Infinity focus is correct at 100′ or 30m.
Prints; originally about the same size as the negative, 2½ x 4¼, all black & white of course with a white border, but color film was available until the 1980s. Good film and proper technique today will make very sharp 12×18″ or larger prints.
Approximate resolution; , similar to a 24mp digital sensor camera with kit lens.
Lens; Carl Zeiss Jena Tessar F/6.3, uncoated four element in three group design. Focusing is done by moving the thumbscrew, which in turn moves the entire lens and shutter combination.
Shutter and speed; aperture has 9 blades, speeds range from 1 second to 1/250, with ‘T’ time mode, and ‘B’ bulb mode. Time mode works by pressing and releasing the shutter button once to open, and a second time to close. Bulb mode works by pressing down and holding the button, and then releasing to close.
Features; two tripod sockets, a vertical and horizontal stand for keeping the camera level on a flat surface. Viewfinder has two masks, one for viewing horizontally, and one for vertical orientation. Autographic film compatible using door on back of camera, and stylus stored alongside the lens, see picture above.
Film; 116, the dimensions for this size negative is 2½ x 4¼, or 6.5 x 11cm. Actual frame size when using 120 film, 60mm x 109mm.
Accessories for this model; there are a lot of accessories for this model, but the most popular are: cloud filters, a portrait and close-up filter; and a leather carrying case.
Crippling features and omissions; the little viewfinder makes it hard to set your composition properly as it’s mounted to the lens board, and quite small. Additionally, the film was discontinued in the mid 1980s, and it’s super expensive when available in sealed boxes.
Good features; Two 1/4″-20 tripod sockets that you’ll need if you shoot at small apertures; and a cable shutter release for the same reason; low shutter speeds.
Product shots with descriptions.
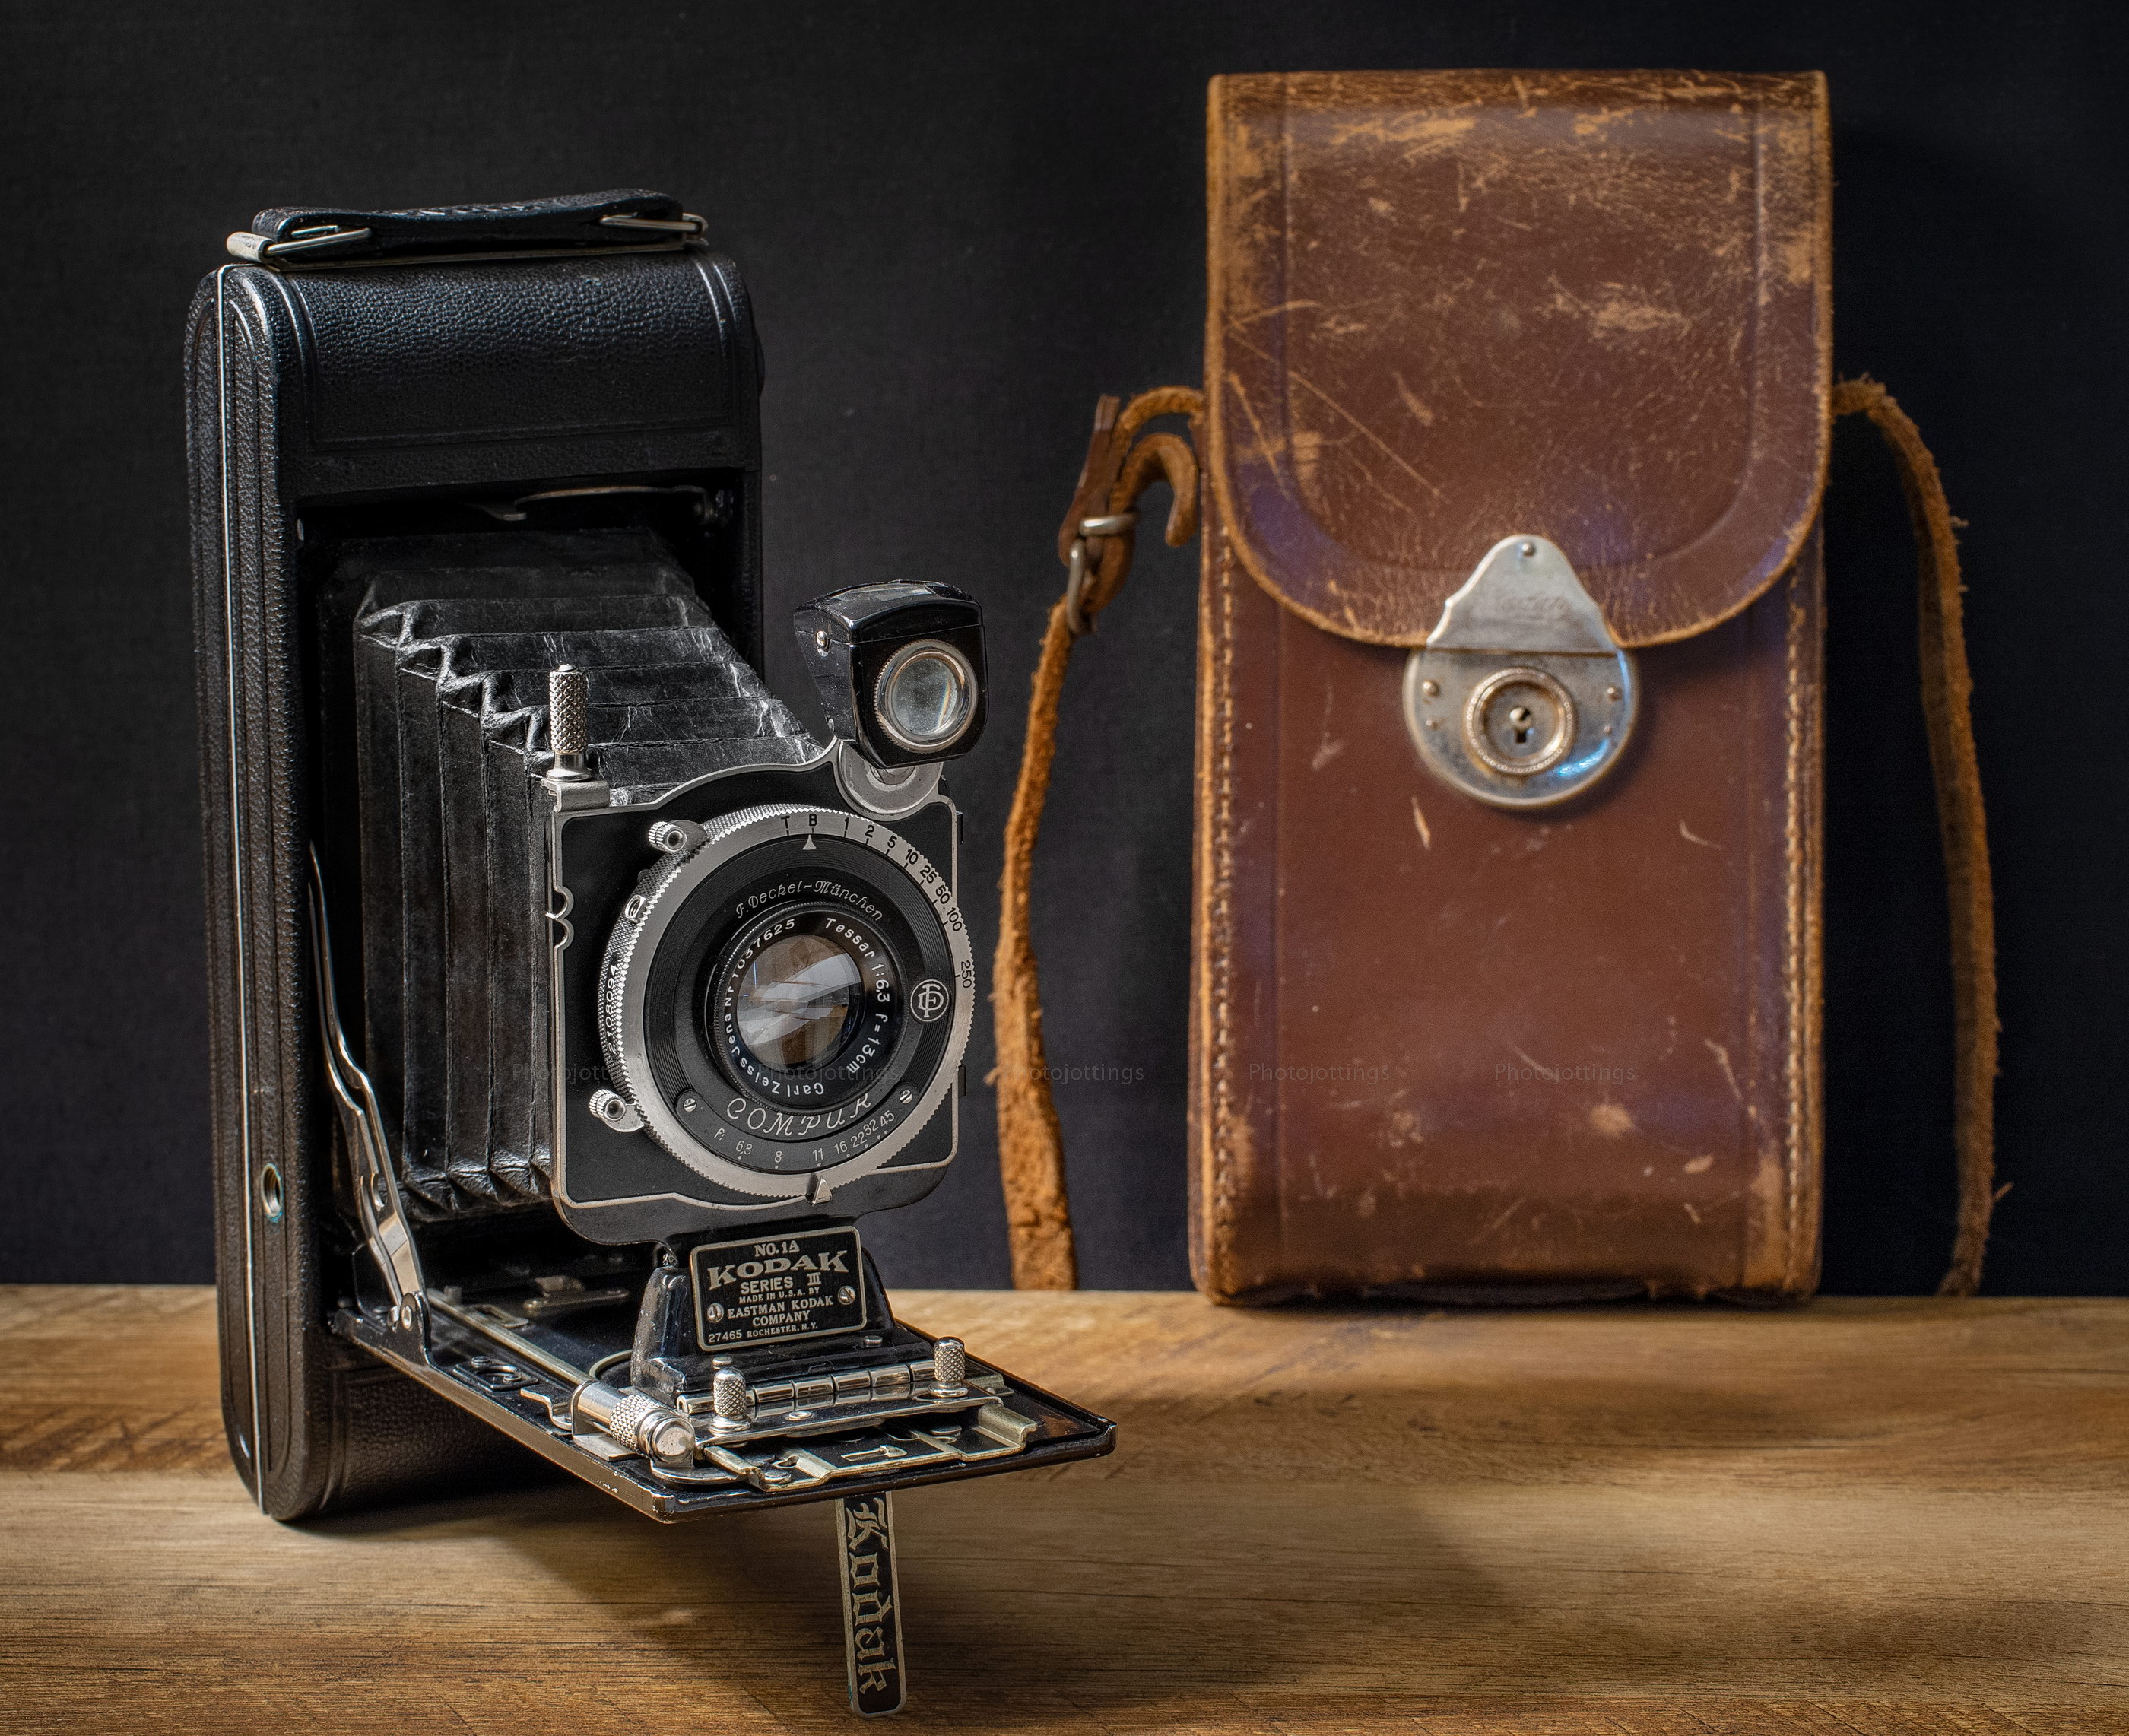
Shown here is the handsome Kodak No. 1A Series III with a carrying case; I’m not sure if it’s a genuine Kodak case though. The long knurled knob above the shutter and opposite the viewfinder adjusts the ‘rise’ mechanism. You turn the screw until you think you’ve corrected the keystoning (ex; tilted-in building from pointing the camera up) enough. As I said in the introduction, you can’t see the effect in the viewfinder, so you’ll have to guess how much correction is needed, and whether or not it’s framed correctly. In the picture it’s in the center position, between the two ‘U’ shaped cut-outs; that’s where you want it to be for normal picture taking.
The camera is extended and ready to shoot in the ‘portrait’ orientation with the kickstand down. The Stylus for the autographic feature is stored along the lens board on the left side as you shoot, or right in this picture.

The back of the camera shows the red window for seeing the shot number on the film backing paper. The long slot is for recording information on Kodak’s special Autographic film: to do that you use the included stylus to move the ‘door’ down and out of the way, and write your message or shooting data in the area of the slot; and then hold it up to the light for a moment and allow it to ‘burn’ in. The chrome winding knob is on the top right; it should only turn one way, if it turns both ways, the gears are stripped, but it should still be usable.

The camera in the folded up position. The serial number is located under the ‘Kodak’ leveling stand.

The camera comes apart using by pressing a button by the winding knob. The film is loaded on the left side, with the empty spool on the right. The back contains a film pressure plate and red window.

A good view of the focusing index scale and thumb screw focusing. When retracting the lens onto the body, set the lens to the 100 foot mark, squeeze the two knobs and push back until the lens is inside the camera body. Notice the cracked ‘Bakelite’ support block holding the name plate, lens and focusing index pointer. Oddly, it’s still as solid as can be.
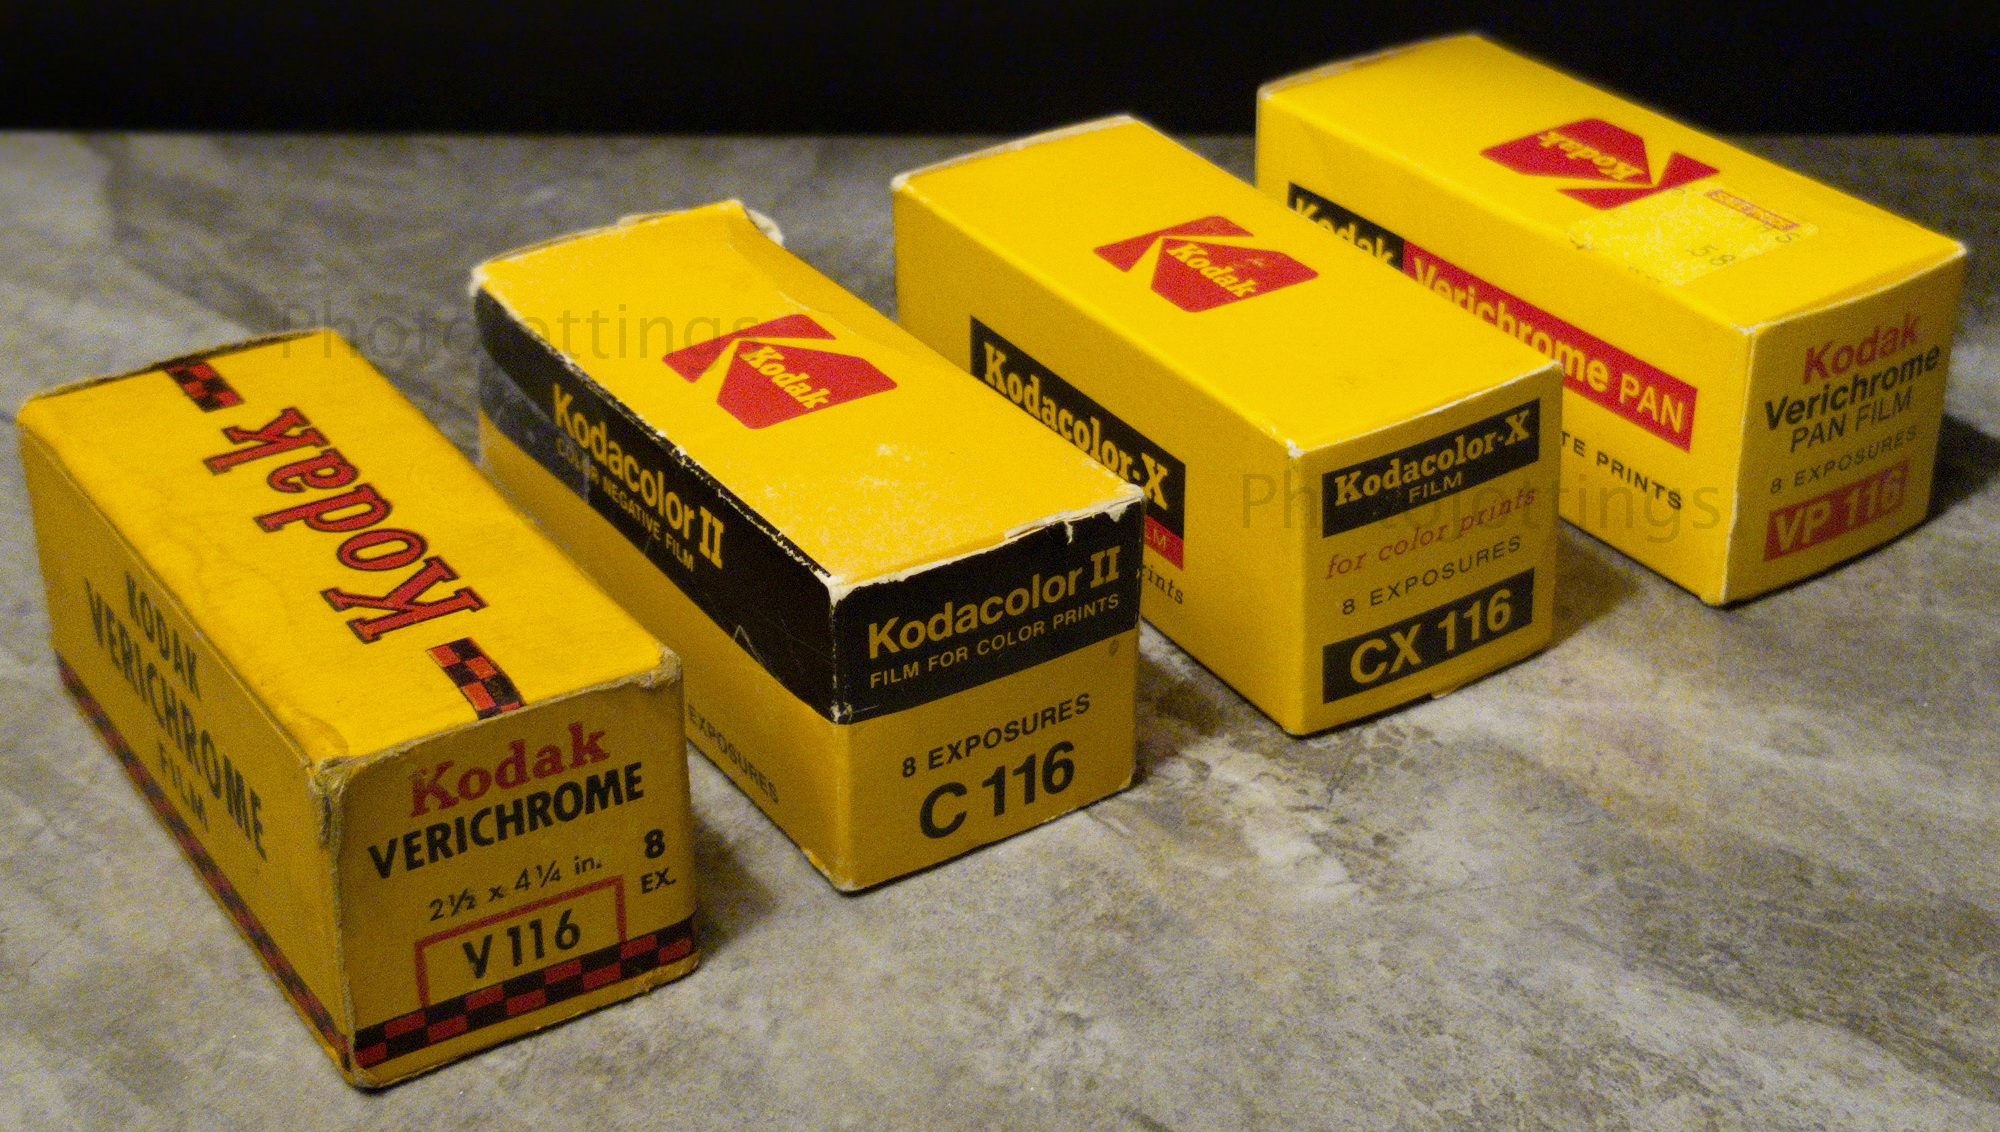
Here’s my collection of 116 film so far. From left to right; Kodak Verichrome (ortho B&W) V 116, tropical packaging (comes in sealed thin metal can), expired in May 1947. Kodacolor II C 116, expired Nov 1984. Kodacolor-X CX 116 (uses now obsolete C-22 processing) expired Oct 1975. Kodak Verichrome Pan (normal B&W) VP 116, expired March 1976.
Sample shots below.
Here are some samples for your viewing pleasure. They’re around 6000 pixels long, so click for a larger version. Scanned on a Nikon Coolscan 9000 ED.

This is the whole image if you shoot with 120 film. Notice the film markings along the sides. Scanned on an Epson V700.

The same image as above but this time cropped to 6×9 and scanned on the much better Nikon 9000. I’m not sure why, but I took this picture at a diffraction limiting F/45, and it still looks super sharp, even along the sides; F/45, 2 seconds, using Kodak Portra 160.
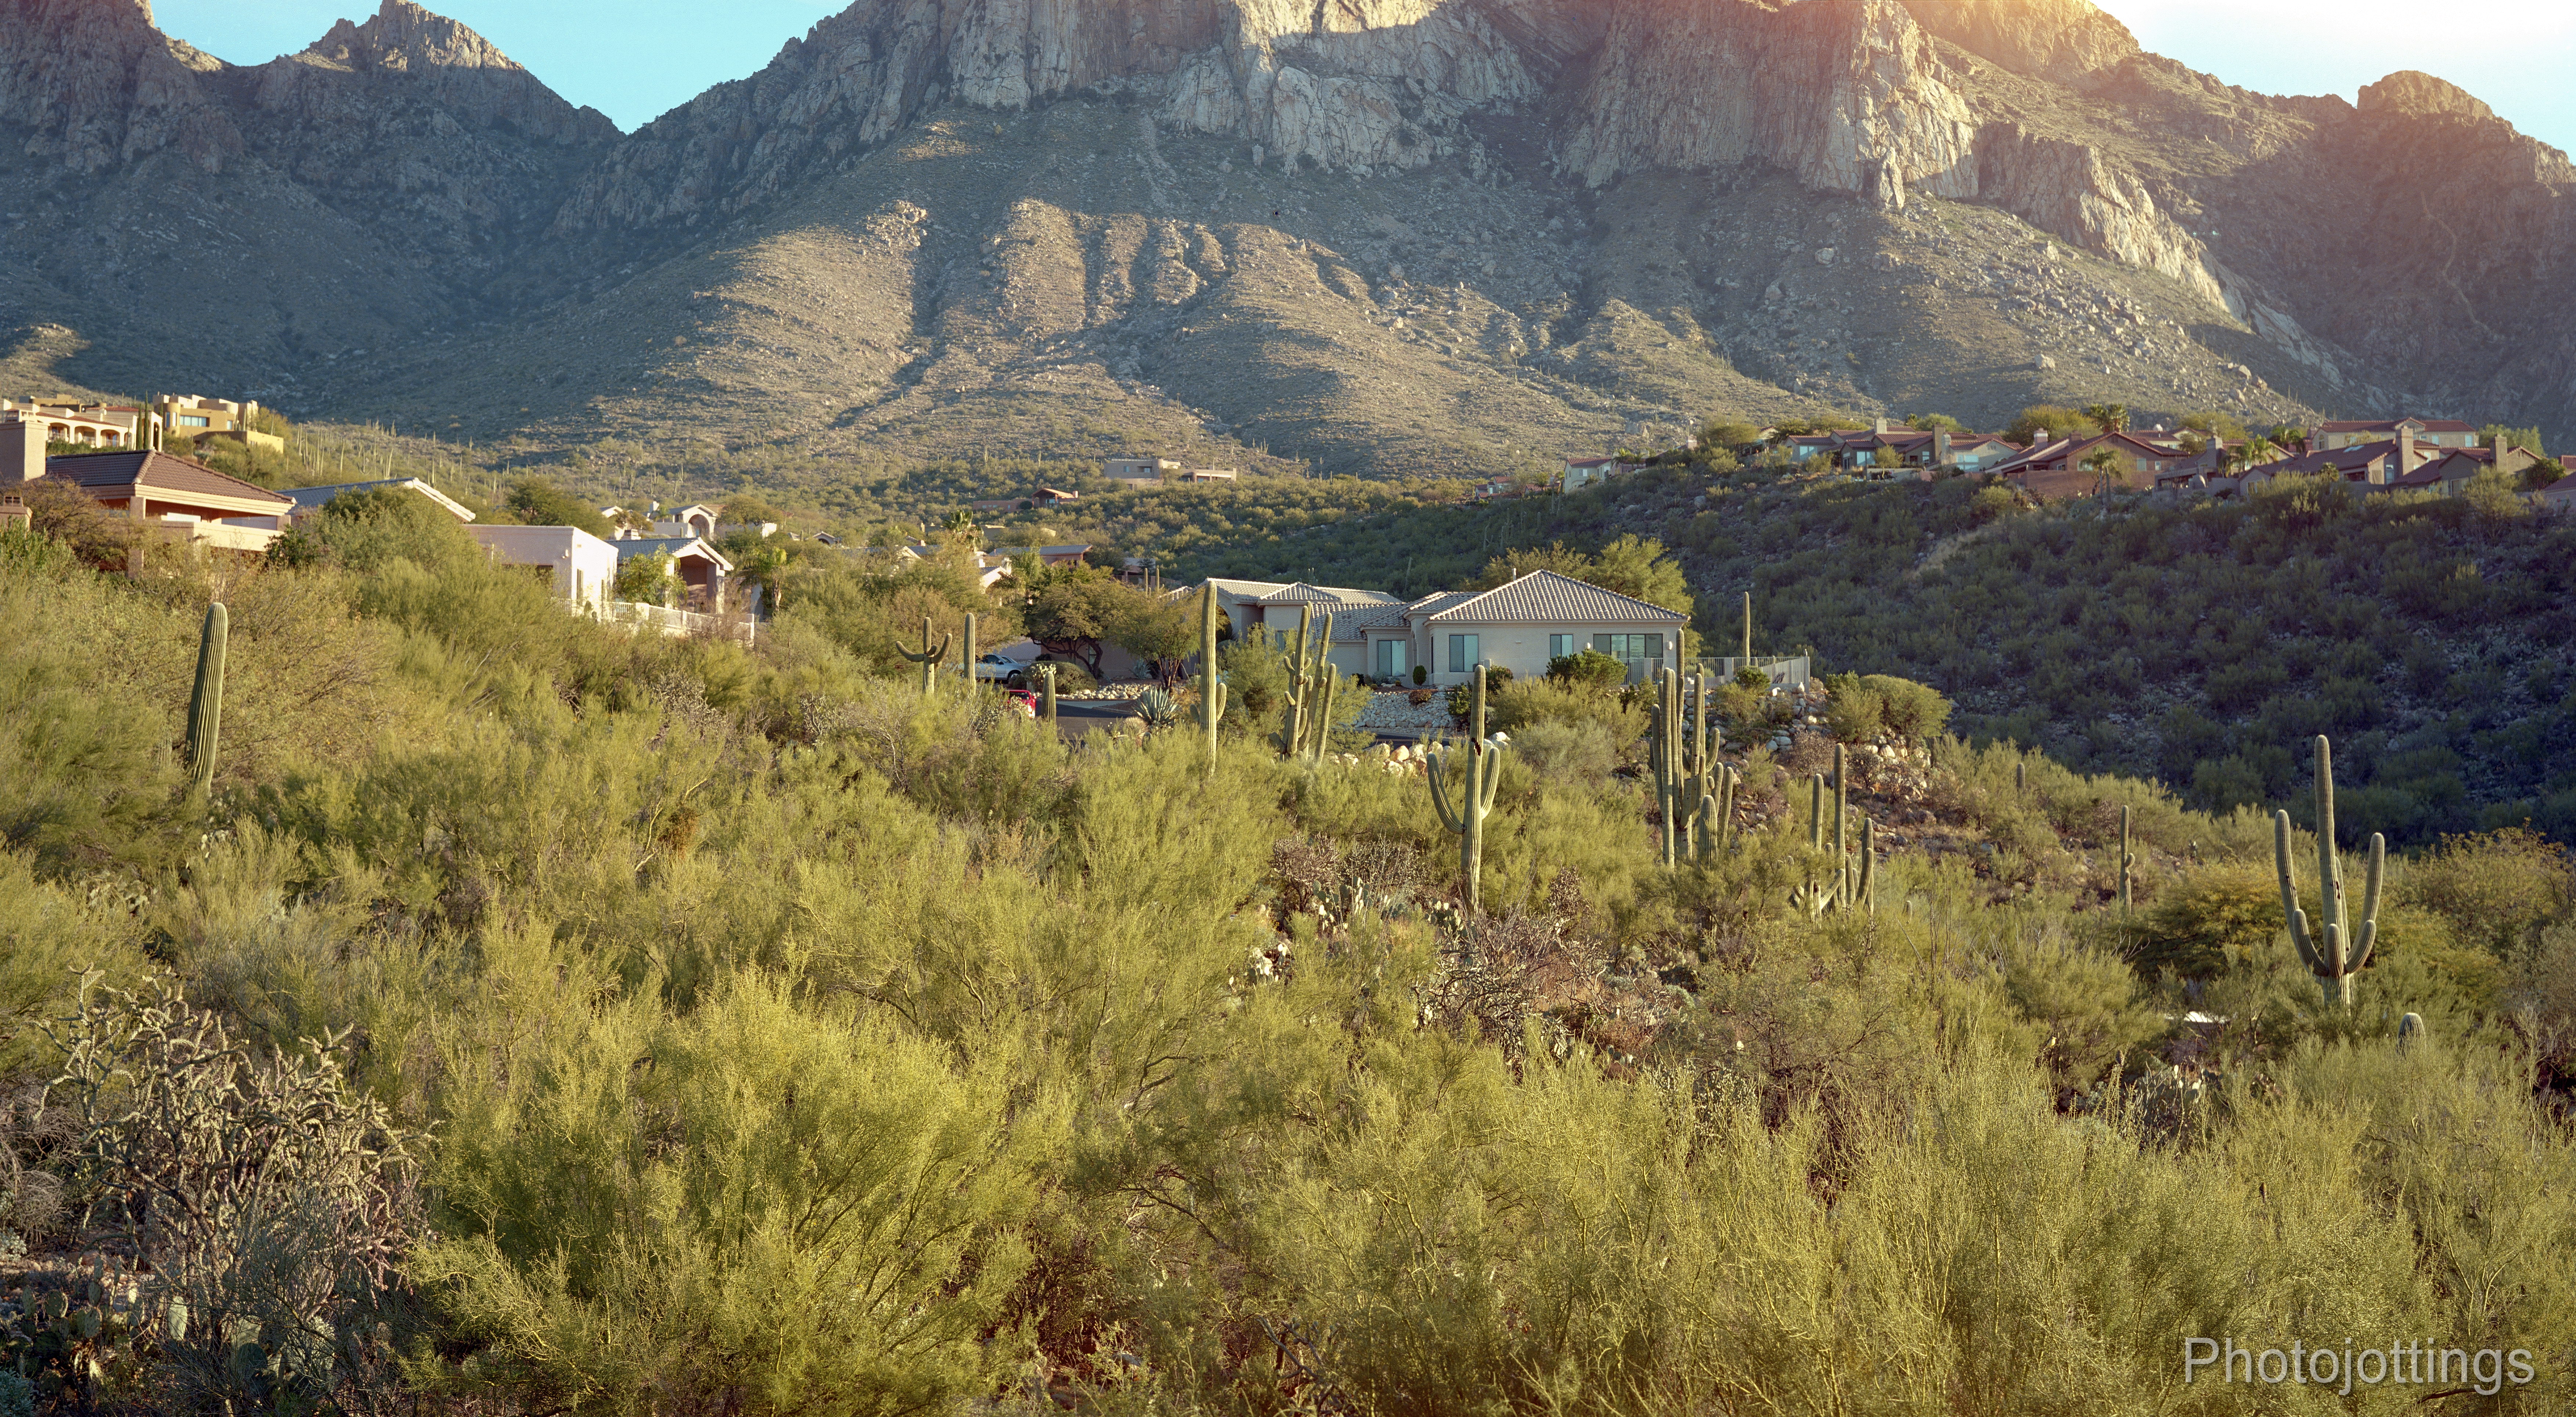
Another image, this time using our familiar mountain test scene. I must’ve forgotten to set the correct framing, and didn’t cover up the red window in back, so there is a light leak in the upper part of the picture. Bad framing and all, it’s very sharp, taken around F/22. Kodak Ektar 100.
Below are family photos from the 1930s, and most likely not taken with my camera, but wouldn’t it be crazy if they were? The 116 roll was cut and each negative put in a Kodak negative album, and that’s the way I bought them. I scanned the images below from the negatives with the Nikon 9000, no scratch and dust removal, or other corrections.
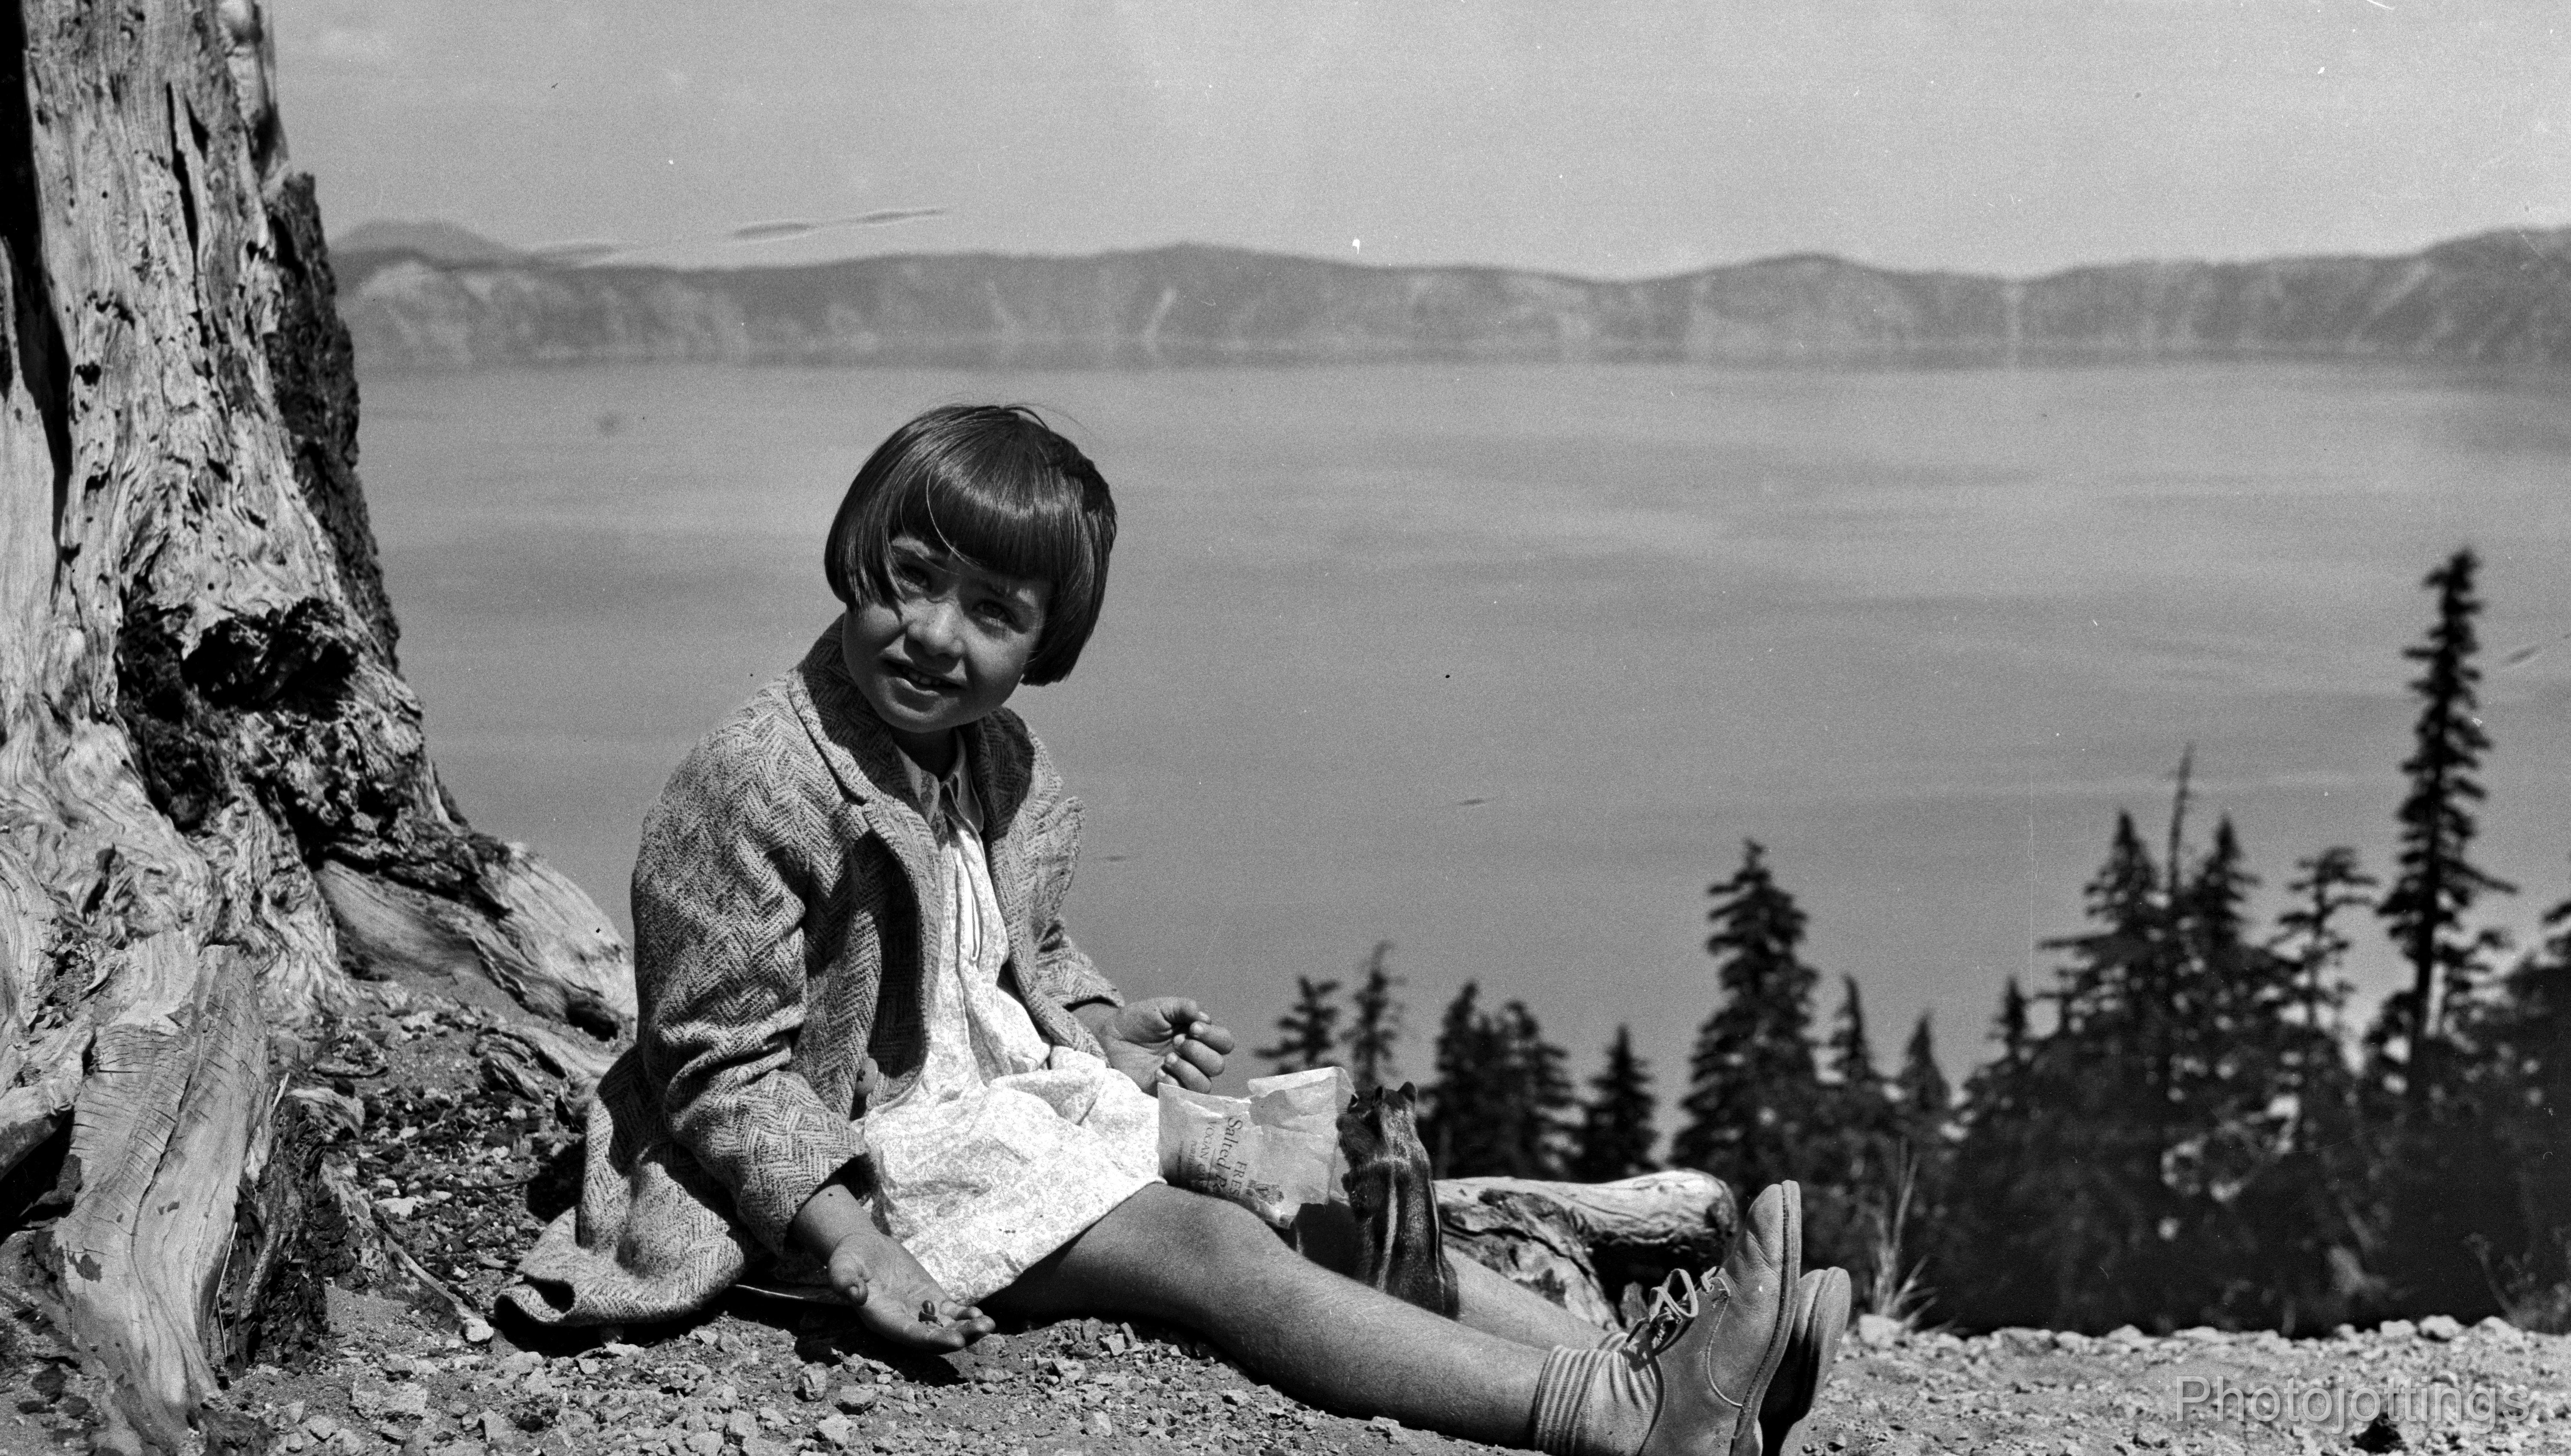
Salted Peanut Girl. Nice focusing and composition, lake Tahoe I think.

I think this may be Yosemite Nat’l Park.

A Wisteria covered porch. The person that took it could remember the beautiful colors that day, even long after the vacation is over, but it’s lost to other viewers in B&W.

Another excellent job of close focusing; why can’t I be this good with a ‘guess’ focusing camera?

Getting ready for a parade, maybe California.

This image, (including margins), was taken at the Cliff House Restaurant in San Francisco California, apparently in the early to mid 1970s based on the clothing. The left side is a little soft for some reason. The car looks like a late 1960s Oldsmobile 88.
Conclusion, and using 120 film.
The Kodak No. 1A Series III turned in a very good review. Although I didn’t put any 116 film through it (yet!), I did manage to take a few rolls with commonly available 120 film, and it worked out pretty well, you get five or six 60 x 109mm images with an aspect ratio very close to HD 16:9 TV. If you’re interested in doing this you can get some spool adapters here. You’ll also need an extra 120 take-up spool, and a good memory.
Starting out, the red window may, or may not show any frame numbers with 120 film, it depends on what type of film you have; and what side you load the film in your particular camera. My experience is with new Kodak color 120 film, and on the 120 backing paper there are three numbers aligned in a row towards the middle on one side; but the other side has only one number, spaced about halfway to the middle of the paper, so if your camera is like mine, the red window shows what’s at the ‘top’ of the paper with only one number, and it’s too far towards the middle to see correctly; I can just barely see the bottom edge of the number by looking very closely at a hard angle in bright light; unfortunately, when you leave the red window open, it allows some light to enter the camera, and will wash out some of your picture, like the mountain test scene above. Ideally you’ll want to tape off the window so no light enters the film chamber. Some websites are recommending a work-around by opening the autographic door and reading the number from there; but don’t do that, it’ll fog your film in normal daylight. There are differently marked backing papers depending on the type and manufacturer of the film, I’ve only tried Kodak Ektar and Portra, but maybe Fujifilm or some B&W film with differently marked paper will work better with my camera.
So to use 120 film in a model like mine, you’ll need to load the film with the adapters in place, and wind it until the big arrow is at the end of the film gate, right by the take-up spool; then close the back of the camera and tape over the red window. Next, you’ll want to wind the film a full 5 turns, then you’re ready to start taking pictures. After your first shot, wind the film 2.5 turns for each shot, you should get six pictures with minimal spacing. If you want to be sure and avoid any overlap, use 3 full turns each, for five pictures.
If your camera will ‘see’ the frame numbers for 6×4.5, you can be safe and use numbers 3, 6, 9, 12 and 15 for five shots, or you can be brave and try in-between setting and get six images, good luck!
Some websites show you how to mask off the film gate so the pressure plate will make contact with the narrower 120 film, and that makes sense, but I didn’t seem to need it, my images came out pretty sharp, even along the sides at F/16-22 without any film gate modifications. For best results, use small apertures, along with some 400 or 800 speed film, which will easily allow you to use F/22 in good light for properly exposed images.
If you want to get ‘panoramic’ type shots with 120 film, acquiring a 116, or 616 camera may be just the ticket for budget minded people. You have to screw around a bit to get good pictures, but it’s a lot cheaper than buying a 6x12cm camera. With that said, I don’t like the ‘pot luck’ nature of shooting like this, so I’m not going much farther into the problems and fixes with this camera, but I may use a roll or two of my 116 supply and have some fun!
That’s it for this review, thanks for visiting!