
I bought the above set of hot lights from B&H photo for about $329. It’s the K61-U kit, with two 3200k 600w floodlights with bulbs, umbrellas, and light stands. Hot lights are lights that put out a lot of heat, and stay on continuously, as opposed to strobe types, which act in the same way as a camera flash. The hot lights in the kit say halogen on the box, which means they get very hot, and if allowed to get too close to curtains or bed sheets, would easily start a fire and burn your house down. I purchased hot lights because they’re relatively inexpensive, and I wanted to be able to see the shadows and arrange the lights accordingly, which is good for beginners. I don’t know much about strobes, but if I had to do it over, I’d buy those over the hot lights, as hot lights really are hot, and will heat up a room to uncomfortable levels very quickly, especially here in southern Arizona. That’s why some of my product shots are better than others, the heat gets to be too much, and I end up calling it quits before I’m happy with the shot!
The Kit above is ok, but the build quality is not so great. They’re adequate if you handle them very carefully, and will do a good job for the price. There are cheaper light kits, but I wouldn’t buy anything with less than 600 watt lights though, as I’ve found you need to back off from your subject to get smooth diffused lighting, and with the shoot-through umbrellas, the light that actually gets to your subject is minimal, but more on that later. I don’t know if tabletop light boxes work very well, I’ve never tried them.
Let’s start off with the set-up I use.
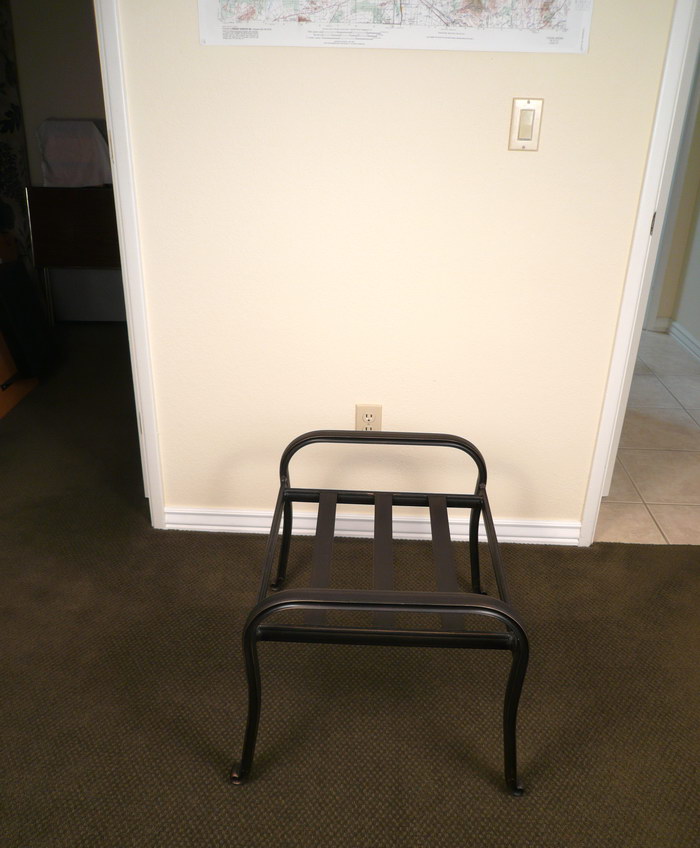
This is a foot stool with the cushion removed. It makes a good table for our application because of the raised sides. Anything similar to this would work fine.
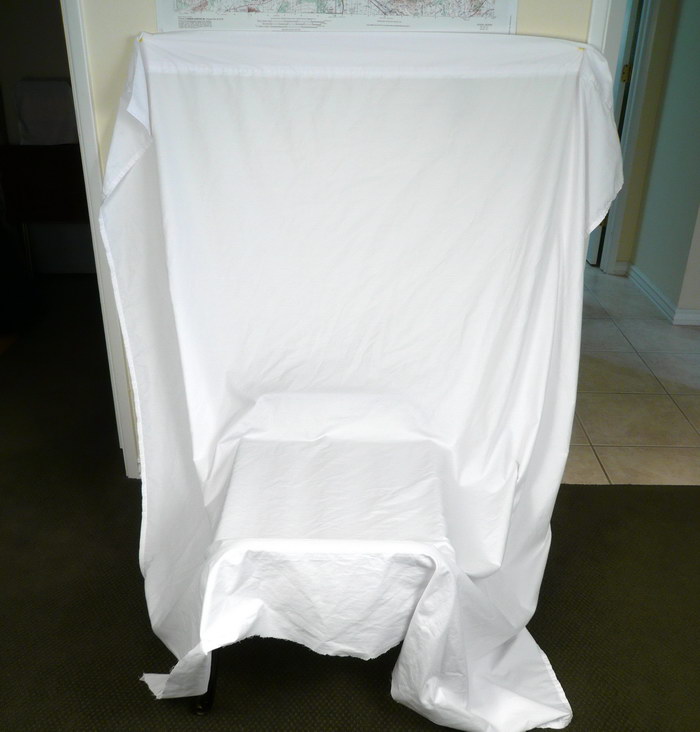
Next, I drape a white twin bedsheet over the stool, and attach it to the wall above. Try to smooth out all the wrinkles you can, as wrinkles can cause dark areas in your images, which is hard to remove later.
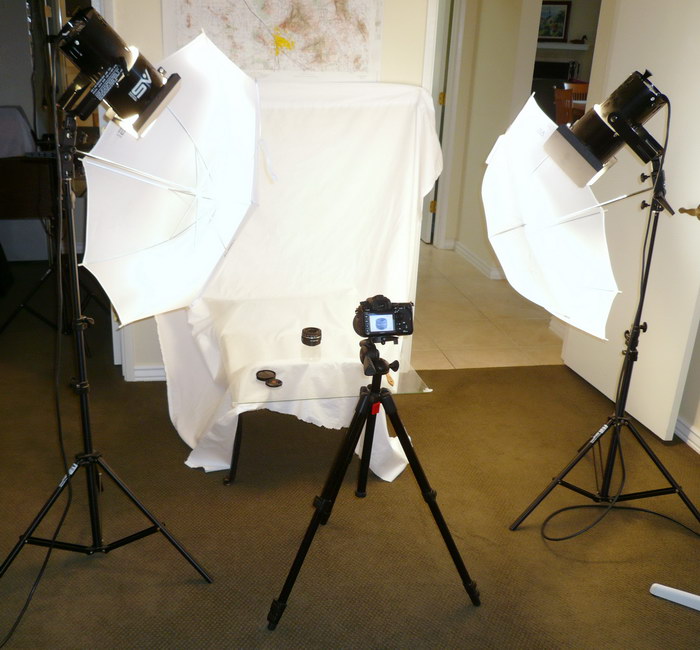
This is the set-up for the lens shot. In this view, I set a piece of cheap picture frame glass on the stool, which rests about 4″ (100mm) above the white sheet, this distance keeps the shadows from forming under and around the subject; the Sony lens. The two lights are placed in front of, and slightly off to the sides and above the lens. I closed off some of the light on the left unit, using the “barn doors.” You’ll have to experiment with each different shot to see what lighting arrangement is most pleasing to you.

Here I take the shot you see below. I’m using the Sony A700 with the Sony 100mm F/2.8 macro lens. Camera settings are as follows; Aperture F/22, shutter speed 4 seconds, ISO 200, EV +1.30, white balance set manually to 3200k. I use F/22 to get the depth of field to include the whole lens. Front level shots, and box and contents shots I use F/16, or F/11 because there is no depth, you’re just shooting the front part. F/22 isn’t nearly as sharp as F/11 comparatively speaking, but when you need depth of field such as the shot below, it ends up looking much sharper all-around. It’s important to get the shot with little or no dark areas in what should be white areas. You’ll need to experiment with exposure values and light placement until you get the results you want. The “floating in white” look is sometimes tough to pull off. It’s also helpful to keep the shot angle high above the glass where the product won’t reflect off the glass so much. I’ve used polarizers to try and cut reflections, unfortunately I don’t like the outcome. Polarizers add longer shutter speeds, possibly causing you to up the ISO and as a result, a decrease in sharpness, so I figure It’s not worth those negatives.
Two things to remember; use the self timer or corded remote, especially important with long shutter speeds and a tripod on carpeting. Also keep in mind color casts that may show up on the subject coming from brightly painted colored walls, carpeting, your clothing etc. If you’re shooting close to your subject, and wearing a bright blue shirt, there may be a bluish cast on the subject. That’s where the corded remote will come in handy too! Keep your distance or wear white or black clothes.
In the picture above, you can see the brush (on the glass) I use to try and keep dust off the subject, it’s easier to remove dust with a brush before taking the pictures than doing it in post processing.

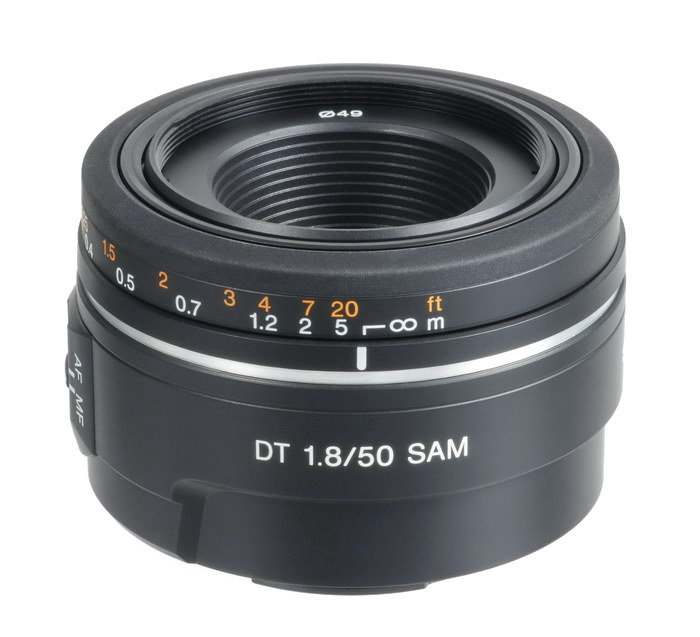
Here’s the shot I chose as the one most like the official Sony product shot. You can see the dust that still shows up, even when it looks clean before the shooting session. In fact, this lens is right out of the package and wrapping, and has never been touched!! I cropped this image, other than that, it’s exactly as it came out of the camera. Be sure and focus about a third of the way towards the back of the lens, and alter the focus point front and back slightly with several shots to make sure everything is as sharp as you want it.
I removed the dust using the heal feature on ACDSee Pro 2.5 ($129). In fact, you can do everything I’m doing here with that software, which is excellent, and I would be lost without it. As a side note; use the heal brush for areas away from lines, and the clone feature for areas very close to lines. You can heal lines, but you need to have the line inside the brush circle. Most photo editing software have these simple tools to remove dust and other unwanted specks.
Next I used the light equalizing feature in ACDSee Pro 2.5 to better define the edges, most noticeable along the sides. Another way to tone down the light on the sides is to put some black cloth along each side, as high and long as the item you’re shooting. You can support it with a box or wire frame. You have to get it pretty close to the subject, like a couple of inches or so. You can check your work by watching what happens as you move the cloth closer or farther away, then take a shot to see what it looks like. It takes patience, but is worth the effort if the sides are way over-exposed. This happens with shiny objects, like the original Minolta AF lenses.
In this shot I sent the image to Lightroom 2.3 to get rid of the bluish cast in the black. I could’ve done this in ACDSee using the color cast feature, but it’s easier in Lightroom. This bluish cast isn’t from my shirt, I think it’s a WB issue shifted towards blue. Sony doesn’t have in-camera WB adjustments for blue/yellow shift, hopefully, they will in the near future.

In this final image I touched up a few small specks that I missed the first time, then used a simple mid-tones slider (0.85) adjustment to try and match the overall Sony image below.

This is the official Sony press release photo from their website. As you can see, Sony has more diffused lighting, and managed to center the lens better than me! It looks like they use film, as I see grain. I like some aspects of my photo better, like the definition of lines near the front filter area, and the lower left line towards the bottom. Sony managed to make the rubber focus grip ring more smooth, I’m not sure how they did that. They also have better highlight roll-off on the silver band, though I think I clipped mine in the final adjustment as it looks better in the next to final shot. I like the more diffused lighting too. I could’ve done more to smooth out the rubber grip, but it would have taken much more time. If I wanted to spend several hours on one shot, I might be able to better match the Sony shot, But I don’t think I could’ve matched the lighting exactly, I think if I had some powerful strobes and large softboxes, I might have been able to pull it off. I think my shot looks pretty good for the equipment used, and my limited experience with product shots.
I hope this “how-to” article helps you out in making better photos!